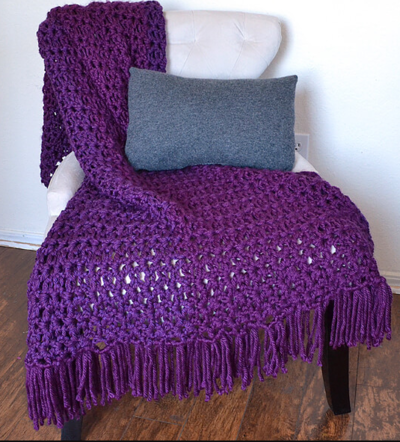
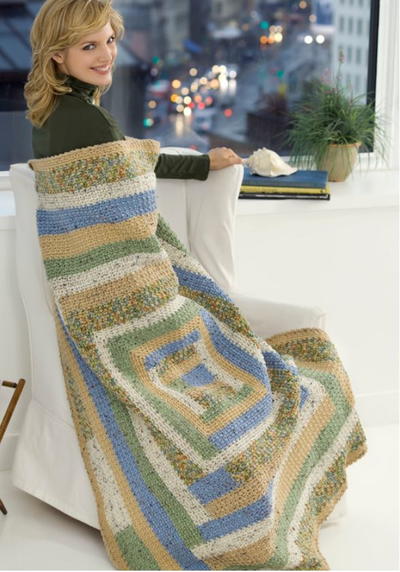
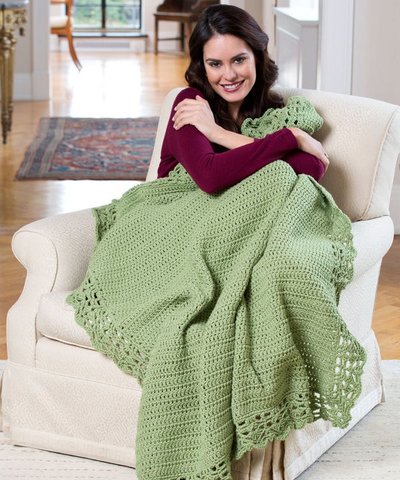
Ridiculously Cozy Crochet Blanket Pattern

Get ready to snuggle with the Ridiculously Cozy Crochet Blanket Pattern. Made with a simple double crochet body and lacy border, this blanket will easily become a classic in any household. Its simple design means that it will easily go with any type of home decor, from rustic to contemporary, and can be used all year round. The challenge of this easy crochet blanket will not be making it, but instead fighting over who gets to snuggle with it once it's done. Create a classic pattern for your home with the help of this fabulous pattern.

Crochet HookJ/10 or 6 mm hook
Yarn Weight(4) Medium Weight/Worsted Weight and Aran (16-20 stitches to 4 inches)
Materials:
- RED HEART® With Love®: 4 skeins 1601 Lettuce
- Susan Bates® Crochet Hook: 6.5mm [US K-10.5]
- Yarn needle
Gauge: 13 sts = 5” (12.5 cm); 8 rows = 5” (12.5 cm) in double crochet (dc). CHECK YOUR GAUGE. Use any size hook to obtain the gauge.
Throw measurement: 45 x 54” (114.5 x 137 cm)
Notes
- Throw is worked back and forth in rows.
- Edging is worked in joined rounds all the way around outer edges of throw, with right side facing at all times.
THROW
Ch 109.
Row 1 (right side): Dc in 4th ch from hook (beginning ch counts as first dc) and in each ch across, turn—107 dc.
Rows 2–77: Ch 3 (counts as first dc here and throughout), dc in each st across, turn. Do not fasten off and do not turn at end of last row.
Edging
Note: To work sc evenly spaced across long edge, designer recommends working 1 sc in the end of every other row and 2 sc in the end of every other row, until the indicated stitch count is achieved.
Round 1 (right side): With right side still facing, and working in ends of rows across long edge, 3 sc in corner, work 113 sc evenly spaced across long edge, 3 sc in corner; working across opposite side of foundation ch, skip first ch (corner), sc in next 105 ch, 3 sc in corner; working in ends of rows across next long edge, work 113 sc evenly spaced across long edge, 3 sc in corner; working across sts of last row, skip first st (corner), sc in next 105 sts; join with slip st in first sc—448 sc.
Round 2: Slip st in next sc (center sc of 3-sc corner), ch 3 (counts as first dc here and throughout), 2 dc in same sc, **ch 2, skip next st, dc in next st, ch 2, skip next 2 sts, dc in next 3 sts, *ch 2, skip next 2 sts, dc in next st, ch 2, skip next 2 sts, dc in next 3 sts; repeat from * to 3 sts before next 3-sc corner, ch 2, skip next 2 sts, dc in next st, ch 2, skip next st ***, 3 dc in next st (center sc of 3-sc corner); repeat from ** 3 more times ending last repeat at ***; join with slip st in top of beginning ch.
Round 3: Slip st in next dc (center dc of 3-dc corner), ch 3, (2 dc, ch 3, 3 dc) in same dc, **ch 2, skip next ch-2 space, sc in next dc, *ch 2, skip next ch-2 space, skip next dc, (2 dc, ch 3, 2 dc) in next dc (center dc of 3-dc group), ch 2, skip next dc, skip next ch-2 space, sc in next dc; repeat from * across to ch-2 space before next 3-dc corner, ch 2, skip next ch-2 space, skip next dc ***, (3 dc, ch 3, 3 dc) in center dc of 3-dc corner; repeat from ** 3 more times ending last repeat at ***; join with slip st in top of beginning ch. Note: You should have 13 (2 dc, ch 3, 2 dc) shells between corner shells across each short edge, and 14 (2 dc, ch 3, 2 dc) shells between corner shells across each long edge.
Round 4: Slip st in next 2 dc, (slip st, ch 3, 2 dc, ch 3, 3 dc) in first corner ch-3 space, **ch 2, skip next ch-2 space, dc in next sc, *ch 2, skip next ch-2 space, (3 dc, ch 2, 3 dc) in next ch-3 space, ch 2, skip next ch-2 space, dc in next sc; repeat from * across to ch-2 space before next corner, ch 2, skip next ch-2 space ***, (3 dc, ch 3, 3 dc) in corner ch-3 space; repeat from ** 3 more times ending last repeat at ***; join with slip st in top of beginning ch.
Round 5: Slip st in next 2 dc, (sc, ch 2, sc, ch 3, sc, ch 2, sc) in corner ch-3 space, **ch 3, skip next ch-2 space, (dc, ch 1, dc) in next dc (V-st made), *ch 3, skip next ch-2 space, (sc, ch 3, sc) in next ch-2 space (center ch-2 space of (3 dc, ch 2, 3 dc) shell), ch 3, skip next ch-2 space, (dc, ch 1, dc) in next dc; repeat from * across to ch-2 space before next corner, ch 3, skip next ch-2 space ***, (sc, ch 2, sc, ch 3, sc, ch 2, sc) in corner ch-3 space; repeat from ** 3 more times ending last repeat at ***; join with slip st in first sc.
Round 6: (Slip st, sc, ch 3, sc) in first ch-2 space, (sc, ch 5, sc) in next ch-3 space, (sc, ch 3, sc) in next ch-2 space, **ch 3, skip next ch-3 space, (sc, ch 3, sc) in next ch-1 space (at center of V-st), *ch 3, skip next ch-3 space, 5 dc in next ch-3 space, ch 3, skip next ch-3 space, (sc, ch 3, sc) in next ch-1 space; repeat from * across to ch-3 space before next corner, ch 3, skip next ch-3 space ***, (sc, ch 3, sc) in next ch-2 space, (sc, ch 5, sc) in next ch-3 space, (sc, ch 3, sc) in next ch-2 space; repeat from ** 3 more times ending last repeat at ***; join with slip st in first sc.
Fasten off.
FINISHING
Weave in all ends.
Read NextHerfst Blanket
Your Recently Viewed Projects
Thanks for your comment. Don't forget to share!
Report Inappropriate Comment
Are you sure you would like to report this comment? It will be flagged for our moderators to take action.
Thank you for taking the time to improve the content on our site.