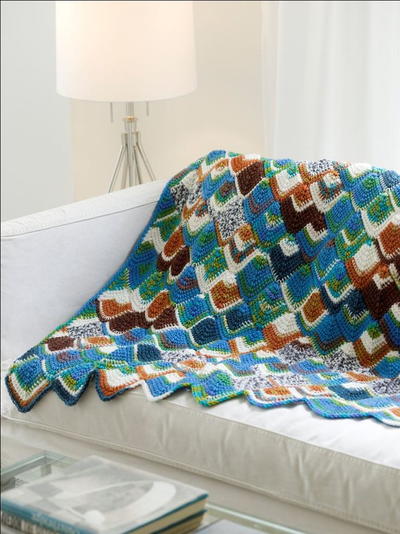
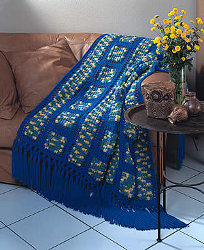
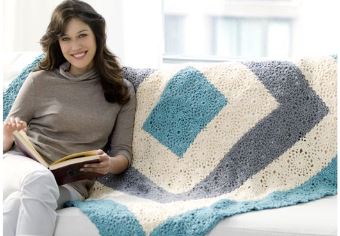
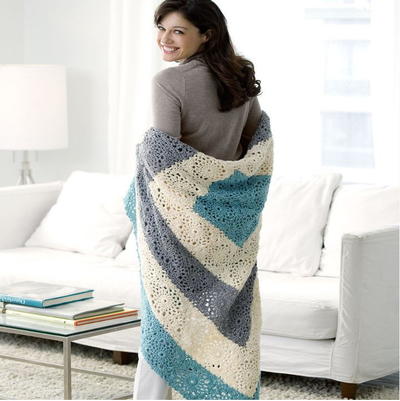
Square Upon Square Throw

This stunning throw from Red Heart Yarns is perfect for using on a chilly afternoon or evening. Crochet granny squares with Red Heart Yarn to complete this free crochet afghan pattern. Use the diagram provided to join the squares together.
It's hard to believe that this is an easy crochet afghan pattern because of the stunning detail, but it is. The color combination is also gorgeous but easy to change up for your home decor color theme. Drape this throw over your couch or keep it as an effortless way to add a little warmth in any room of the house.

Crochet HookI/9 or 5.5 mm hook
Yarn Weight(4) Medium Weight/Worsted Weight and Aran (16-20 stitches to 4 inches)
Throw measures 57” square.
Materials
RED HEART® “Soft Yarn®”:
- 4 Balls each 9520 Seafoam A
- 4 Balls of 4601 Off White B
- 2 Balls 9440 Light Grey Heather C
Crochet Hook: 5.5mm [US I-9].
GAUGE:
Square = 5.75”.
CHECK YOUR GAUGE. Use any size hook to obtain the gauge.
NOTE:
After the first square, all others are joined while working Rnd 5.
FIRST SQUARE:
With A, ch 5; join with a slip st in first ch to form a ring.
Rnd 1: Ch 3, 15 dc in ring; join with a slip st in top of ch-3.
Rnd 2: Ch 1, sc in same st as joining, [ch 3, sc in next dc] 15 times; hdc in first sc to join and form last space.
Rnd 3: Ch 1, sc over hdc, [ch 4, sc in next ch-3 space] 15 times; ch 1, hdc in first sc to join and form last space.
Rnd 4: Ch 1, sc over hdc, * 7 dc in next space, sc in next space **, [ch 2, sc in next space] twice; repeat from * to last space, end at **; ch 2, sc in last space, ch 2; join with a slip st in first sc.
Rnd 5: Ch 1, (sc, ch 2, sc) all in first sc, * ch 2, skip 2 dc, (sc, ch 2, sc) all in next dc, (sc, ch 4, sc) all in next dc, (sc, ch 2, sc) all in next dc, ch 2, skip 2 dc, (sc, ch 2, sc) all in next sc, sc in next ch-2 space, ch 2, sc in next ch-2 space **, (sc, ch 2, sc) all in next sc; repeat from * around, end at **; join in first sc. Fasten off. You will be making 39 more squares with A, 40 with
B, and 20 with C, all joined following diagram for placement by working Rnd 5 as follows:
Next Square-Joining Rnd 5:
Ch 1, (sc, ch 2, sc) all in first sc, ch 2, skip 2 dc, (sc, ch 2, sc) all in next dc, sc in next dc; ch 2, drop loop from hook, insert hook in corresponding ch-4 loop of completed square and into loop again, draw loop through, ch 2, sc in same dc – corner joined; sc in next dc; ch 1, drop loop, insert hook into corresponding ch-2 of completed square and into loop again, draw loop through, ch 1, sc in same st – ch-2 space joined; ch 2, skip 2 dc, sc in next sc, join next ch-2 space, sc in next ch-2 space; ch 1, drop loop, insert hook into corresponding ch-2 of completed square and into loop again, draw loop through, ch 1 – center ch-2 space joined; sc in next ch-2 space, sc in next sc, join next ch-2 space, ch 2, skip 2 dc, sc in next dc, join next ch-2 space, sc in next dc, join next corner – one side joined; * (sc, ch 2, sc) all in next dc, ch 2, skip 2 dc, (sc, ch 2, sc) all in next sc, sc in next ch-2 space, ch 2, sc in next ch-2 space **, (sc, ch 2, sc) all in next sc, ch 2, skip 2 dc, (sc, ch 2, sc) all in next dc, (sc, ch 4, sc) all in next dc; repeat from * around, end at **; join. Fasten off.
Continue to make and join squares following the diagram. Weave in ends.
Read NextRows of Love Blanket
Your Recently Viewed Projects

Thanks for your comment. Don't forget to share!
Zeemer
Sep 26, 2018
I love this Square Upon Square Throw. The squares are easy to make but tedious. The colors are readily available though and the stitches are easy to do. I like how it looks on top of the sofa.
ldynwaitin 3887326
Mar 18, 2014
I had trouble with my crocheted beginning edges laying flat. I found out it was how I was using my hook. When making a stitch that's going to be an edge I push my loop of yarn past the hooked tip and down to the rounder fat part of the Crochet hook. It makes the loop a bit bigger, and gives the edge some breathing room.
Report Inappropriate Comment
Are you sure you would like to report this comment? It will be flagged for our moderators to take action.
Thank you for taking the time to improve the content on our site.