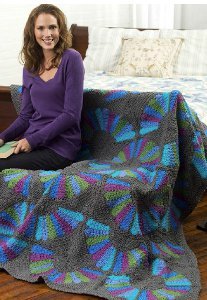
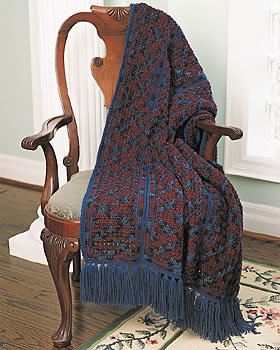
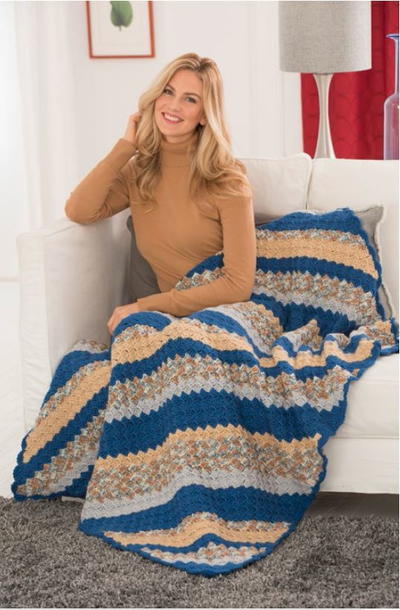
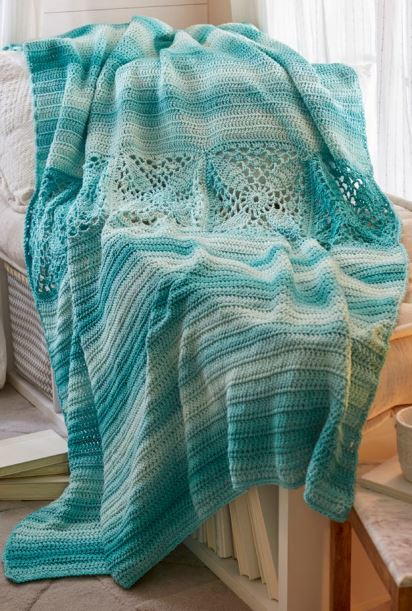
Sky Blue Crochet Bed Throw

With its intricate design, this Sky Blue Crochet Bed Throw will look simply stunning when placed on your bed or draped over your favorite chair. The crochet throw pattern might look complicated, but it's actually quite easy to make. With its use of just a few types of crochet stitches, this crochet pattern is one that even those who are fairly new to crochet can make with great success. You will be proud to show off this beautiful blanket in your home, and you could even crochet the throw as a gift for a special friend or close relative. This crochet throw pattern can be made in four sizes and is almost too pretty to use!

Crochet HookJ/10 or 6 mm hook
Yarn Weight(4) Medium Weight/Worsted Weight and Aran (16-20 stitches to 4 inches)
Crochet Gauge11 sts = 3.75" (8.5 cm); 5 rows = 3¼" (8.5 cm). CHECK YOUR GAUGE. Use any size hook to obtain the gauge.
Finished SizeThrow measures 55½ (66½, 77½, 88½)" [141 (169, 197, 225) cm] wide x 75 (75, 80, 80)" long [190.5 (190.5, 203, 203) cm].
Materials List
- RED HEART® Super Saver Ombre™: 6 (8, 10, 11) skeins 3970 Spearmint (Note: Depending on your gauge, you may only require 9 skeins for size Queen)
- Susan Bates® Crochet Hook: 6mm [US J-10]
- Yarn needle
Instructions
Notes
-
Directions are for bed size Single. Changes for sizes Full, Queen, and King are in parentheses.
-
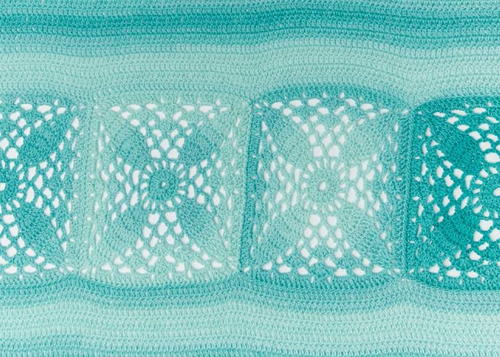
Throw is made from Blocks sewn together to form a center motif which is then sewn to Panels.
-
Panels are worked back and forth in turned rows.
-
Blocks are worked in joined rounds with right side facing at all times.
Special Stitch
dc2tog = [Yarn over, insert hook in next stitch, yarn over and pull up loop, yarn over, draw through 2 loops] 2 times, yarn over, draw through all 3 loops on hook.
Special Technique
Join with sc = Place a slip knot on hook, insert hook in indicated stitch, yarn over and pull up a loop, yarn over and draw through both loops on hook.
Throw: Panel (Make 2)
-
Ch 162 (194, 226, 258).
-
Row 1 (right side): Dc in 3rd ch from hook (beginning skipped ch do not count as a st) and in each ch across, turn—160 (192, 224, 256) dc.
-
Rows 2–51 (51, 55, 55): Ch 2 (does not count as a st here and throughout), dc in each dc across, turn.
-
Fasten off.
Throw: Block [Make 5 (6, 7, 8)]
-
Ch 8; join in first ch to form a ring.
-
Round 1: Ch 3 (counts as first dc here and throughout), 15 dc in ring; join with slip st in top of beginning ch—16 dc.
-
Round 2: Ch 5 (counts as first dc, ch 2), dc in next dc, (ch 2, dc) in each dc around, ch 2; join with slip st in 3rd ch of beginning ch—16 dc and 16 ch-2 spaces.
-
Round 3: Ch 3, 3 dc in first ch-2 space, dc in next dc, ch 5, skip next ch-2 space, sc in next ch-2 space, *ch 5, skip next dc, dc in next dc, 3 dc in next ch-2 space, dc in next dc, ch 5, skip next ch-2 space, sc in next ch-2 space; repeat from * twice, ch 5, skip last dc; join with slip st in top of beginning ch—20 dc and 8 ch-5 spaces.
-
Round 4: Ch 3, dc in next dc, 3 dc in next dc, dc in next 2 dc, [ch 5, sc in next ch-5 space] twice, *ch 5, dc in next 2 dc, 3 dc in next dc, dc in next 2 dc, [ch 5, sc in next ch-5 space] twice; repeat from * twice, ch 5; join with slip st in top of beginning ch—28 dc and 12 ch-5 spaces.
-
Round 5: Ch 3, dc in next 2 dc, 3 dc in next dc, dc in next 3 dc, [ch 5, sc in next ch-5 space] 3 times, *ch 5, dc in next 3 dc, 3 dc in next dc, dc in next 3 dc, [ch 5, sc in next ch-5 space] 3 times; repeat from * twice, ch 5; join with slip st in top of beginning ch—36 dc, 12 sc, and 16 ch-5 spaces.
-
Round 6: Ch 3, skip next dc, dc in next 5 dc, skip next dc, dc in next dc, [ch 5, sc in next ch-5 space] twice, 3 dc in next sc, [sc in next ch-5 space, ch 5] twice, *dc in next dc, skip next dc, dc in next 5 dc, skip next dc, dc in next dc, [ch 5, sc in next ch-5 space] twice, 3 dc in next sc, [sc in next ch-5 space, ch 5] twice; repeat from * twice; join with slip st in top of beginning ch—four 3-dc groups, 28 dc, 16 sc, and 16 ch-5 spaces.
-
Round 7: Ch 3, skip next dc, dc in next 3 dc, skip next dc, dc in next dc, ch 5, sc in next ch-5 space, 3 dc in next sc, sc in next ch-5 space, ch 5, sc in center st of next 3-dc group, ch 5, sc in next ch-5 space, 3 dc in next sc, sc in next ch-5 space, *ch 5, dc in next dc, skip next dc, dc in next 3 dc, skip next dc, dc in next dc, ch 5, sc in next ch-5 space, 3 dc in next sc, sc in next ch-5 space, ch 5, sc in center st of next 3-dc group, ch 5, sc in next ch-5 space, 3 dc in next sc, sc in next ch-5 space; repeat from * twice, ch 5; join with slip st in top of beginning ch— eight 3-dc groups, 20 dc, 16 sc, and 16 ch-5 spaces.
-
Round 8: Ch 3, skip next dc, dc in next dc, dc2tog, ch 5, sc in next ch-5 space, ch 5, sc in center st of next 3-dc group, ch 5, sc in next ch-5 space, 3 dc in next sc, sc in next ch-5 space, ch 5, sc in center st of next 3-dc group, ch 5, sc in next ch-5 space, *ch 5, dc2tog, dc in next dc, dc2tog, ch 5, sc in next ch-5 space, ch 5, sc in center st of next 3-dc group, ch 5, sc in next ch-5 space, 3 dc in next sc, sc in next ch-5 space, ch 5, sc in center st of next 3-dc group, ch 5, sc in next ch-5 space; repeat from * twice, ch 5; join with slip st in top of beginning ch—four 3-dc groups, 12 dc, 24 sc, and 24 ch-5 spaces.
-
Round 9: Slip st in next dc, ch 5 (counts as first dc, ch 2), dc in same st, [4 dc in next ch-5 space] 3 times, 4 dc in center st of next 3-dc group, [4 dc in next ch-5 space] 3 times, *skip next dc, (dc, ch 2, dc) in next dc, skip next dc, [4 dc in next ch-5 space] 3 times, 4 dc in center st of next 3-dc group, [4 dc in next ch-5 space] 3 times; repeat from * twice; join with slip st in 3rd ch of beginning ch—120 dc and 4 ch-2 spaces. Fasten off, leaving a long tail for sewing.
-
Click here for a larger version of the photo below.
Assembly
-
With end tails, seam Blocks together in a 1-row panel.
-
With right sides together, seam last row of each Panel to long edge of Block panel, sewing through 30 sts and 2 ch-2 spaces of each Block.
Finishing: Border
-
With right side of either short edge facing and working in opposite side of foundation ch, join yarn with sc in first ch, 2 sc in same dc, *sc in each ch across to last ch, 3 sc in last ch; working in ends of rows across long edge, work 2 sc in each row of Panels and sc in each st of Block*; working in opposite side of foundation ch of other short edge, 3 sc in first ch; repeat from * to * around; join with slip st in first sc.
-
Fasten off.
-
Weave in all ends.
-
Click here for a larger version of the photo below.
Abbreviations
- ch
- chain(s)
- dc
- double crochet
- sc
- single crochet
- st(s)
- stitch(es)
- ( )
- work directions in parentheses into same st
- [ ]
- work directions in brackets the number of times specified
- *
- repeat whatever follows the * as indicated
Read NextFinger Crochet Afghan Pattern
Your Recently Viewed Projects
Thanks for your comment. Don't forget to share!
mulberrygalprinces s
Mar 04, 2018
Gorgeous. And the best part is it's very easy to do. I really enjoy the projects that you can make and then connect them. You can take it with you and not have to drag a huge yarn bag along. I can sit at the doctor and work on this.
Morehouse17
Feb 28, 2018
This looks like the perfect project for me. I would like to make something a little bit more challenging than just a solid piece. This project calls for two panels and a few blocks. At this time I do not have a lot of experience with joining but with such large pieces it probably will not be too much of an issue.
kdsbunny 4598327
Feb 10, 2018
I'm a little confused because it looks like it calls for Red Heart Spearmint only but the picture looks like there are a couple of colors, how many colors and when are they switched?
Nanjar
Feb 24, 2018
Its the Red Heart Ombr yarn that is the key. Ombr means shaded in French. The colors are all in the way the yarn is shaded from light to dark and back again. It does all the switching for you. Hope that clarifies the yarn for you!
Delphine Bryant
Feb 09, 2018
I see that this project is completed in parts with panels and blocks. When I have to make two of the same thing it is often they do not turn out identical. Would a little difference in size matter much when putting the pieces together?
Nanjar
Feb 25, 2018
You could try blocking the finished blocks to help make them fit better when they are joined. There are tutorials to explain that process. I think it would help the most in getting an even edge to join.
Report Inappropriate Comment
Are you sure you would like to report this comment? It will be flagged for our moderators to take action.
Thank you for taking the time to improve the content on our site.