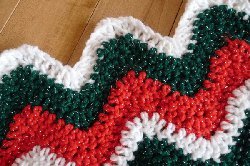
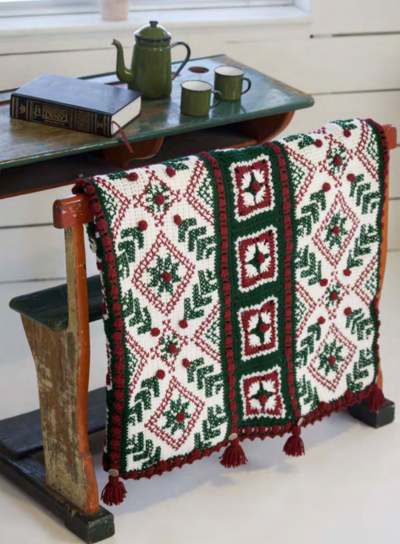
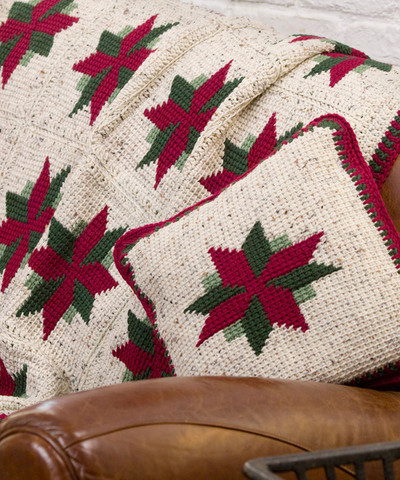
Vintage Christmas Poinsettia Throw

Childhood Christmas memories are enough to warm anyone's heart. Get a blast from the past with the Vintage Crochet Poinsettia Throw. This is one of the most classic free crochet Christmas patterns around. With a poinsettia crochet flower pattern and a forest green background, this free crochet pattern will remind you of Christmas at your grandparents' house when you were a kid. There's nothing better than cuddling with a Christmas crochet afghan while watching classic Christmas movies.

Crochet HookH/8 or 5 mm hook, I/9 or 5.5 mm hook
Yarn Weight(4) Medium Weight/Worsted Weight and Aran (16-20 stitches to 4 inches)
Materials:
- RED HEART® Super Saver®: 6 skeins 389 Hunter Green A; 2 skeins each 316 Soft White B and 376 Burgundy C.
- Crochet Hooks: 5.5 mm [US I-9] and 5 mm [US H-8].
- Yarn needle.
Size: Throw measures 50½ x 60”.
Gauge: With larger hook, finished square = 4”. With larger hook, 13 sts and 15 rows in sc = 4”. CHECK YOUR GAUGE. Use any size hook to obtain the gauge given.
Instructions:
SQUARE (make 36)
With larger hook and C, ch 3; join with a slip st to form aring.
Round 1 (right side): Ch 3, 11 dc in ring, join with a slip stin top of ch-3. Fasten off C.
Round 2: With right side facing, join B with a slip st in any dc, *ch 5, slip st in next dc, ch 10, skip next dc, slip st in next dc; repeat from * around; join with a slip st in first ch of ch-5—4 ch-5 Ioops; 4 ch-10 Ioops. Fasten off B.
Round 3: With right side facing, holding ch-loops forward, join A with a slip st in skipped dc under any ch-10 Ioop, ch3 (counts as dc here and throughout), dc in same dc as next slip st, ch 2, sc in next ch-5 Ioop in rnd 2, ch 2, dc in same dc as next slip st in round 1**, dc in next skipped dc in round 1; repeat from * around, ending last repeat at **; join with a slip st to top of beginning ch-3.
Round 4: Ch 3, dc in next dc, *2 dc in next ch-2 space, ch 3, 2 dc in next ch-2 space**, dc in next 3 dc; repeat from *around, ending last repeat at **; dc in next dc; join with a slip st in top of beginning ch-3. Fasten off.
Round 5: With right side facing, join B in any ch-3 space,ch 1, *5 sc in corner ch-3 space, sc in next 3 dc, insert hook through ch-10 Ioop in rnd 2 and into next dc and complete a sc, sc in next 3 dc; repeat from * around; join with a slip stin first sc. Fasten off. With yarn needle and B, whip stitch 3 strips of 12 squares each together.
End Trim Row: With right side facing and larger hook, join A in top right-hand corner, ch 1, work 13 sc across short end of each strip.Repeat end trim row across other short edge of strip.
Side Trim Row: With right side facing and larger hook, holding work horizontally, join B in right-hand corner of strip in side of last st on previous A row, ch 1, sc in each sc across, working 13 sc across each square and one sc in each row-end st of each side edge—158 sc. Fasten off. Repeat side trim row across other long edge of strip.
PANEL (Worked on one side of 2 strips and two sidesof the third strip of squares)
Row 1: With right side facing and larger hook, join A in first sc of last row, ch 1, sc in each sc across, turn—158 sc.
Rows 2-41: Ch 1, sc in each sc across, turn. Fasten off. Cross-stitch on panels following Chart making sure that all cross-stitch borders are going in the same direction. Sew strips and panels together as pictured.
Long Side Edging: With right side facing and smaller hook,join A in top right-hand corner, ch 1, work 211 sc evenly spaced across long edge of throw. Fasten off. Repeat long side edging across other long edge of throw.
EDGING
Round 1: With right side facing, join B in top right-hand corner, ch 1, *3 sc in corner, work 211 sc across long edge, 3 sc in corner st, work 163 sc across short edge; join with a slip st in first sc.
Round 2: SIip st to center sc of comer 3-sc group, ch 1, sc in same sc, ***skip next sc, *(2 dc, ch 3, 2 dc) all in next sc**,skip next 2 sc, sc in next sc, skip next 2 sc; repeat from * to next corner, ending last repeat at **; skip next sc, sc in next sc; repeat from *** around, ending last repeat at **; join with a slip st in first sc. Fasten off.


Read NextSnow Bunny Crochet Blanket Pattern
Your Recently Viewed Projects
Thanks for your comment. Don't forget to share!
Delphine Bryant
Jul 14, 2018
These are the traditional colors of Christmas but now the Poinsettia can be found in more than the traditional red. At my house I fancy the white or pale pink/red ones. This would be the perfect afghan to make to honor the colors of Poinsettia that I display during the holiday.
Morehouse17
Jun 30, 2018
This vintage Christmas Poinsettia throw is really very striking. The design uses the elements of combining squares and stripes to make the whole thrown and then the flower design is cross stitched on the stripes. This is the ultimate take and go project. If you hurry, there is no reason this will not be ready for this Christmas season.
Report Inappropriate Comment
Are you sure you would like to report this comment? It will be flagged for our moderators to take action.
Thank you for taking the time to improve the content on our site.