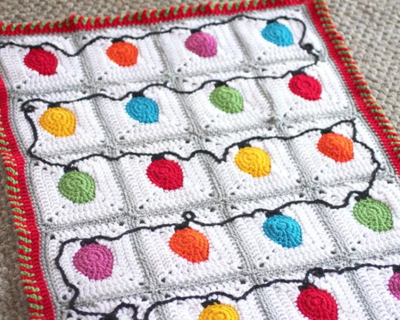
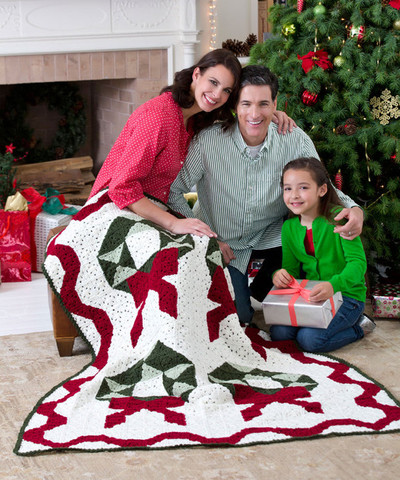
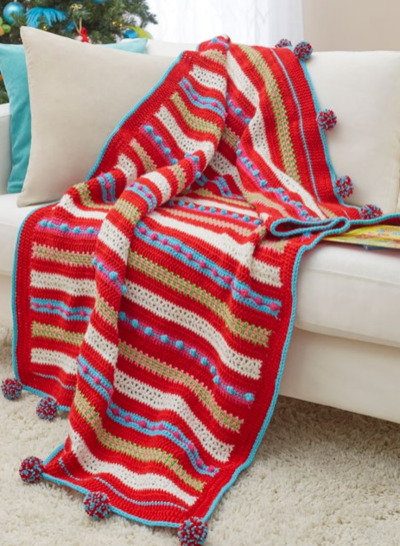
Retro Ornament Pattern Throw

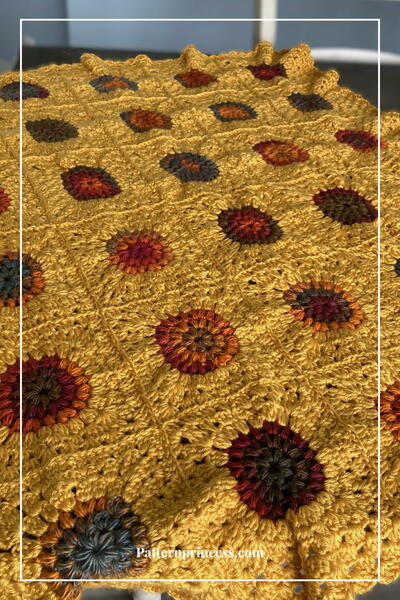
This Retro Ornament Pattern Throw is sure to take the atmosphere back a few decades. You'll be reminded of Christmastime in the sixties, when everything was all about color and trippy designs. If you look closely at this beautiful crochet blanket pattern, you'll notice that each ornament has a unique touch. The lighter background sets off the dark inside accent, and the array of colors really helps to bring out each element of Christmas in this crochet throw pattern. You'll love the effect it has on your mood and your living room!

Crochet HookI/9 or 5.5 mm hook
Yarn Weight(4) Medium Weight/Worsted Weight and Aran (16-20 stitches to 4 inches)
Crochet Gauge1 ornament motif = 4 wide x 5 long (11.5 x 14 cm); Rounds 13 = 3 (9 cm).
Finished SizeThrow measures 45 wide x 55 long (114.5 x 139.5 cm).
Materials List
- RED HEART Super Saver: 2 skeins 316 Soft White A, 1 skein each 319 Cherry Red B, 706 Perfect Pink C, 718 Shocking Pink D, 726 Coral E, 672 Spring Green F, 505 Aruba Sea G, 358 Lavender H, and 512 Turqua I
- Susan Bates Crochet Hook: 5.5mm [US I-9]
- Yarn needle

Notes
Special Stitches bphdc (back post half double crochet) = Yarn over, insert hook from back side of work to front and to back again around post of indicated stitch; yarn over and pull up a loop (3 loops on hook), yarn over and draw through all 3 loops. Skip the stitch in front of the Bpdc. dc2tog = [Yarn over, insert hook in next stitch, yarn over and pull up loop, yarn over, draw through 2 loops] 2 times, yarn over, draw through all 3 loops on hook. Special Techniques Join with Bphdc = Place slip knot on hook, yarn over, insert hook from back side of work to front and to back again around post of indicated stitch; yarn over and pull up a loop (3 loops on hook), yarn over and draw through all 3 loops. Skip the stitch in front of the bpdc. Join with dc = Place slip knot on hook, yarn over, insert hook in indicated space, yarn over and pull up a loop (3 loops on hook), [yarn over, draw through 2 loops] twice. Join with sc = Place a slip knot on hook, insert hook in indicated stitch, yarn over and draw up a loop, yarn over and draw through both loops on hook Color Sequences Make 84 ornaments in the following color sequences: Ornament 1 (make 5): B, E, and D Ornament 2 (make 5): C, B, and E Ornament 3 (make 6): D, C, and B Ornament 4 (make 5): E, D, and C Ornament 5 (make 5): E, B, and D Ornament 6 (make 5): C, E, and B Ornament 7 (make 6): D, C, and E Ornament 8 (make 5): B, D, and C Ornament 9 (make 5): F, G, and H Ornament 10 (make 5): G, H, and I Ornament 11 (make 6): H, I, and F Ornament 12 (make 5): I, F, and G Ornament 13 (make 5): H, G, and I Ornament 14 (make 5): G, I, and F Ornament 15 (make 6): I, F, and H Ornament 16 (make 5): F, H, and G Notes 1. Throw is made of 84 ornament motifs worked in joined rounds with right side facing. Ornaments are joined into Strips which are arranged as shown in Assembly Diagram and joined together. 2. To change color, work last stitch of old color to last yarn over. Yarn over with new color and draw through all loops on hook to complete stitch. Proceed with new color. Cut old color. 3. When instructed to work into a stitch or space 2 rounds below, work into the round numbered 2 less than the current round. For example, if you are working Round 3, a stitch 2 rounds below is in Round 3 2 = Round 1. 4. Beginning and ending tails of Strips are gathered into tassels.
Throw
Ornament (make 84 as shown in Color Sequence) With first color, ch 4; join with slip st in first ch to form a ring. Round 1 (right side): Ch 3 (counts as first dc), 11 dc in ring; join with slip st in top of beginning ch12 dc. Round 2: Ch 3 (counts as first hdc and ch 1), hdc in next st, [ch 1, hdc in next st] 10 times, ch 1; change to 2nd color; join with slip st in 2nd ch of beginning ch12 hdc and 12 ch-1 spaces. Round 3: Ch 3 (counts as first dc), dc in same st as join, working in front of first ch-1 space, dc in next st 2 rounds below, [2 dc in next st, working in front of next ch-1 space, dc in next st 2 rounds below] 11 times; join with slip st in top of beginning ch36 dc. Fasten off. Weave in end. Round 4: Join 3rd color with Bphdc around any st, Bphdc around each remaining st; join with slip st in top of beg Bphdc36 hdc. Round 5: Ch 2 (counts as first hdc), hdc in same st as join, hdc in next 2 sts, [2 hdc in next st, hdc in next 2 sts] 3 times, (hdc, dc) in next st, dc in next st, 2 tr in next 2 sts, dc in next 2 sts, [2 hdc in next st, hdc in next 2 sts] 4 times, (hdc, dc) in next st, dc in next st, 2 tr in next 2 sts, dc in next 2 sts; join with slip st in top of beginning ch34 hdc, 8 dc, and two 4-tr groups. Fasten off. Strip (make 12) Refer to Assembly Diagram for ornament placement. Hold each ornament with right side facing. Leave a long tail at beginning and end of each round. With A, ch 1. Round 1 (right side): Working across first edge, slip st in 3rd tr of any 4-tr group of first ornament, slip st in next 24 sts, *ch 5, slip st in 3rd tr of any 4-tr group of next ornament, slip st in next 24 sts; repeat from * 4 times, ch 5, slip st in 3rd tr of any 4-tr group of first ornament, slip st in next 24 sts, ch 2; working across other edge, slip st in each st across same ornament, slip st in bottom loop of next 5 ch, **slip st in each st across next ornament, slip st in bottom loop of next 5 ch; repeat from ** 4 times, slip st in each st across last ornament; join with slip st in first ch380 slip sts, 30 ch, 1 ch-1 space, and 1 ch-2 space. Fasten off. Round 2: With right side facing, join A with dc in ch-1 space, 2 dc in same space, *[dc2tog] twice, [dc in next 5 sts, 2 dc in next st] twice, dc in next 5 sts, [dc2tog] twice, dc in next 5 ch, repeat from * 5 times, [dc2tog] twice, [dc in next 5 sts, 2 dc in next st] twice, dc in next 5 sts, [dc2tog] twice, (2 dc, ch 2, 2 dc) in ch-2 space, **[dc2tog] twice, [dc in next 5 sts, 2 dc in next st] twice, dc in next 5 sts, [dc2tog] twice, dc in each of next 5 ch, repeat from ** 5 times, [dc2tog] twice, [dc in next 5 sts, 2 dc in next st] twice, dc in next 5 sts, [dc2tog] twice, 3 dc in ch-1 space, ch 1; join with slip st in first dc392 dc, 1 ch-1 space, and 1 ch-2 space. Fasten off. ASSEMBLY Arrange Strips as shown in Assembly Diagram. Leave a long tail at beginning and end of each row. Joining Row for Strips A and B: With right side facing and working in back loops, join A with sc in first dc after ch-1 space of Strip A, sc in next 13 dc; hold Strips A and B with wrong sides together, working through both thicknesses and in inner loops (back loop of Strip A and front loop of Strip B), sc in next dc of Strip A and first dc after ch-2 space of Strip B, sc in each dc across to ch-2 space of Strip A, skip ch-2 space; working in back loops only, sc in last 14 dc of Strip B; leave ch-1 space unworked210 sc. Fasten off. Joining Row for Strips B and C: With wrong side facing and working in front loops, join A with sc in first dc after ch-1 space of Strip C, sc in next 13 dc; hold Strips B and C together, working through both thicknesses and in inner loops (back loop of Strip B and front loop of Strip C), sc in first dc after ch-2 space of Strip B and next dc of Strip C, sc in each dc across to ch-2 space of Strip C, skip ch-2 space; working in back loops only, sc in last 14 dc of Strip B; leave ch-1 space unworked210 sc. Fasten off. Repeat last 2 rows to join remaining Strips as follows: Strips C and D, E and F, G and H, I and J, K and L: work Joining Row for Strips A and B Strips D and E, F and G, H and I, J and K: work Joining Row for Strips B and C
Finishing
Edging With right side of unworked edge of Strip A facing and working in back loops only, join A with sc in first dc, sc in each dc across. Fasten off, leaving a long tail. Weave tail through end of Strip. Repeat on unworked edge of Strip L. Tassels Cut six 24 (61 cm) strands of each of B, C, D, and E. Make 6 hanks, each containing 1 strand of each color. With right side of Strip A facing, thread each end of hank between first 2 dc on each side of ch-1 space of Round 2. Pull ends to close space and with A tails held with hank, tie an overhand knot. Repeat with each hank in end of Strips C, E, G, I, and K. Repeat with F, G, H, and I, threading through ch-2 spaces of Strips B, D, F, H, J, and L. Trim tassels evenly to desired length. Weave in ends.
Read NextSnow Bunny Crochet Blanket Pattern
Your Recently Viewed Projects
Thanks for your comment. Don't forget to share!
kenziewood07 43526 50
Oct 10, 2018
This Retro Ornament Pattern Throw is absolutely perfect for a retro/nostalgic feel and I can't wait to give it a go. The 'ornaments' are spot on, and I think the main color could be white or even a green would look nice. It is also a great way to use up small amounts of yarn for each ornament.
KathrynAllison
Nov 17, 2017
Wow, this afghan looks like a true labor of love. The vintage vibe from the old-fashioned Christmas ornaments is wonderful.
Report Inappropriate Comment
Are you sure you would like to report this comment? It will be flagged for our moderators to take action.
Thank you for taking the time to improve the content on our site.