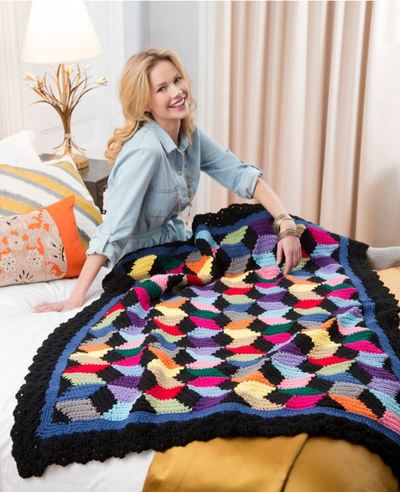
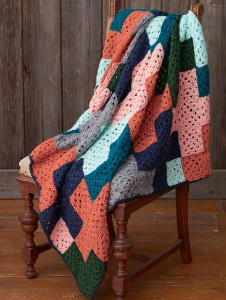
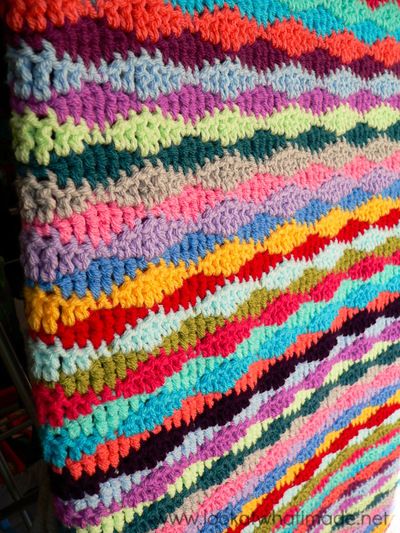
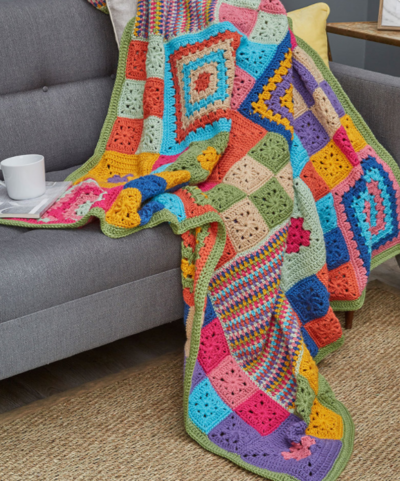
Patched Persuasion Throw

Everyone knows that color is a huge part of decorating, but did you know that when it comes to crochet blankets, the pattern can have just as much of an impact. Think of all the blue blankets you've seen. They probably each set a different tone, despite being similar colors. This Patched Persuasion Throw is an example of just how important a pattern is in creating an aesthetic. This isn't just any bright, colorful crochet blanket. This rainbow pattern is a great way to add a bohemian touch to soften any room.

Crochet HookH/8 or 5 mm hook
Crochet Gauge Square I = 4 x 4" [10 x 10 cm]; Square II = 8 x 8" [20.5 x 20.5 cm]; Rounds 1 and 2 of Square II = 3 x 3" [7.5 x 7.5 cm]; Square III = 12 x 12" [30.5 x 30.5 cm]; Rounds 1–4 of Square III = 4 x 4" [10 x 10 cm]; Square IV = 16 x 16" [40.5 x 40.5 cm]; 15 sts = 4" [10 cm] and 14 rows = 4" [10 cm] in pattern of Square IV
Finished SizeThrow measures about 50 x 62" [127 x 157.5 cm], including border
Materials List
- RED HEART® Super Saver®: 1 skein each of 321 Gold A, 3945 Blue Suede B, 774 Light Raspberry C, 668 Honeydew D, 358 Lavender E, 512 Turqua G, 334 Buff H and 718 Shocking Pink I, and 2 skeins each of 726 Coral F, and 624 Tea Leaf J.
- Susan Bates® Crochet Hook: 5mm [US H-8]
- Yarn needle
Instructions
Special Stitches
beg-Cl (beginning 3 treble crochet cluster) = Ch 3, [yarn over] twice, insert hook in indicated stitch or space and pull up a loop, [yarn over and draw through 2 loops on hook] twice (2 loops remain on hook); [yarn over] twice, insert hook in same stitch or space and pull up a loop, [yarn over and draw through 2 loops on hook] twice; yarn over and draw through all 3 loops on hook.
Cl (3 treble crochet cluster) = [Yarn over] twice, insert hook in indicated stitch and pull up a loop, [yarn over and draw through 2 loops on hook] twice (2 loops remain on hook); *[Yarn over] twice, insert hook in same stitch and pull up a loop, [yarn over and draw through 2 loops on hook] twice; repeat from * once more, yarn over and draw through all 4 loops on hook.
Notes
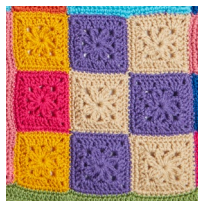
1. Throw is made from 89 Squares: 75 Square I, 7 Square II, 5 Square III, and 2 Square IV.
2. Squares are whipstitched together following Assembly Diagrams. A border is worked around entire outer edge of Throw.
3. Squares I, II, and III are worked in joined rounds with right side always facing. Square IV is worked back and forth in rows.
4. Yarn color is changed when working Squares II, III, and IV. To change yarn color when working Squares II and III, fasten off old color and join next color as instructed. To change yarn color when working Square IV, work last stitch of old color to last yarn over. Yarn over with new color and draw through all loops on hook to complete stitch. Proceed with new color. Fasten off old color.
5. It is very important that all Squares measure the size indicated in the GAUGE section. Change hook size as needed to achieve the needed measurements.
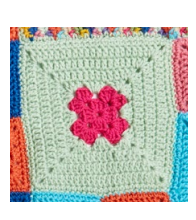
Square I
(make 75 – 9 with B; 8 each with A, C, and F; and 7 each with D, E, G, H, I, and J)
Ch 4; join with slip st in first ch to form a ring.
-
Round 1 (right side): Beg-Cl in ring, [ch 3, Cl in ring] 7 times; join with ch 1, hdc in top of beg-Cl—8 clusters and 8 ch-3 spaces. Note: The joining ch 1, hdc count as a ch-3 space
-
Round 2: Ch 3 (counts as dc), 2 dc around post of joining hdc, 3 dc in next ch-3 space, [(3 dc, ch 2, 3 dc) in next ch-3 space (corner made), 3 dc in next ch-3 space] 3 times, 3 dc again around post of joining hdc; join with hdc in top of beginning ch-3 (joining hdc counts as a ch-2 space)—Twelve 3-dc groups and 4 corner ch-2 spaces.
-
Round 3: Ch 1, 2 sc around post of joining hdc, sc in next 9 dc, [3 sc in next corner ch-2 space, sc in next 9 dc] 3 times, sc again around post of joining hdc; join with slip st in first sc—48 sc. Fasten off.
Square II
(make 7 – 1 each in each color sequence)
Use first yarn color listed for Rounds 1 and 2, and second yarn color listed for Rounds 3–7.
Color Sequence #1: E, A.
Color Sequence #2: A, J.
Color Sequence #3: D, F.
Color Sequence #4: J, H.
Color Sequence #5: H, G.
Color Sequence #6: I, D.
Color Sequence #7: C, E.
With first color, ch 4; join with slip st in first ch to form a ring.
-
Round 1 (right side): With first color, ch 3 (counts as dc here and throughout), 3 dc in ring, [ch 2, 4 dc in ring] 3 times; join with hdc in top of beginning ch-3 (joining hdc counts as a ch-2 space)— Four 4-dc groups and 4 ch-2 spaces
-
Round 2: With first color, ch 3, 3 dc around post of joining hdc, (4 dc, ch 2, 4 dc) in each of next 3 ch-2 spaces (3 corners made), 4 dc again around post of joining hdc, ch 2 (last corner made); join with slip st in top of beginning ch-3—Eight 4-dc groups and 4 corner ch-2 spaces. Fasten off
-
Round 3: With right side facing, join second color with slip st in any ch-2 space, ch 3, (2 dc, ch 2, 3 dc) in same ch-2 space, [4 dc in next space between 4-dc groups, (3 dc, ch 2, 3 dc) in next corner ch-2 space] 3 times, 4 dc in last space between 4-dc groups; join with slip st in top of beginning ch-3—Eight 3-dc groups, four 4-dc groups, and 4 corner ch-2 spaces.
-
Round 4: With second color, ch 3, [dc in each dc to next corner ch-2 space, (2 dc, ch 3, 2 dc) in corner ch-2 space] 4 times, dc in each dc to end of round; join with slip st in top of beginning ch-3—56 dc and 4 corner ch-3 spaces (14 dc along each of 4 sides between corner ch-3 spaces).
-
Round 5: With second color, ch 3, [dc in each dc to next corner ch-3 space, (2 dc, ch 3, 2 dc) in corner ch-3 space] 4 times, dc in each dc to end of round; join with slip st in top of beginning ch-3—72 dc and 4 corner ch-3 spaces (18 dc along each of 4 sides between corner ch-3 spaces).
-
Round 6: Repeat Round 5—88 dc and 4 corner ch-3 spaces (22 dc along each of 4 sides between corner ch-3 spaces).
-
Round 7: With second color, ch 1, [sc in each dc to next corner ch-3 space, 3 sc in corner ch-3 space] 4 times, sc in each dc to end of round; join with slip st in first sc—100 sc (22 sc along each of 4 sides between 3-sc corners). Fasten off.
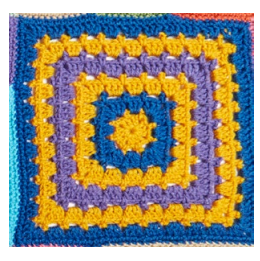
Square III
(make 5 – 1 in each color sequence)
Use first yarn color listed for first 2 rounds, then use each following yarn color, in order listed, for 2 rounds.
Color Sequence #1: D, C, I, C, D, and I.
Color Sequence #2: F, H, G, H, F, and G.
Color Sequence #3: J, F, J, A, J, and F.
Color Sequence #4: A, B, A, E, A, and B.
Color Sequence #5: B, G, C, G, B, and C.
With first color, ch 4; join with slip st in first ch to form a ring.
-
Round 1 (right side): With first color, ch 3 (counts as dc here and throughout), 2 dc in ring, [ch 2, 3 dc in ring] 3 times; join with hdc in top of beginning ch-3 (joining hdc counts as a ch-2 space)— Four 3-dc groups and 4 ch-2 spaces
-
Round 2: With first color, ch 1, sc around post of joining hdc, [ch 3, sc in center dc of next 3-dc group, ch 3, sc in next ch-2 space] 3 times, ch 3, sc in center dc of last 3-dc group, ch 3; join with slip st in first sc—8 sc and 8 ch-3 spaces. Fasten off.
-
Round 3: With right side facing, join second color with slip st in any ch-3 space, ch 3, 2 dc in same ch-3 space, [3 dc in next ch-3 space, (3 dc, ch 2, 3 dc) in next ch-3 space (corner made)] 3 times, 3 dc in next ch-3 space, 3 dc again in first ch-3 space; join with hdc in top of beginning ch-3 (joining hdc counts as a ch-2 space)—Twelve 3-dc groups and 4 corner ch-2 spaces (Three 3-dc groups along each of 4 sides between corner ch-2 spaces).
-
Round 4: With second color, ch 1, sc around post of joining hdc, *[ch 3, sc in next space between 3-dc groups] twice, ch 3, (sc, ch 3, sc) in next corner ch-2 space; repeat from * 2 more times, [ch 3, sc in next space between 3-dc groups] twice, ch 3, sc again around post of joining hdc, ch 3; join with slip st in first sc—16 sc and 16 ch-3 spaces (3 ch-3 spaces along each of 4 sides between ch-3 corner spaces). Fasten off
-
Round 5: With right side facing, join third color with slip st in any corner ch-3 space, ch 3, 2 dc in same corner ch-3 space, [3 dc in each ch-3 space to next corner ch-3 space, (3 dc, ch 2, 3 dc) in corner ch-3 space (corner made)] 3 times, 3 dc in each ch-3 space to end of round, 3 dc again in first corner ch-3 space; join with hdc in top of beginning ch-3 (joining hdc counts as a ch-2 space)—Twenty 3-dc groups and 4 corner ch-2 spaces (Five 3-dc groups along each of 4 sides between corner ch-2 spaces).
-
Round 6: With third color, ch 1, sc around post of joining hdc, [*ch 3, sc in next space between 3-dc groups; repeat from * to next corner ch-2 space, ch 3, (sc, ch 3, sc) in corner ch-2 space] 3 times, **ch 3, sc in next space between 3-dc groups; repeat from ** to end of round, ch 3, sc again around post of joining hdc, ch 3; join with slip st in first sc—24 sc and 24 ch-3 spaces (5 ch-3 spaces along each of 4 sides between corner ch-3 spaces). Fasten off.
-
Rounds 7 and 8: With fourth color, repeat Rounds 5 and 6—32 sc and 32 ch-3 spaces in Round 8 (7 ch-3 spaces along each of 4 sides between corner ch-3 spaces). Fasten off.
-
Rounds 9 and 10: With fifth color, repeat Rounds 5 and 6—40 sc and 40 ch-3 spaces in Round 10 (9 ch-3 spaces along each of 4 sides between corner ch-3 spaces). Fasten off
-
Round 11: With sixth color, repeat Round 5—Forty-four 3-dc groups and 4 corner ch-2 spaces (Eleven 3-dc groups along each of 4 sides between corner ch-2 spaces).
-
Round 12: With sixth color, ch 1, 3 sc around post of joining hdc, [sc in each st to next corner ch-2 space, 5 sc in corner ch-2 space] 3 times, sc in each st to end of round, 2 sc again around post of joining hdc; join with slip st in first sc—152 sc (33 sc along each of 4 sides between 5-sc corners). Fasten off
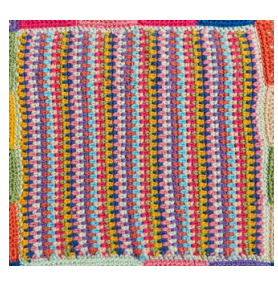
Square IV
(make 2)
With A, ch 60
Notes
1. Square should measure about 15½ x 15½" [39.5 x 39.5 cm] before Border Round is worked. After Border Round is complete Square should measure 16 x 16" [40.5 x 40.5 cm].
2. In Border Round 1, 48 sc are worked along each of the 4 sides and 3 sc at each corner. Detailed instructions for achieving this are provided. Alternately, distribute the 48 sc along each side and work 3 sc in each corner in any way desired.
-
Row 1 (wrong side): With A, sc in 2nd ch from hook, *ch 1, skip next ch, sc in next ch; repeat from * across and change to B in last st—30 sc and 29 ch-1 spaces.
-
Row 2: With B, ch 1, turn, sc in first sc, sc in next ch-1 space, *ch 1, skip next sc, sc in next ch-1 space; repeat from * to last sc, sc in last sc and change to C—31 sc and 28 ch-1 spaces.
-
Row 3: With C, ch 1, turn, sc in first sc, *ch 1, skip next sc, sc in next ch-1 space; repeat from * to last 2 sc, ch 1, skip next sc, sc in last sc and change to D—30 sc and 29 ch-1 spaces.
-
Rows 4–53: Repeat Rows 2 and 3 changing color every row as follows: *Work next row with D, and then 1 row each with E, F, G, H, I, J, A, B, and C; repeat from * 4 more times. Change to D in last st of Row 53.
-
Border Round: With D, ch 1, turn, 2 sc in first sc, skip next ch-1 space, *[sc in next sc, sc in next ch-1 space] 3 times, skip next sc, [sc in next ch-1 space, sc in next sc] 3 times, skip next ch-1 space; repeat from * to last sc, 3 sc in last sc; working in ends of rows along side edge, skip end of Row 53, sc in end of next 12 rows, [skip end of next row, sc in end of next 12 rows] 3 times, skip end of Row 1; working along opposite side of foundation ch, 3 sc in ch at base of first sc, skip next ch, *[sc in ch at base of next sc, sc in next ch-1 space] 3 times, skip ch at base of next sc, [sc in next ch-1 space, sc in ch at base of next sc] 3 times, skip next ch; repeat from * to ch at base of last sc, 3 sc in ch at base of last sc; working in ends of rows along side edge, skip end of Row 1, sc in end of next 12 rows, [skip end of next row, sc in end of next 12 rows] 3 times, skip end of Row 53, sc in same sc as first 2 sc of this round; join with slip st in first sc—204 sc. Fasten off.
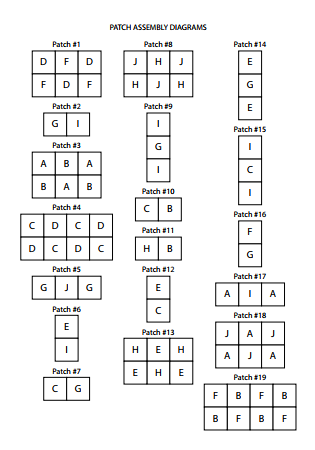
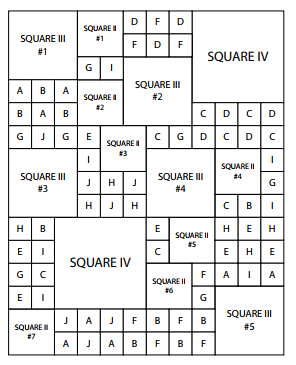
Assembly
-
Hold Squares with right sides together. Whipstitch Squares together from wrong side following Patch Assembly Diagrams to whipstitch Square I pieces together then follow Throw Assembly Diagram to whipstitch Patches and remaining Squares together. Alternately, whipstitch all Squares together following Full Throw Assembly Diagram, without sewing Squares I into Patches first.
Border
-
Round 1 (right side): With right side facing, join J with slip st in any sc on outer edge, sc in each st around working 3 sc in center sc of each 3-sc corner; join with slip st in first sc
-
Round 2: Ch 3 (counts as dc), dc in each st around working 3 dc in center sc of each 3-sc corner; join with slip st in top of beginning ch-3
-
Round 3: Ch 1, sc in each st around working 3 sc in center dc of each 3-dc corner; join with slip st in first sc. Fasten off.
Finishing
-
Weave in ends.
Read NextPlaid Planned Pooling Blanket
Your Recently Viewed Projects
Thanks for your comment. Don't forget to share!
Hippie Chick
Sep 19, 2017
I love the seventies look of this granny square afghan. The colors are on fleck and the asymmetrical size of the squares and the way they are sewn together gives it a sort of art deco look too. This coloring should allow it to blend in with any room of your house. I love boho items and this would definitely make it to my collection
Tricia108
Sep 09, 2017
What a great stash buster! And so colorful! You would not get bored making this afghan. It also will go with everything in your house. All the different colors seem to come together. It is a detailed pattern over all but once you go over it a few times it all comes together. Just take your time. Thank you.
Report Inappropriate Comment
Are you sure you would like to report this comment? It will be flagged for our moderators to take action.
Thank you for taking the time to improve the content on our site.