Positive Signs Throw Pattern

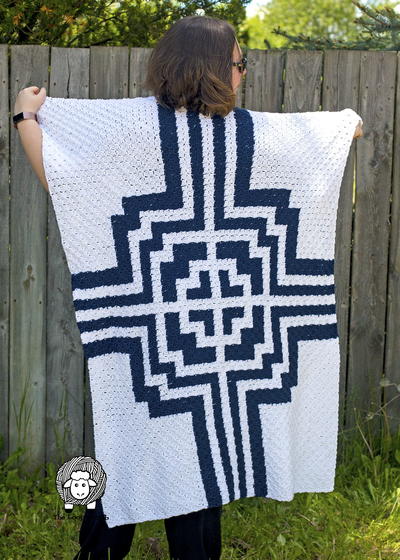
Update your understanding of all that crochet can accomplish with this modern take on a traditional quilting design. The Positive Signs Throw Pattern will have you hooking up a bold, yet classic stunner that can blend with any decor or become the inspiration for the rest of your design aesthetic. Send your not-so-kiddo off to college with this cozy reminder of home. Drape this black-and-white blanket over a rocking chair to bring an antique furniture piece into the 21st century. Or just cover you and your honey with this contemporary crochet throw as you sink into the couch at the end of the day.

Crochet HookJ/10 or 6 mm hook
Yarn Weight(4) Medium Weight/Worsted Weight and Aran (16-20 stitches to 4 inches)
Crochet GaugeOne square = about 9 x 9" [23 x 23 cm]. CHECK YOUR GAUGE. Use any size hook to obtain the gauge.
Finished SizeThrow measures 45" [114.5 cm] x 54" [137 cm].
Materials List
- RED HEART® Soft®: 7 balls 4600 White A, and 2 balls 4614 Black B
- Yarn needle
INSTRUCTIONS
Special Stitches
ch-2-join (join ch-2 spaces as you go) = Ch 1, drop loop from hook, insert hook from right side to wrong side through corresponding ch-2 space in neighboring Square, return dropped loop to hook, ch 1.
ch-4-join (join corner ch-4 spaces as you go) = Ch 2, drop loop from hook, insert hook from right side (front) to wrong side (back) through corresponding corner ch-4 space in neighboring Square, return dropped loop to hook, ch 2.
join with sc = Place a slip knot on hook, insert hook in indicated stitch, yarn over and draw up a loop, yarn over and draw through both loops on hook.
Notes
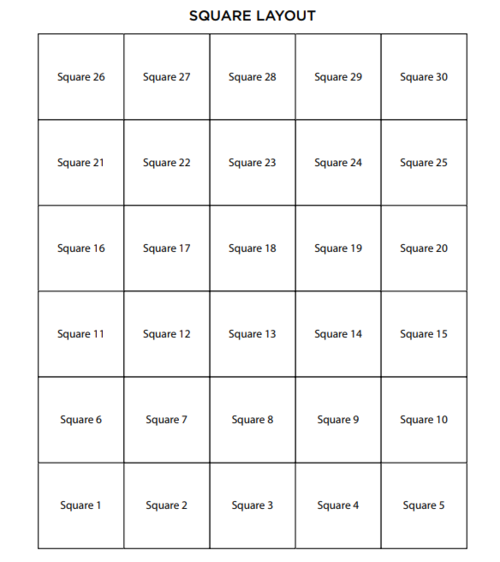
1. Throw is made from 30 Squares, arranged and joined into 6 rows of 5 Squares each.
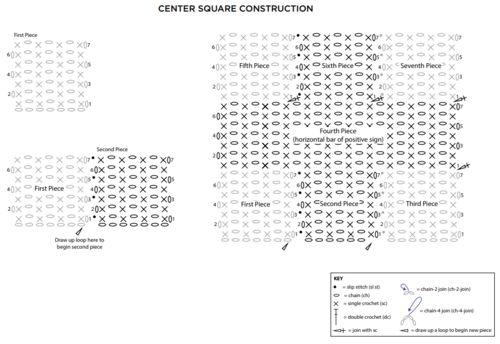
2. Each Square is made from 7 pieces that form a positive sign.
3."Join-as-you-go" techniques are used to join pieces into Squares and the Squares into rows.
4. Diagrams clarify the "join-as-you-go" techniques and show Square layout.
THROW
SQUARE 1
-
First Piece
With A, ch 8.
Row 1 (right side): Sc in 2nd ch from hook, *ch 1, skip next ch, sc in next ch; repeat from * across – 4 sc and 3 ch-1 spaces.
Rows 2-7: Ch 1, turn, sc in first sc, *ch 1, skip ch-1 space, sc in next sc; repeat from * across.
Fasten off. -
Second Piece
With right side facing, draw up a loop of B in ch at base of first sc of Row 1 of first piece (lower right corner), then ch 8.
Row 1 (right side): Sc in 2nd ch from hook, [ch 1, skip next ch, sc in next ch] 3 times, slip st in beginning ch of Row 1 of first piece – 4 sc and 3 ch-1 spaces.
Row 2: Ch 1, turn, sc in first sc, *ch 1, skip next ch-1 space, sc in next sc; repeat from * across.
Row 3: Ch 1, turn, sc in first sc, [ch 1, skip next ch-1 space, sc in next sc] 3 times, slip st in beginning ch of Row 3 of first piece.
Row 4: Repeat Row 2.
Row 5: Repeat Row 3, joining to beginning ch of Row 5 of first piece.
Row 6: Repeat Row 2.
Row 7: Repeat Row 3, joining to beginning ch of Row 7 of first piece.
Fasten off. -
Third Piece
With A, make the same as second piece, joining to right edge of second piece. -
Fourth Piece
Row 1 (right side): With right side facing, join B with an sc in first st Row 7 of third piece, *ch 1, skip next sc or seam between pieces, sc in next sc; repeat from * across – 12 sc and 11 ch-1 spaces.
Rows 2-7: Ch 1, turn, sc in first sc, *ch 1, skip ch-1 space, sc in next sc; repeat from * across.
Fasten off. -
Fifth Piece
Row 1 (right side): With right side facing, join A with sc in 9th sc of Row 7 of fourth piece, *ch 1, skip next ch-1 space, sc in next sc; repeat from * across – 4 sc and 3 ch-1 spaces.
Rows 2-7: Repeat Rows 2-7 of first piece.
Fasten off. -
Sixth Piece
Row 1 (right side): With right side facing, join B with sc in 5th sc of Row 7 of fourth piece, *ch 1, skip next ch-1 space, sc in next sc; repeat from * across, slip st in beginning ch of Row 1 of fifth piece – 4 sc and 3 ch-1 spaces.
Rows 2-7: Repeat Rows 2-7 of second piece.
Fasten off -
Seventh Piece
Row 1 (right side): With right side facing, join A with sc in first sc of Row 7 of fourth piece, *ch 1, skip next ch-1 space, sc in next sc; repeat from * across, slip st in beginning ch of Row 1 of sixth piece – 4 sc and 3 ch-1 spaces.
Rows 2-7: Repeat Rows 2-7 of second piece.
Fasten off -
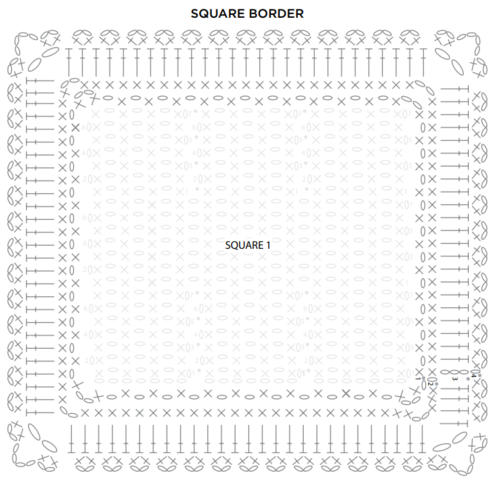
Border
Round 1 (right side): With right side facing, join A with sc in beginning ch of Row 1 of third piece; working up right edge of square, [ch 1, skip next row, sc in end of next row] 9 times, ch 1, skip next row, (sc, ch 2, sc) in corner sc; turn to work along top edge, [ch 1, skip next ch-1 space or seam between pieces, sc in next sc] 10 times, ch 1, skip next ch-1 space, (sc, ch 2, sc) in corner sc; turn to work along left side edge, ch 1, skip first row, [ch 1, skip next row, sc in end of next row] 9 times, ch 1, skip last row; turn to work along opposite edge of foundation ch, (sc, ch 2, sc) in first ch, [ch 1, skip next ch-1 space, sc in next ch] 10 times, ch 1, skip next ch-1 space, (sc, ch 2, sc) in last ch; join with slip st in first sc – 48 sc, 44 ch-1 spaces, and 4 corner ch-2 spaces (12 sc and 11 ch-1 spaces along each of 4 sides between corner ch-2 spaces).
Round 2: Ch 1, sc in each sc and each ch-1 space around, working (sc, ch 2, sc) in each corner ch-2 space; join with slip st in first sc – 100 sc (25 sc along each of 4 sides between corner ch-2 spaces).
Round 3: Ch 3 (counts as first dc here and throughout), dc in each sc around, working (dc, ch 2, dc) in each corner ch-2 space; join with slip st in top of beginning ch-3 – 108 dc; 27 dc along each side and 4 ch-2 spaces.
Round 4: Skip same dc as joining, [*(sc, ch 2, sc) in next dc, skip next dc; repeat from * to next corner ch-2 space, (sc, ch 2, sc, ch 4, sc, ch 2, sc) in corner ch-2 space, skip next dc] 4 times; join with slip st in first sc – 52 (sc, ch 2, sc) groups and 4 (sc, ch 2, sc, ch 4, sc, ch 2, sc) corner-groups (13 (sc, ch 2, sc) groups along each of 4 sides between corners).
Fasten off.
Center Square completed.
SQUARE 2
Work same as Square 1 through Round 3 of border.
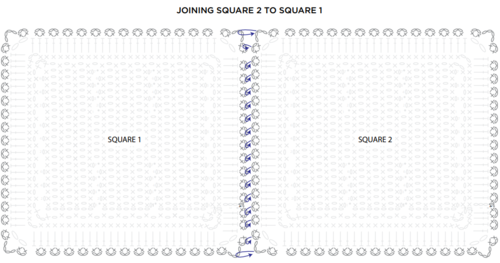
Note: Round 4 of Square 2 is worked the same as Round 4 of Square 1, EXCEPT the ch-2 spaces and corner ch-4 spaces are joined-as-you-go to the ch-2 spaces and corner ch-4 spaces along one edge of Square 1. Before beginning Round 4, review the ch-2- join and ch-4 join defined in the Special Stitches section at the beginning of the pattern instructions. Refer to diagram for placement of each Square. Hold Square 2 to the left of Square 1 as you join the left edge of Square 2 to the right edge of Square 1.
-
Round 4 (Joining Round): Skip same dc as joining,
-
Work along right edge: *(Sc, ch 2, sc) in next dc, skip next dc; repeat from * to next corner ch-2 space, (sc, ch 2, sc, ch 4, sc, ch 2, sc) in corner ch-2 space, skip next dc,
-
Work along top edge: *(Sc, ch 2, sc) in next dc, skip next dc; repeat from * to next corner ch-2 space, (sc, ch 2, sc, ch4-join, sc, ch-2-join, sc) in next corner ch-2 space, skip next dc,
-
Work along left edge joining to right edge of previous Square: *(Sc, ch-2-join, sc) in next dc, skip next dc; repeat from * to next corner ch-2 space, (sc, ch-2-join, sc, ch-4-join, sc, ch 2, sc) in next corner ch-2 space, skip next dc,
-
Work along lower edge: *(Sc, ch 2, sc) in next dc, skip next dc; repeat from * to next corner ch-2 space, (sc, ch 2, sc, ch 4, sc, ch 2, sc) in corner ch-2 space, [skip next dc, (sc, ch 2, sc) in next dc] twice; join with slip st in first sc.
Fasten off.
SQUARES 3-5
Work same as Square 2, joining each square to the previous square to complete first row of Squares, as shown in layout diagram.
SQUARE 6
Work same as Square 1 through Round 3 of border.
Note: Round 4 of Square 6 is worked the same as Round 4 of Square 2, EXCEPT the lower edge of Square 6 is joined to the top edge of Square 1 to begin the next row of Squares. Hold Square 6 above Square 1 as you join the lower edge of Square 6 to the top edge of Square 1, as shown in layout diagram.
-
Round 4 (Joining Round): Skip same dc as joining,
-
Work along right and top edge: [*(Sc, ch 2, sc) in next dc, skip next dc; repeat from * to next corner ch-2 space, (sc, ch 2, sc, ch 4, sc, ch 2 and sc) in corner ch-2 space, skip next dc] twice,
-
Work along left edge: *(Sc, ch 2, sc) in next dc, skip next dc; repeat from * to next corner ch-2 space, (sc, ch 2, sc, ch4-join, sc, ch-2-join, sc) in next corner ch-2 space, skip next dc,
-
Work along lower edge joining to top edge of previous Square: *(Sc, ch-2-join, sc) in next dc, skip next dc; repeat from * to next corner ch-2 space, (sc, ch-2-join, sc, ch-4-join, sc, ch 2, sc) in corner ch-2 space, [skip next dc, (sc, ch 2, sc) in next dc] twice; join with slip st in first sc.
Fasten off.
SQUARES 7-10
Note: Round 4 of Squares 7-10 are worked the same as Round 4 of Square 2, EXCEPT two sides are joined to two previous Squares. The left edge of Square 7 is joined to the right edge of Square 6 and lower edge of Square 7 is joined to the top edge of Square 2. Refer to the layout diagram for placement of Squares. Hold the current Square to the right and above the previous neighboring Squares.
-
Round 4 (Joining Round): Skip same dc as joining,
-
Work along right edge: *(Sc, ch 2, sc) in next dc, skip next dc; repeat from * to next corner ch-2 space, (sc, ch 2, sc, ch 4, sc, ch 2 and sc) in corner ch-2 space, skip next dc,
-
Work along top edge: *(Sc, ch 2, sc) in next dc, skip next dc; repeat from * to next corner ch-2 space, (sc, ch 2, sc, ch4-join, sc, ch-2-join, sc) in next corner ch-2 space, skip next dc,
-
Work along left edge joining to right edge of previous Square: *(Sc, ch-2-join, sc) in next dc, skip next dc; repeat from * to next corner ch-2 space, (sc, ch-2-join, sc, ch-4-join, sc, ch-2-join, sc) in next corner ch-2 space, skip next dc,
-
Work along lower edge joining to top edge of previous Square: *(Sc, ch-2-join, sc) in next dc, skip next dc; repeat from * to next corner ch-2 space, (sc, ch-2-join, sc, ch-4-join, sc, ch-2-join, sc) in corner ch-2 space, [skip next dc, (sc, ch 2, sc) in next dc] twice; join with slip st in first sc.
Fasten off.
Repeat to work SQUARES 8-10 and complete second row of Squares.
REMAINING SQUARES
SQUARES 11-15
Work same as Squares 6-10 to complete third row of Squares.
SQUARES 16-20
Work same as Squares 6-10 to complete fourth row of Squares.
SQUARES 21-25
Work same as Squares 6-10 to complete fifth row of Squares.
SQUARES 26-30
Work same as Squares 6-10 to complete sixth row of Squares.
FINISHING
Throw Border
-
Round 1: With right side facing, join A in any corner ch-4 space with a slip st, ch 1, (sc, ch 2, sc) in corner ch-4 space, [ch 1, skip next sc or seam between Squares, sc in next ch-pace] around, working (sc, ch 2, sc) in each corner ch-4 space; join with slip st in first sc.
-
Round 2: Ch 1, sc in each sc and ch-1 space around, working (sc, ch 2, sc) in each corner ch-2 space; join with slip st in first sc.
-
Round 3: Ch 1, (sc, ch 2, sc) in same sc, [skip next sc, (sc, ch 2, sc) in next sc] around, working (sc, ch 4, sc) in each corner ch-2 space; join with slip st in first sc.
Fasten off.
Weave in ends.
STITCH DIAGRAMS
Read NextMorning Glory Afghan
Your Recently Viewed Projects
Thanks for your comment. Don't forget to share!
Jayayay
Aug 02, 2018
Wow, I don't often come across a modern throw pattern and I totally love this one. It's so traditional yet trendy looking, like the blanket equivalent of a SoHo loft apartment.
Report Inappropriate Comment
Are you sure you would like to report this comment? It will be flagged for our moderators to take action.
Thank you for taking the time to improve the content on our site.