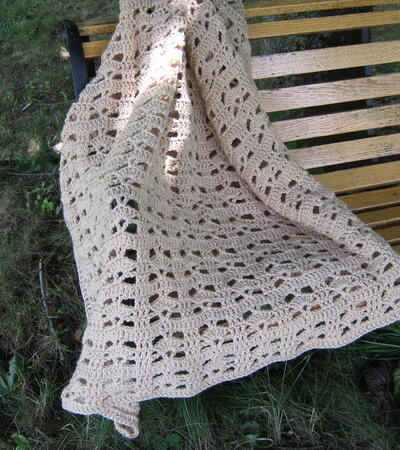
Cluster Lace Throw

Somehow both lacy and cozy, this Cluster Lace Throw is the best of both worlds. This afghan blanket crochet pattern is designed for intermediate crocheters who are looking for a springtime wrap. As you follow this tutorial, you'll master the cluster stitch, which helps this crochet project stand out even if it's only one color. The mossy green of this beautiful blanket matches its soft texture. This elegant throw will keep you warm when a cool spring breeze comes through your open window.

Crochet HookK/10.5 or 6.5 mm hook
Yarn Weight(4) Medium Weight/Worsted Weight and Aran (16-20 stitches to 4 inches)
Materials:
-
RED HEART® “Super Saver®”
- 10 skeins 661 Frosty Green
- 6.5mm [US K-10.5]
- Yarn needle
Size: 51” x 69”
Gauge: 4 CL = 4”; Rows 2-7 = 4” in pattern.
Abbreviations:
CL (CL) = [yo and draw up ½” loop in st indicated] 4 times, yo and draw through 8 loops, yo and draw through last 2 loops on hook.
V-st (v-stitch) = (dc, ch 2, dc) all in stitch indicated
PB (post bobble) = [yo, insert hook from front to back to front around post of hdc indicated, pull up ½” loop] 5 times, yo and draw through all 11 loops on hook, ch 1 tightly to lock.
Shell = (3 dc, ch 2, 3 dc) all in st indicated
Picot = Ch 3, slip st in 3rd ch from hook
Instructions:
Ch 135.
Row 1 (Right Side): Sc in 2nd ch from hook, * ch 2, CL in same ch as last sc, ch 2 **, skip 2 ch, sc in next ch; repeat
from * to last ch, end at **; sc in last ch; turn – 45 CL.
Row 2: Ch 2, sc in top of first CL, * ch 2, CL in top of same CL as last sc, ch 2 **, sc in top of next CL; repeat from * to
last st, end at **; sc in top of ch-2; turn.
Rows 3-10: Repeat Row 2.
Row 11: Ch 4, dc in top of first CL, * 2 dc in first ch-2 space, dc in top of next CL; repeat from * to last st; 2 dc in top of ch-2; turn – 136 sts.
Row 12: Ch 5, dc in first st (beginning V-st made), * skip 2 sts, V-st in next st; repeat from * across working last V-st in 3rd ch of ch-4; turn – 46 V-sts.
Row 13: Ch 1, sc in first ch-2 space, * 2 hdc between V-sts, sc in next ch-2 space; repeat from *across; turn – 136 sts.
Row 14: Ch 2, hdc in first st, * ch 1, skip 1 st, hdc in next st; repeat from * to last st; hdc in last st; turn.
Row 15: Ch 1, sc in first hdc, PB around next hdc, * sc in next ch-1 space, PB around next hdc; repeat from * to last st; sc in top of ch-2. Fasten off.
Row 16: Attach yarn in first sc of last row; ch 1, * sc in next PB, sc in next sc; repeat from * across; turn – 136 sts.
Row 17: Rep Row 12, with last v-st worked in last sc.
Row 18: Ch 2, hdc in first ch-2 space, dc between V-sts, * hdc in next ch-2 space, 2 dc between V-sts; repeat from * across, working 1 dc instead of 2 between last 2 V-sts; hdc in ch-2 space of last V-st. Fasten off.
Row 19: Skip ch-2 of last row, attach yarn in first hdc, ch 2, CL in same st as joining, ch 2, *skip 2 sts, (sc, CL) in next st, ch 2; repeat from * to last st; sc in last st; turn – 45 CL.
Repeat Rows 2-19 5 more times, then Rows 2-10 once more. Do not fasten off after last row, turn.
Edging
Round 1: Ch 2, [taking care to keep work flat, work a multiple of 6 plus 3 sc across to next corner, work 3 sc in corner] 4 times; join with a slip st in first sc.
Round 2: Ch 1, sc in same sc, sc in each sc around working 3 sc in center corner sc; join. Fasten off.
Border
Round 1: Attach yarn in center corner sc of any corner; ch 3, (2 dc, ch 2, 3 dc) all in same sc, * skip 3 sc, shell in next sc, ** skip 5 sc, shell in next sc; repeat from ** to 4 sc before next center corner sc; skip next 3 sc ***, shell in next (corner) sc; repeat from * around, end at ***; join in top of ch-3.
Round 2: Slip st in next 2 dc, slip st in ch-2 space, ch 1, * (sc, picot, sc) all in corner ch-2 space, ch 2, 3 dc between next 2 shells, ** ch 1, (sc, picot, sc) all in next ch-2 space, ch 1, 3 dc between next 2 shells; repeat from ** to next corner; ch 2 **; repeat from * around; join in first sc.
Round 3: Slip st in corner picot, draw up ½” loop, * ([CL, picot] 3 times, CL) all in corner picot loop, ch 2, sc in 2nd dc of next 3-dc group, ** ch 2, (CL, picot, CL) all in next picot loop, ch 2, sc in 2nd dc of next 3-dc group; repeat from ** to next corner; ch 2; repeat from * around; join in top of first CL. Fasten off. Weave in ends.
Find this afghan pattern and more in 17 Fast Crochet Afghan Patterns.