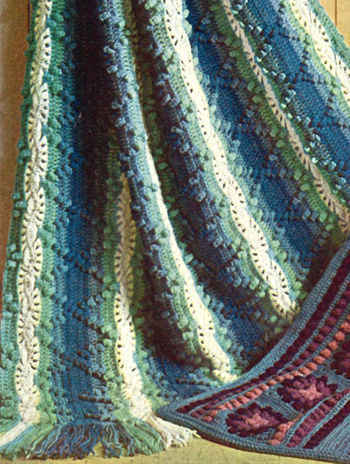
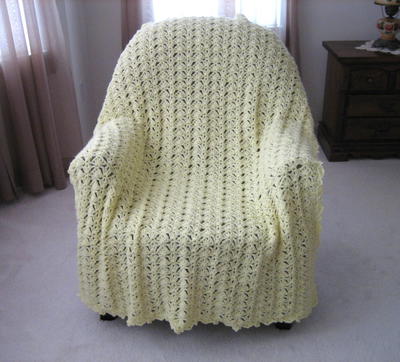
Sky Blue Lace Crochet Pattern
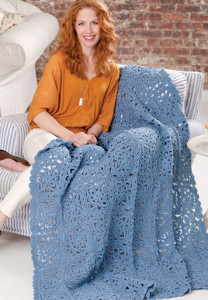
Add some regal elegance to your home with this Sky Blue Lace Crochet Pattern. Beautiful Renaissance inspired motifs make this free crochet pattern a true treasure. Relaxing with this comfy blanket is made easy by its soothing sky blue color. Its wonderful lace pattern comes from a variety of unique stitches, which means you'll never get bored making it! You can also join squares together as you crochet the last round, so you don't have to worry about messy finishing.

Crochet HookI/9 or 5.5 mm hook
Materials:
- RED HEART® Super Saver®: 7 skeins 382 Country Blue
- Crochet hook: 5.5mm [US I-9]
- Yarn needle
Size:Throw measures 52” x 65”
Gauge:Round 1 = 2¾” across; Square = 6 ¼” x 6 ¼”. CHECK YOUR GAUGE. Use any size hook to obtain gauge.
Abbreviations:ch = chain; dc = double crochet; mm = millimeters; sc = single crochet; st(s) = stitch (es); tr = treble (triple) crochet; [ ] = work directions in brackets the number of times specified; * or ** = repeat whatever follows the * or ** as indicated
Special Stitches:
- Beginning Cluster (beg cl): Ch 3; *[yarn over] twice, insert hook in ring and pull up a loop, [yarn over and draw through 2 loops on hook] 2 times*, repeat from * to *, yarn over and draw through all 3 loops on hook.
- 3-Triple Crochet Cluster (cl): [Yarn over] twice, insert hook in ring and pull up a loop, [yarn over and draw through 2 loops on hook] 2 times (2 loops remain on hook), *[yarn over] twice, insert hook in same ring and pull up a loop, [yarn over and draw through 2 loops on hook] 2 times*, repeat from * to *, yarn over and draw through all 4 loops on hook.
- Picot (picot): Ch 4, slip st in 4th ch from hook.
- V-stitch (v-st): (Dc, ch 1, dc) in indicated stitch
Note: After the first square, all others are joined while working Round 5. When joining a corner to previously joined corners, slip st into the center of the previous joining slip st.
THROW:
First Square: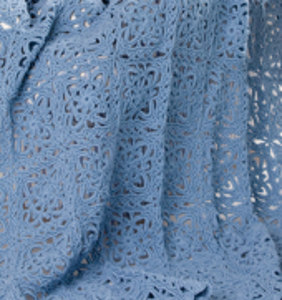
Ch 5; join with a slip st in first ch to form a ring.
Round 1: – beg cl , ch 4; [cl, ch 4] 7 times; join with a slip st in top of beg cl – 8 clusters.
Round 2: Ch 1, sc in beg cl; *(2 sc, picot , 2 sc) all in next ch-4 space, sc in next cl; ch 9, TURN; skip last 5 sc made, slip st in next sc, TURN; ch 1, 16 sc in ch-9 loop**; (2 sc, picot, 2 sc) all in next ch-4 space, sc in next cl; repeat from * to last space, ending at **; (2 sc, picot, 2 sc) all in last space; join with a slip st in first ch-1 – 4 ch-9 loops.
Round 3: Slip st in first sc worked in ch-9 loop, ch 7 (counts as dc, ch 4); *skip next 5 sc, sc in next 2 sc, ch 2, sc in next 2 sc, ch 4, skip next 5 sc, dc in last sc worked in ch-9 loop, ch 4**, dc in first sc worked in ch-9 loop, ch 4; repeat from * around, ending at **; join to third ch of ch-7 – 12 ch-4 loops.
Round 4: Ch 1, sc in same ch as joining, *3 sc in space, sc in next 2 sc, 3 sc in corner ch-2 space, sc in next 2 sc, [3 sc in next space, sc in next dc] twice; repeat from * around omitting last sc in last repeat; join to first sc – 76 sc.
Round 5: *Ch 1, skip next sc; v-st in next sc; ch 1, skip next sc, slip st in next sc, ch 1, skip next 2 sc, (2 dc, ch 3, 2 dc) all in next (corner) sc, ch 1, skip next 2 sc, [slip st in next sc, ch 1, skip next sc, v-st in next sc, ch 1, skip next sc] twice, slip st in next sc; repeat from * around working last slip st in joining slip st of Round 4. Fasten off.
Second Square:
Rounds 1-4: Work same as First Square.
Round 5-Joining Round: Ch 1, skip next sc, v-st in next sc, ch 1, skip next sc, slip st in next sc, ch 1, skip next 2 sc, 2 dc in next (corner) sc, ch 1; with Wrong Sides together, slip st in corresponding ch-3 space of completed square, ch 1, 2 dc in same sc on square in progress, ch 1, skip next 2 sc, [slip st in next sc, ch 1, skip next sc, dc in next sc, slip st in next ch-1 space on completed square, dc in same sc on square in progress, ch 1, skip next sc] 3 times, slip st in next sc, ch 1, skip next 2 sc, 2 dc in next (corner) sc, ch 1, slip st in corner space of completed square, ch 1, 2 dc in same sc on square in progress – one side joined; * ch 1, skip next 2 sc, [slip st in next sc, ch 1, skip next sc, v-st in next sc, ch 1, skip next sc] 3 times, slip st in next sc, ch 1, skip next 2 sc, (2 dc, ch 3, 2 dc) all in next sc; repeat from * around, working sts in brackets 2 instead of 3 times at end of round; join with slip st in joining slip st of Round 4. Fasten off.
Join 78 more squares in this manner, making Throw 8 squares wide and 10 squares long
EDGING:
With Right Side facing, attach yarn in corner ch-3 space; ch 4, (dc, [ch 1, dc] 5 times) all in same space, ch 2, * [sc in next slip st, ch 1, (dc, ch 1, dc, ch 1, dc) all in next ch-1 space, ch 1] 3 times, sc in next slip st**, ch 1, (dc, ch 1, dc, ch 1, dc) all in next dc of corner shell, ch 1, skip next dc, sc in joining, ch 1, skip next dc of next corner shell, (dc, ch 1, dc, ch 1, dc) all in next dc, ch 1; repeat from * to next corner, ending at **; ch 2, (dc, [ch 1, dc] 6 times) all in corner space, ch 2; repeat from * around, ending at **; ch 2; join to top of ch-3. Fasten off. Weave in all ends.
Read NextBohemian Lace Afghan
Your Recently Viewed Projects
Thanks for your comment. Don't forget to share!
auntyshanny 880184 7
Jan 21, 2017
Thanks for the helpful comments, so frustrating when you get going on a pattern and then have to problem solve why it is not working out. It is beautiful and I would like to give it a try. I will definitely follow the advice. I especially like patterns with "join as you go"!
Zeemer
Aug 26, 2016
I was looking at the pattern and it's definitely not for beginners. I understand why one reader wants to see a tutorial of this afghan. Well it's a beautiful lace afghan and it's worth making one. Thanks for the free pattern which is easy to understand for veteran crocheters. (I wonder if patterns can further be made easier to figure out.) I would think so.
Crafter 5957113
Jun 26, 2016
I would really like to see a tutorial video on how to make this afghan please.
AFC Editor Julia
Jun 27, 2016
That's a great idea - thank you for suggesting that! I'll speak to our video department about the possibility of making a tutorial for each square type. Thank you! Julia, editor for AllFreeCrochetAfghanPatterns
crotchety crochete r
Feb 29, 2016
This looks like such a beautiful throw. As of today, Feb 29, 2016, has anyone corrected the pattern instructions for errors as noted by other members below?
mitoszshornack 402 1005
Nov 14, 2015
It would be nice to have a closer photo of the square. Agree with Lyinal, I think there is a count error - too many of the loops and affects all the rest of rows. With a closer photo we can verify the count. Thanks, it's a very pretty throw and hope the pattern can be reviewed.
lyinal
Jun 25, 2014
I have given this only 3 stars only for the beauty in the photo.having a bit of fun looking for granny throw, tried this pattern with some scrap and found 9 loops are 3 to many for it to lay flat. I will try with a 3 yarn and see how it works. thank God I had not gone out and paid for all the yarn needed.
Report Inappropriate Comment
Are you sure you would like to report this comment? It will be flagged for our moderators to take action.
Thank you for taking the time to improve the content on our site.