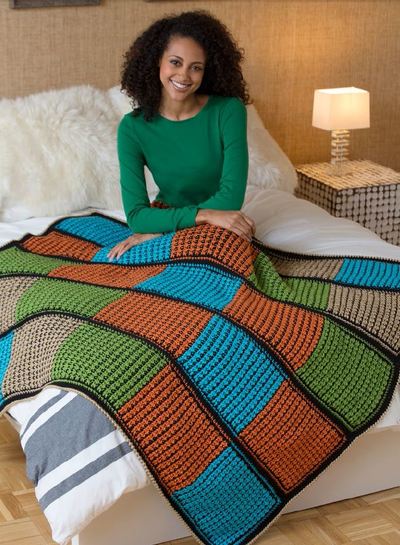
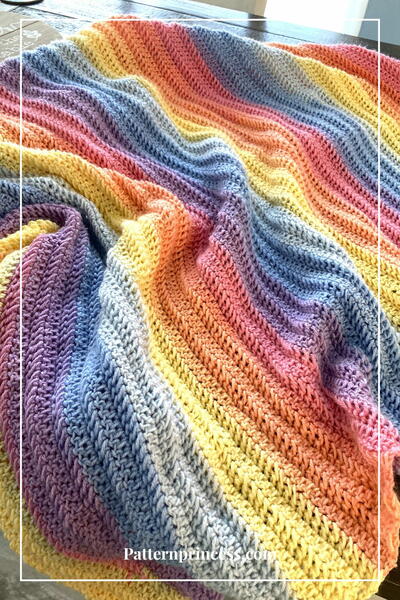
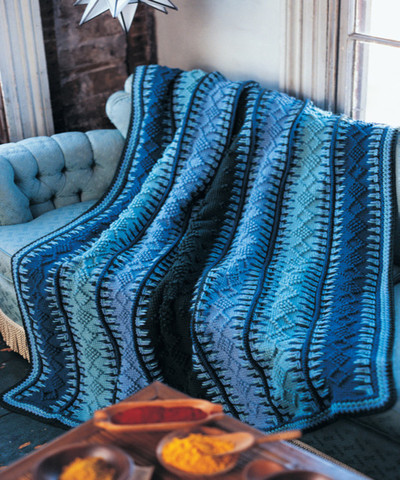
Alaskan Blue Tunisian Crochet Blanket

A mix of light and deep blues make the Alaskan Blue Tunisian Crochet Blanket stand out from the crowd. This intermediate crochet pattern features a gorgeous geometric design in shifting hues of blue and accented with a deep blue.
Try the popular Tunisian crochet stitch with this free crochet blanket pattern and you won't be disappointed with the results. Worked in panels, this mile-a-minute blanket is similar in construction to granny square blankets but instead features long panels, not small squares, that are worked separately and joined together. We promise that you are going to love this mixed Tunisian crochet afghan blanket.
PLUS! Check out the video right below to get a visual lesson for Tunisian crochet.

Crochet HookG/6 or 4 mm hook
Yarn Weight(4) Medium Weight/Worsted Weight and Aran (16-20 stitches to 4 inches)
Crochet Gauge17 Tss + 14 rows = 2" / 5cm using size G/6 (4mm) crochet hook. CHECK YOUR GAUGE. Use any size hook to obtain specified gauge.
Finished SizeApprox 54" x 75" [137.16cm x 190.5cm]
Materials List
- RED HEART® "Super Saver®": 5 skeins 633 Dark Sage A, 4 skeins each of 382 Country Blue B, 631 Light Sage C and 380 Windsor Blue D
- Crochet Hook: G/6 (4.5mm) Tunisian/Afghan hook or any size to obtain correct gauge and G/6 (4.5mm) crochet hook
- Yarn needle
Instructions for PANELS:
NOTES:
1. Chart shows Tss return pass of each row only.
2. Each vertical line on each row on chart represents a vertical bar of an afghan st.
3. Each dot on chart represents ch-3 for picot.
Special Abbreviations:
Tss (Tunisian simple stitch) = One row of Tunisian simple stitch is worked in two steps as follows:
Forward Pass (step 1): Sk first vertical bar; *insert hook under next vertical bar, yo and draw up a lp; repeat from * across.
Return Pass (step 2): Yo and draw through one lp on hook; *yo and draw through 2 lps on hook; repeat from * until only one lp remains on hook (one row of Tss complete).
Long dc = Yo, insert hook under specified st, yo and draw up a lp to height of row in work, [yo and draw through 2 lps on hook] twice.
Beginning joint st = ch 2, skip next st, yo, insert hook in next st, yo and draw up a lp to height of ch-2, yo and draw through all lps on hook.
Joint st = Yo, insert hook in same st where last lp was drawn up, yo and draw up a lp to height of ch-2, sk next st, yo, insert hook in next st, yo and draw up a lp to height of ch-2, yo and draw through all 5 lps on hook.
Cluster (cl) = [yo, insert hook in specified st, yo and draw up a lp to height of ch-2] twice, yo and draw through all lps on hook.
Beginning cluster (beginning cl) = Ch 2, yo, insert hook in same sp as joining, yo and draw up a lp to height of ch-2, yo and draw through all lps on hook.
-
CENTER PANEL
With A and afghan hook, ch 40.
Row 1: Insert hook in 2nd ch from hook, yo and draw up a lp; *insert hook in next ch, yo and draw up a lp; repeat from * across – 40 lps on hook. Work Tss return pass – 40 Tss.
Rows 2-5: Work Tss forward pass and return pass.
Row 6: Work Tss forward pass – 40 lps on hook. For Tss return pass: yo and draw through one lp on hook, [yo and draw through 2 lps on hook] 19 times; ch 3 to be formed into picot on forward pass of next row; [yo and draw through 2 lps on hook] 20 times – 39 Tss and 1 Tss with picot.
Row 7: Work Tss forward pass, holding ch-3 lp toward front to form picot – 40 lps on hook. For Tss return pass: yo and draw through one lp on hook, [yo and draw through 2 lps on hook] 18 times; ch 3 for picot, [yo and draw through 2 lps on hook] twice; ch 3 for picot, [yo and draw through 2 lps on hook] 19 times – 38 Tss and 2 Tss with picots. Follow each row on chart from A to D. Working Tss forward pass as before and starting with row 8 of chart for Tss return pass, follow chart until Tss return pass of row 23 is completed, then repeat Rows 6-23 twelve times more, Rows 6-14 once and Row 2 five times more.
Last Row: Sk first vertical bar, sl st in next vertical bar and in each vertical bar across.
Fasten off. -
NARROW PANELS
(make 2 panels each with B, C and D)
With appropriate color yarn and afghan hook, ch 20.
Row 1: Insert hook in 2nd ch from hook, yo and draw up a lp; *insert hook in next ch, yo and draw up a lp; repeat from * across – 20 lps on hook. Work Tss return pass – 20 Tss.
Rows 2-5: Work Tss forward pass and return pass.
Row 6: Work Tss forward pass – 20 lps on hook. For Tss return pass: yo and draw through one lp on hook, [yo and draw through 2 lps on hook] 9 times; ch 3 to be formed into picot on forward pass of next row; [yo and draw through 2 lps on hook] 10 times – 19 Tss and 1 Tss with picot.
Row 7: Work Tss forward pass, holding ch-3 lp toward front to form picot – 20 lps on hook. For Tss return pass: yo and draw through one lp on hook, [yo and draw through 2 lps on hook] 8 times; ch 3 for picot, [yo and draw through 2 lps on hook] twice; ch 3 for picot, [yo and draw through 2 lps on hook] 9 times – 18 Tss and 2 Tss with picots. Follow each row on chart from B to C. Working Tss forward pass as before and starting with row 8 of chart for Tss return pass, follow chart until Tss return pass of row 23 is completed, then repeat rows 6-23 twelve times more, Rows 6-14 once and row 2 five times more.
Last Row: Sk first vertical bar, sl st in next vertical bar and in each vertical bar across.
Fasten off. -
PANEL BORDER
Row 1: With crochet hook and right side facing, join D with sl st in lower-right-hand corner of any panel; working across long edge, ch 1, sc in corner, sc in end st of nextrow; *long dc under 4th afghan st bar below next end st; sk end st behind long dc, sc in end st of next 3 rows; repeat from * across, ending with sc in end st of last 2 rows – 253 sts.
Fasten off.
Do not turn.
Row 2: With right side facing, join C with sl st in first sc, ch 1, sc in back lp of same sc, sc in back lp of next 2 sts; *long dc under 3rd afghan st bar below next st, sk st behind long dc, sc in back lp of next 3 sts; repeat from * across, ending with sc in back lp of last 5 sts.
Fasten off.
Do not turn.
Row 3: With right side facing, join B with sl st in first sc, ch 1, sc in back lp of same sc, sc in back lp of next 3 sts; *long dc under 2nd afghan st bar below next st, sk st behind long dc, sc in back lp of next 3 sts; repeat from * across, ending with sc in back lp of last 4 sts.
Fasten off.
Do not turn.
Row 4: With right side facing, join A with sl st in first sc, ch 1, sc in back lp of same sc, sc in back lp of next 4 sts; *long dc under first afghan st bar below next st, sk st behind long dc, sc in back lp of next 3 sts; repeat from * across.
Fasten off.
Work Rows 1-4 of Panel Border across other long edge of same panel. Work Panel Border on both long edges of each remaining panel.
Instructions for JOINING:
-
With lower edge of each panel at same end and right sides facing, join panels along long edges in following order: D, C, B, A, B, C, D. To join panels: Place first two panels side by side. Join D with sl st in lower-right-hand corner of first panel. Working loosely throughout, sl st in back lp of same st as joining; *sl st in back lp of corresponding st on second panel, sl st in back lp of next st on first panel; repeat from * across.
Fasten off.
Instructions for EDGING/FINISHING:
-
EDGING
Round 1: With crochet hook and right side facing, join D with sl st in upper-right-hand corner; working in sts of Panel Border and in end sts of rows along narrow edge; work beginning joint st, ch 1; *work joint st, ch 1; repeat from * across to next corner; work cl in corner, ch 1; repeat from * around, working joint sts in back lp of sts along Panel Border. Join with sl st in top of beginning joint st. Fasten off.
Round 2: Join C with sl st in last ch-1 sp made; work beginning cl; ch 1; *work joint st in same sp where last lp was drawn up and in next ch-1 sp; ch 1; repeat from * across to next corner, working end of last joint st in ch-1 sp before next cl; work cl in same sp where last lp was drawn up, ch 1, joint st in same sp where last lp was drawn up and in next ch-1 sp for corner, ch 1**; cl in same sp where last lp was drawn up, ch 1; repeat from * around, ending final repeat at **. Join with sl st in top of beginning cl. Fasten off.
Round 3: With B, work same as Round 2.
Round 4: With A, work same as Round 2.
FINISHING
Weave in all ends.
Up Next:
Read NextGolden Years Crochet Blanket
Your Recently Viewed Projects
Thanks for your comment. Don't forget to share!
tlm007 1887932
Dec 04, 2017
The Alaskan Blue Tunisian Blanket does not seem to have any greens in it from the picture. So what blues are they? I can't seem to locate the windsor blue color either?? Might you have used another yarn???
Daughter of Light
Nov 30, 2017
My eye always follows texture and color so this Alaskan Blue Tunisian Crochet Blanket has caught my eye aplenty! There is something soooo striking about the monochromatic color scheme and in this blue it's definitely peaceful as can be. The tunisian stitch always reminds me of weaving of which I'm very fond. I'm a little sad because I know I'm not at the intermediate level yet, but you can believe that I'll be looking forward to creating this little jewel down the way!
fromtheheart
Nov 26, 2019
I made it when I was a beginner 40 years ago. It was very easy if you have the right hooks and follow the directions. It's the only regular sized afghan I've every made. I did it in hues of browns and rust. (I was really into browns then and still love the colors although I'm thinking about doing purple) I had multiple people want me to make them one, but life happened.
Morehouse17
Oct 31, 2017
This is just beautiful. All the hues of blue really are attractive and the different "designs" in the pattern really make this special. It really looks complicated but the trick is that there are panels that are joined together. I really like this on.
edkats 9650044
Oct 22, 2017
I attempted to buy the yarn to make this pattern, however, Red Heart has stopped making the dark sage color. Do you have a suggestion for an alternative color that would blend with the country blue, light sage and Windsor blue. I really do like the blues and am not sure what color would work.
Editor Kaitlin
Oct 23, 2017
Hi edkats 9650044, I think Red Heart's Medium Thyme could work nicely instead of the dark sage. I hope that helps! --Kaitlin, AFCAP Editor
edkats 9650044
Oct 27, 2017
Thank you. Will try to make this when I finish current project that I am working on. Will let you know how I make out.
Delphine Bryant
Sep 30, 2017
This Alaskan Blue Tunisian crochet blanket sure has a LOT of texture. My Sister's favorite color was blue and she would have LOVED this. I like that this is made in panels. I call this type of project, my take along project. I do believe the nephew of my sister would love to have this. I have time to make it for Christmas.
Zeemer
Sep 22, 2017
This Alaskan Blue Tunisian Crochet Blanket does not look like it's a crochet project. It looks so intricate and elaborate with the rich Tunisian stitches used that gave so much texture to the blanket.
Cheryl Y
Jun 28, 2017
Wow, I love the look of this Alaskan Blue Tunisian Crochet Blanket! I enjoy the Tunisian crochet stitches and the way they come out is so unique looking, most people think it's knit. This will be a nice warm blanket, because the Tunisian crochet is a tight stitch. The pattern on this page is well written and easy to follow once you understand how to do the stitches. I own the Tunisian G hook already so that saves me some money, now to buy the yarn. I'm looking forward to making this one. Thank you so much for sharing this free crochet pattern.
Boo Little Kitty
Feb 07, 2017
I'm feeling brave trying this pattern. Question, the gauge, is it really 2 inches by 5 centimeters for 17 tss and 14 rows? That seems IMPOSSIBLY tiny. Help? Thanks.
KLC
Feb 07, 2017
Hi! I just checked the original pattern at Red Heart (http://www.redheart.com/free-patterns/timeless-tunisian) and they have the same gauge listed with no corrections, so I am assuming it is correct. Good luck! -Krista, Editor
Member 1861182
May 14, 2018
Hi, Im planning on making this during the summer. Did you make it using green yarn? How did it come out? I dont see any green in the photo. Thank you.
Zeemer
Jul 12, 2016
It helps a lot that the pattern is just right in front of the page for easy access to crocheters.
Zeemer
Jul 12, 2016
This looks like a very complicated project to do but for seasoned crocheters this is just another easy design for a crocheted blanket.
siouxzan1 8434588
Jun 15, 2016
This is an absolutely beautiful pattern. I was curious as to why they put sage as one of the colors because it's obviously green. Red Heart Super Saver has many blues to choose from even in the ombre category. This would be beautiful in shades of any color really - to the stitcher's preference. This is definitely going on my "to do" list!
patnew1 7237196
Apr 22, 2016
I so wish there was a video of this pattern. I would so love to make it. Still learning how to read a pattern
glows54 4219922
Mar 03, 2016
How do I print the pattern without all the ads and other non-essentials attached to the pattern. I am not fond of keeping my laptop open while I work.
shirleybzz
Feb 22, 2017
Under the name of the pattern you will see a row that says notes, print, save pattern, etc. If you click on print, it will just print the pattern without adds and other things. I usually set my printer to landscape, not portrait. It prints bigger so it is easier to read. You get more pages this way but I don't mind because I can see the pattern without my reading glasses. Hope this is helpful.
karenproof 3949744
Feb 14, 2016
Is sage the correct color. When I went to purchase the yarn the greens didn't seem to fit in with the colors
Mrs Nesbitt
Dec 18, 2015
Literally the most stunning blanket. From the color to the texture, I'm in HEAVEN!
Editor for AllFree CrochetAfghanPatte rns
Dec 07, 2015
I love the name alone. Don't even get me started on how gorgeous the pattern is!
pseaton 3631740
May 29, 2015
This one is on my list for sure. I have seen a lot of afghan patterns but this is still one of my very favorites.
kathleengm19 41442 88
Dec 27, 2014
I haven't made this "yet" but I cannot wait until I can find an empty spot in my time schedule to do so. What with twin grandsons born last May 7th, and identical twin grand daughters due to come this coming March, and raising 5 grandchildren presently, time I do not foresee a time slot coming open any time soon. But I can't wait to make it.
bullet03 6553220
Oct 11, 2013
Is this gauge correct? I cannot see how 17 stitches and 14 rows equals 2 inches. I've been trying to achieve that, and even with a size E hook I'm at about 3-4 inches. Has anyone made this? Is this gauge accurate?
dsalmans 7640036
Apr 15, 2014
Did you end up making this with a G hook? I had the same question concerning the gauge. It does not seem correct. I would love to hear how your's turned out.
Annacatharinaverke rk 3883659
Apr 09, 2016
I too have a problem with the gauge. I did the 17st/14rd and ended up with a 7cm (about3inches) square. Since I had no idea if my wool was the right weight, I figured on doing less repeats to have the blanket dimensions. Now that I have done a couple repeats, I measured again to compute how many repeats I should do and found more than the instructions ! Did you ever get an answer ?
annbridger34 16735 84
Sep 08, 2013
As you say, it's AWESOME!!!!!!! I cannot wait to start it.!!!11111111111
Report Inappropriate Comment
Are you sure you would like to report this comment? It will be flagged for our moderators to take action.
Thank you for taking the time to improve the content on our site.