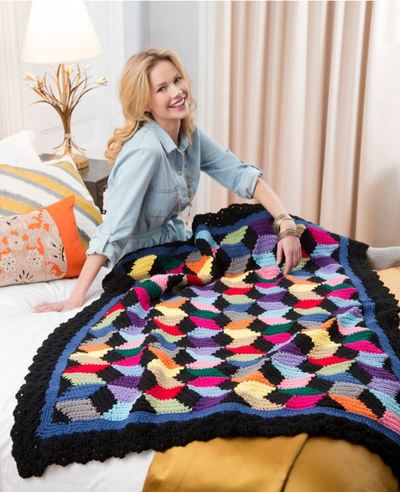
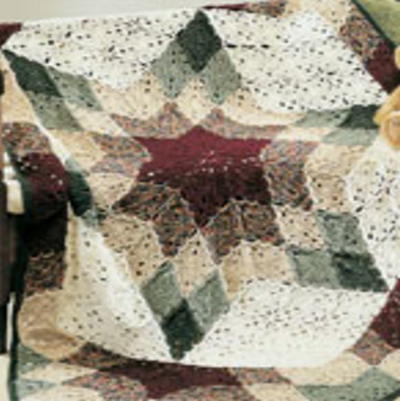
Plaid Planned Pooling Blanket

This stunning Plaid Planned Pooling Blanket pattern will be your new favorite pattern to work up and will add a flavor burst to any couch or bed. The decadent colors weave together seamlessly, yet retain their integrity, and the bold edging creates a polished look to the design. Hook this planned pooling blanket in Red Heart's Super Saver Pooling colors to make crafting this look super easy. A variety of color schemes accommodate any season or decor, so regardless of the weather outside, you can take a dip in this pooling blanket all throughout the year.

Crochet HookH/8 or 5 mm hook
Yarn Weight(4) Medium Weight/Worsted Weight and Aran (16-20 stitches to 4 inches)
Crochet Gauge3 full sc sts per each length of one color in Moss st. CHECK YOUR GAUGE. Use any size hook to obtain the gauge.
Finished SizeBlanket measures 39 x 42" (99 x 106.5 cm) not including edging, or 42 x 45" (106.5 x 114.5 cm) including edging.
Materials List
- RED HEART® Super Saver Pooling®: 6 skeins 8536 Papaya Pooling A
- RED HEART® Super Saver®: 1 skein 705 Grenadine B
- Extra hooks in neighboring sizes (see notes)
- Yarn needle
INSTRUCTIONS
NOTES:
1. It is highly recommended that you watch Marly Bird’s tutorial video on planned color pooling before beginning this project.
2. You may have to tighten or loosen some stitches as you go in order to keep the color pooling intact. Keep a variety of hook sizes on hand to help resize your stitches.
3. The last sc of Row 3 and the first sc of Row 4 may have to be replaced with hdc sts in order to keep the pooling intact. You may or may not have to do this; keep an eye on the color alignment to decide.
4. This yarn has been specially designed to get 3 sc in each color in the sequence when worked in Moss st.
5. Each color length, or 3 repeats, should measure about 1½" (4 cm) across in Moss st. However, it is more important that you follow the per-color gauge than the per-inch gauge.
6. Your blanket may turn out to be a different width depending on the number of colors in your colorway. Find how many colors are in the sequence YOU are using, and maintain 3 sc per color for perfect results.
7. When instructed to work into the “camel st,” work into the strand just below the back loop, or the 3rd loop, of the st.
MOSS STITCH
-
Ch an even number of sts.
Row 1: Skip 3 ch, sc in next ch, * ch 1, skip 1 foundation ch, sc in next ch; repeat from * to end, turn. -
Row 2: Ch 2 (counts as a st now and throughout), sc in next ch-1 space, * ch 1, sc in next ch-1 space; repeat from * to end finishing with a sc in last ch-3 space, turn.
-
Row 3: Ch 2 (counts as a st now and throughout), sc in next ch-1 space, * ch 1, sc in next ch-1 space; repeat from * to end finishing with a sc in last ch-2 space, turn.
Repeat Row 3 only for Moss st.
BLANKET
With A, ch for at least 42" (106.5 cm), with the last loop on hook being the first loop of a new color just after a color change in the yarn.
-
Row 1 (right side): Skip 3 ch (counts as a st), sc in the 4th ch from hook, * ch 1, sc around the foundation ch (instead of going into a ch st); repeat from * until 5 full color sequences have been completed. The number of sc made in each individual color in the colorway should be 3. Leave remaining ch sts unworked. Undo one st repeat (sc, ch 1), turn.
Note: If at this point you are NOT getting 3 sc per color, then redo the row with a different hook size. Getting 3 sc per color with this yarn is essential to making this technique work. -
Row 2 (wrong side): Ch 2 (counts as a st now and throughout), sc in next ch-1 space, * ch 1, sc in next ch-1 space; repeat from * to end finishing with a sc in last ch-3 space, turn.
Note: As you work this row and all remaining rows, you MUST get the correct number of sc in each color in order to maintain the planned color pooling. Change hook sizes, or actual st used, to get the correct color in place. -
Row 3 (right side): Ch 2 (counts as a st now and throughout), sc in next ch-1 space, * ch 1, sc in the next ch-1 space; repeat from * to end, finishing with a sc in last ch-2 space, turn.
Note: The color of the sts on this row will shift to the left or right by 1 st from the previous right side row depending on the colorway and if you are right or left handed. It doesn’t matter which direction the st shifts as long as it is offset by 1. -
Row 4 (wrong side): Ch 2 (counts as a st now and throughout), sc in next ch-1 space, * ch 1, sc in the next ch-1 space; repeat from * to end, finishing with a sc in last ch-2 space, turn.
Note: The color of the sts on this row will shift to the left or right by 1 st from the previous wrong side row depending on the colorway and if you are right or left handed. It doesn’t matter which direction the st shifts as long as it is offset by 1.
Repeat Rows 3 and 4 until 5 full color repeats have been completed lengthwise, ending on a Row 4 (wrong side row).
Fasten off.
FINISHING
Squish or stretch the sts on foundation chain to match the width of the rest of the Blanket. You can slide the sts around along the foundation chain, as with an adjustable ring. Unravel unused foundation ch sts and weave in yarn tail to secure foundation.
-
Edging
With right side facing, join B with slip st in foundation ch st under last sc of Row 1, being ready to work across foundation edge. -
Round 1 (right side): Ch 1, hdc evenly around, working 3 hdc in each corner st or space; join with slip st in first hdc.
-
Rounds 2 – 6: Ch 2, dc in camel st of each st around, working 3 dc in camel st of each corner st, join with slip st in first dc.
-
Fasten off. Weave in all loose ends.
Plaid Planned Pooling Blanket Schematic
Your Recently Viewed Projects
Thanks for your comment. Don't forget to share!
Delphine Bryant
Oct 06, 2018
As I search the never ending "pages" of All Free Crochet, from time to time I will come across something new. This is my something new for this week and I am totally fascinated by it. As usual I went to the site to purchase some material. I can not wait until it is delivered so that I can attempt this new to me technique.
Morehouse17
Sep 25, 2018
Perfectly beautiful. I have been seeing this "pooling" technique and I just think it is amazing. I did get the chance to view the suggested video and I am still a little intimidated but I am sure that if I really put my mind to it I can create a beautiful piece of work like this.
Jayayay
Aug 02, 2018
Oh my gosh, I am making this asap! Looks so professional, but the yarn does the work for you! Maybe this one for the baby shower...
Report Inappropriate Comment
Are you sure you would like to report this comment? It will be flagged for our moderators to take action.
Thank you for taking the time to improve the content on our site.