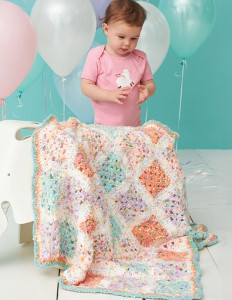
Kiddie Flower Afghan

The bright colors of this flower crochet blanket pattern will appeal to little girls and little boys alike. Learn how to crochet a bold and beautiful afghan that's perfect for spring. This tutorial, which was created with intermediate crocheters in mind, teaches you how to make two flower motifs of varying sizes. The different flower designs add interest to this Kiddie Flower Afghan. Girly girls will want a pink and purple crochet afghan, but you can alter this pattern to accommodate your little guy's color preferences, too.

Crochet HookK/10.5 or 6.5 mm hook
Yarn Weight(4) Medium Weight/Worsted Weight and Aran (16-20 stitches to 4 inches)
Materials:
- RED HEART® "Super Saver®"
- 1 Skein 722 Pretty ‘n Pink (A)
- 1 Skein 672 Spring Green (B)
- 2 Skeins 324 Bright Yellow (C)
- 3 Skeins 385 Royal (D)
- Crochet Hooks: 6.5mm [US K-10.5] and 5.5mm [US I-9].
- Yarn needle.
Diagram
Size: 54" x 54"
Gauge: Motif = 6" across with larger hook
Instructions:
Note: After the first motif, all others are joined while working Joining Rnd 3.
Main Flower (32 A, 40 C, and 9 B)
With larger hook, ch 5; join with a slip st to form a ring.
Rnd 1: Ch 3, 15 dc in ring; join with a slip st in top of ch-3 – 16 sts.
Rnd 2: Ch 4, holding back last loop on hook, tr in same st as joining, holding back last loop on hook, 2 tr in next dc, yo and draw through all 4 loops on hook – beginning cl (cluster) made; ch 5, * holding back last loop on hook, 2 tr in each of next 2 dc, yo and draw through all 4 loops on hook – cl (cluster) made, ch 5; repeat from * around; join with a slip st in top of beginning cl – 8 petals. Fasten off.
Make all the Flowers, then work Rnd 3, joining them together following the diagram.
Rnd 3 (First motif only): With right side facing and larger hook, join D in any ch-5 space; ch 3, (3 dc, ch 2, 4 dc) all in same space, * (4 dc, ch 2, 4 dc) all in next ch-5 space; repeat from * around; join in top of ch-3. Fasten off.
Joining Rnd 3: With right side facing and larger hook, join D in any ch-5 space; ch 3, (3 dc, ch 2, 4 dc) all in same space; 4 dc in next ch-5 space, ch 1, slip st in corresponding ch-2 space of adjoining motif, ch 1, 4 dc in same ch-5 space, slip st between two 4-dc groups of adjoining motif, 4 dc in next ch-5 space, ch 1, slip st in corresponding ch-2 space of adjoining motif, ch 1, 4 dc in same ch-5 space – one side joined; * (4 dc, ch 2, 4 dc) all in next ch-5 space; repeat from * around; join in top of ch-3. Fasten off.
Tip: When joining more than 1 side, work in same manner, joining "corner" ch-2 spaces and slip stitching between two 4-dc groups as before.
Secondary Flowers
Note: intersection = the space between two 4-dc groups or the slip st of a previous joining.
Work four flowers with B around each center B flower as follows:
With larger hook, ch 5; join with a slip st to form a ring.
Joining Rnd 1: With right side facing, ch 3, dc in ring, ch 2, slip st in any intersection, ch 2, * 2 dc in ring, ch 2, slip st in next intersection, ch 2; repeat from * around; join in top of ch-3. Fasten off.
Work a flower with D in each of the remaining spaces between motifs as follows:
With larger hook, ch 5; join with a slip st to form a ring.
Joining Rnd 1: With right side facing, ch 4, slip st in any intersection, ch 4, * sc in ring, ch 4, slip st in next intersection, ch 4; repeat from * around; join with a slip st in ring. Fasten off.
Border
Rnd 1: With right side facing and smaller hook, join C in back loop of any dc at outer edge; ch 1, working in back loops only, slip st in each st around taking care not to pull yarn too tightly; join with a slip st in ch-1.
Rnd 2: Ch 1, slip st in back loops only of each st around; join. Fasten off. Weave in ends.
Your Recently Viewed Projects
Thanks for your comment. Don't forget to share!
Report Inappropriate Comment
Are you sure you would like to report this comment? It will be flagged for our moderators to take action.
Thank you for taking the time to improve the content on our site.