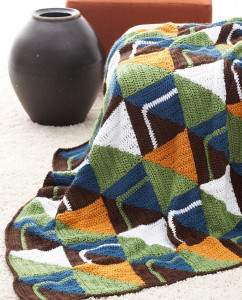
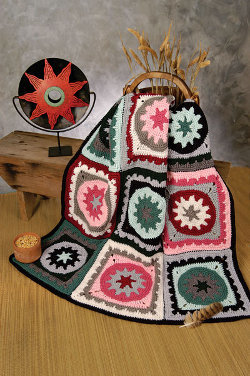
Woodsy Chic Triangle Lapghan
Get a taste of the outdoors with this amazing Woodsy Chic Triangle Lapghan. This free crochet pattern is a spiral of geometric shapes that gives a modern flair to a rustic color palette. You only need to pick out two multi-colored yarns to get this amazing array of shades, which means you won't have many ends to weave in! When it comes to easy crochet patterns, this outdoor chic lapghan is the most creative.

Crochet HookJ/10 or 6 mm hook
Yarn Weight(4) Medium Weight/Worsted Weight and Aran (16-20 stitches to 4 inches)
Materials:
- RED HEART® Boutique Treasure™: 4 balls each 1918 Abstract A, and 1907 Portrait B
- Crochet hook: 6mm [US J-10]
- Yarn needle
Size: Lapghan measures 40” (101.5 cm) square
Gauge: 12 sts = 4” (10 cm); 12 rows = 4” (10 cm) over Center Squares in single crochet, after blocking. CHECK YOUR GAUGE. Use any size hook to obtain the gauge.
Abbreviations: A and B = Color A and Color B; sc = single crochet; st(s) = stitch (es); yo = yarn over; [ ] = work directions in brackets the number of times specified.
Special Stitches: Fsc (foundation single crochet) = First st: Ch 2, insert hook under top 2 strands of first ch, yo, draw up a loop, yo, draw through 1 loop, yo, draw through both loops (first Fsc complete). Remaining sts: Insert hook under both loops of previous st, yo, draw up a loop, yo, draw through 1 loop, yo, draw through both loops. sc2tog = [Insert hook in next stitch, yarn over and pull up a loop] twice, yarn over and draw through all 3 loops on hook. sc3tog = [Insert hook in next stitch, yarn over and pull up a loop] 3 times, yarn over and draw through all 4 loops on hook.
Notes:
- Lapghan is worked from the center outwards, beginning with the Center Squares.
- A large center square is worked, changing color to give the appearance of four squares.
- Rounds of Triangles are then worked around the Center Squares.
- T o change color, work last stitch of old color to last yarn over. Yarn over with new color and draw through all loops on hook to complete stitch. Proceed with new color.
INSTRUCTIONS:
Center Squares:
Row 1 (right side): With A , Fsc 10; with B , Fsc 10—20 sts, turn. Row 2: With B , ch 1, sc in first 10 sts; with A , sc in last 10 sts, turn. Row 3: With A , ch 1, sc in first 10 sts; with B , sc in last 10 sts, turn. Row 4: Repeat Row 2. Rows 5–10: Repeat last 2 rows 3 more times. Fasten off both yarns. Row 11: With right side facing, join B with sc in first st of last row, sc in next 9 sts; with A , sc in last 10 sts. Row 12: Repeat Row 3. Row 13: Repeat Row 2. Rows 14-19: Repeat last 2 rows 3 more times. Row 20: Repeat Row 3. Fasten off A . Do not fasten off B .
FIRST ROUND OF TRIANGLES:
Note: Each Triangle of the First Round is worked beginning across one side edge of each of the Center Squares.
First Triangle
Row 1 (right side): With B , sc in each st across, turn—20 sts.
Rows 2–10: Ch 1, sc2tog, sc in each st to last 2 sts, sc2tog, turn—2 sts.
Row 11: Ch 1, sc2tog—1 st. Fasten off.
Second Triangle
Row 1 (right side): With right side facing and A , work 20 sc evenly spaced across next edge of Center Squares (to the left of the First Triangle)—20 sts.
Rows 2–11: Work same as Rows 2–11 of First Triangle. Fasten off.
Third Triangle
Row 1 (right side): With right side facing and B , work 20 sc evenly spaced across next edge of Center Squares (to the left of the Second Triangle)—20 sts.
Rows 2–11: Work same as Rows 2–11 of First Triangle. Fasten off.
Fourth Triangle
Work same as Second Triangle across remaining edge of Center Squares. Do not fasten off.
SECOND ROUND OF TRIANGLES:
Note: Each Triangle of the Second Round is worked beginning across one side edge of each of two Triangles of the First Round.
First Triangle
Row 1 (right side): With A , ch 1, work 15 sc evenly spaced across side edge of Fourth Triangle, sc in space between Fourth and First Triangle, work 15 sc evenly spaced across side edge of First Triangle, turn—31 sts.
Rows 2–15: Ch 1, sc2tog, sc in each st to last 2 sts, sc2tog, turn—3 sts.
Row 16: Ch 1, sc3tog—1 st. Fasten off.
Second Triangle
Row 1 (right side): With right side facing and B , ch 1, work 15 sc evenly spaced across next side edge of First Triangle, sc in space between First and Second Triangles, work 15 sc evenly spaced across side edge of Second Triangle—31 sts.
Rows 2–16: Work same as Rows 2–16 of First Triangle. Fasten off.
Third Triangle
Row 1 (right side): With right side facing and A , ch 1, work 15 sc evenly spaced across next side edge of Second Triangle, sc in space between Second and Third Triangles, work 15 sc evenly spaced across side edge of Third Triangle—31 sts.
Rows 2–16: Work same as Rows 2–16 of First Triangle. Fasten off.
Fourth Triangle
Row 1 (right side): With right side facing and B , ch 1, work 15 sc evenly spaced across next side edge of Third Triangle, sc in space between Third and Fourth Triangles, work 15 sc evenly spaced across remaining side edge of Fourth Triangle—31 sts.
Rows 2–16: Work same as Rows 2–16 of First Triangle. Do not fasten off.
THIRD ROUND OF TRIANGLES:
Note: Each Triangle of the Third Round is worked beginning across one side edge of each of two Triangles of the Second Round.
First Triangle
Row 1 (right side): With B , ch 1, work 20 sc evenly spaced across side edge of Fourth Triangle, sc in space between Fourth and First Triangle, work 20 sc evenly spaced across side edge of First Triangle, turn—41 sts.
Rows 2–20: Ch 1, sc2tog, sc in each st to last 2 sts, sc2tog, turn—3 sts.
Row 21: Ch 1, sc3tog—1 st. Fasten off.
Second Triangle
Row 1 (right side): With right side facing and A , ch 1, work 20 sc evenly spaced across next side edge of First Triangle, sc in space between First and Second Triangles, work 20 sc evenly spaced across side edge of Second Triangle—41 sts.
Rows 2–21: Work same as Rows 2–21 of First Triangle. Fasten off.
Third Triangle
Row 1 (right side): With right side facing and B , ch 1, work 20 sc evenly spaced across next side edge of Second Triangle, sc in space between Second and Third Triangles, work 20 sc evenly spaced across side edge of Third Triangle—41 sts.
Rows 2–21: Work same as Rows 2–21 of First Triangle. Fasten off.
Fourth Triangle
Row 1 (right side): With right side facing and A , ch 1, work 20 sc evenly spaced across next side edge of Third Triangle, sc in space between Third and Fourth Triangles, work 20 sc evenly spaced across remaining side edge of Fourth Triangle—41 sts.
Rows 2–21: Work same as Rows 2–21 of First Triangle. Do not fasten off.
FOURTH ROUND OF TRIANGLES:
Note: Each Triangle of the Fourth Round is worked beginning across one side edge of each of two Triangles of the Third Round.
First Triangle
Row 1 (right side): With A , ch 1, work 25 sc evenly spaced across side edge of Fourth Triangle, sc in space between Fourth and First Triangle, work 25 sc evenly spaced across side edge of First Triangle, turn—51 sts.
Rows 2–25: Ch 1, sc2tog, sc in each st to last 2 sts, sc2tog, turn—3 sts.
Row 26: Ch 1, sc3tog—1 st. Fasten off.
Second Triangle
Row 1 (right side): With right side facing and B , ch 1, work 25 sc evenly spaced across next side edge of First Triangle, sc in space between First and Second Triangles, work 25 sc evenly spaced across side edge of Second Triangle—51 sts.
Rows 2–26: Work same as Rows 2–26 of First Triangle. Fasten off.
Third Triangle
Row 1 (right side): With right side facing and A , ch 1, work 25 sc evenly spaced across next side edge of Second Triangle, sc in space between Second and Third Triangles, work 25 sc evenly spaced across side edge of Third Triangle—51 sts.
Rows 2–26: Work same as Rows 2–26 of First Triangle. Fasten off.
Fourth Triangle
Row 1 (right side): With right side facing and B , ch 1, work 25 sc evenly spaced across next side edge of Third Triangle, sc in space between Third and Fourth Triangles, work 25 sc evenly spaced across remaining side edge of Fourth Triangle—51 sts.
Rows 2–26: Work same as Rows 2–26 of First Triangle. Do not fasten off.
FIFTH ROUND OF TRIANGLES:
Note: Each Triangle of the Fifth Round is worked beginning across one side edge of each of two Triangles of the Fourth Round.
First Triangle
Row 1 (right side): With B , ch 1, work 30 sc evenly spaced across side edge of Fourth Triangle, sc in space between Fourth and First Triangle, work 30 sc evenly spaced across side edge of First Triangle, turn—61 sts.
Rows 2–30: Ch 1, sc2tog, sc in each st to last 2 sts, sc2tog, turn—3 sts.
Row 31: Ch 1, sc3tog—1 st. Fasten off.
Second Triangle
Row 1 (right side): With right side facing and A , ch 1, work 30 sc evenly spaced across next side edge of First Triangle, sc in space between First and Second Triangles, work 30 sc evenly spaced across side edge of Second Triangle—61 sts.
Rows 2–31: Work same as Rows 2–31 of First Triangle. Fasten off.
Third Triangle
Row 1 (right side): With right side facing and B , ch 1, work 30 sc evenly spaced across next side edge of Second Triangle, sc in space between Second and Third Triangles, work 30 sc evenly spaced across side edge of Third Triangle—61 sts.
Rows 2–31: Work same as Rows 2–31 of First Triangle. Fasten off.
Fourth Triangle
Row 1 (right side): With right side facing and A , ch 1, work 30 sc evenly spaced across next side edge of Third Triangle, sc in space between Third and Fourth Triangles, work 30 sc evenly spaced across remaining side edge of Fourth Triangle—61 sts.
Rows 2–31: Work same as Rows 2–31 of First Triangle. Do not fasten off.
SIXTH ROUND OF TRIANGLES:
Note: Each Triangle of the Sixth Round is worked beginning across one side edge of each of two Triangles of the Fifth Round.
First Triangle
Row 1 (right side): With A , ch 1, work 35 sc evenly spaced across side edge of Fourth Triangle, sc in space between Fourth and First Triangle, work 35 sc evenly spaced across side edge of First Triangle, turn—71 sts.
Rows 2–35: Ch 1, sc2tog, sc in each st to last 2 sts, sc2tog, turn—3 sts. Row 36: Ch 1, sc3tog—1 st. Fasten off.
Second Triangle
Row 1 (right side): With right side facing and B , ch 1, work 35 sc evenly spaced across next side edge of First Triangle, sc in space between First and Second Triangles, work 35 sc evenly spaced across side edge of Second Triangle—71 sts.
Rows 2–36: Work same as Rows 2–36 of First Triangle. Fasten off.
Third Triangle
Row 1 (right side): With right side facing and A , ch 1, work 35 sc evenly spaced across next side edge of Second Triangle, sc in space between Second and Third Triangles, work 35 sc evenly spaced across side edge of Third Triangle—71 sts.
Rows 2–36: Work same as Rows 2–36 of First Triangle. Fasten off.
Fourth Triangle
Row 1 (right side): With right side facing and B , ch 1, work 35 sc evenly spaced across next side edge of Third Triangle, sc in space between Third and Fourth Triangles, work 35 sc evenly spaced across remaining side edge of Fourth Triangle—71 sts.
Rows 2–36: Work same as Rows 2–36 of First Triangle. Fasten off.
FINISHING: Weave in ends.
Read NextTiki Sunset Lapghan
Your Recently Viewed Projects
Thanks for your comment. Don't forget to share!
Cheryl Y
May 16, 2018
I have passed over this pattern a few times thinking all the triangles are made then put together. Today I stopped and read the written pattern and to my surprise it is all crocheted together. Lesson learned, don't just go by a picture to decide if you would like the pattern or not. LOL Well after reading this Woodsy Chic Triangle Lapghan pattern I'm going to be making one forsure. I hope the bugs have been worked out and that it comes out as sweet looking as pictured. I'll follow the written pattern ans hope it come out.. Thank you for giving me another chance to see this great crochet pattern.
Zeemer
Apr 23, 2016
Reminds me of camping in the woods. This is perfect for making you warm on those cold camp nights. Perfect for snuggling and having a sip of hot coffee. Pattern is on the same page.
lauriejenkins 1561 777
Jan 02, 2016
I've made this blanket twice. The first time I followed the pattern using the recommended yarn. It turned out beautifully. I then made it again using Lion Brand Tweed Stripes yarn in Woodland and Ozark Forest - I love that blanket even more. I gave it to a man who lives and works in our neighborhood doing odd jobs - he loves it.
spazlapaz 3482971
Feb 02, 2015
I followed this pattern using Red Heart Baby Soft yarn which is heavier than the yarn used in this pattern. My blanket bunches up and the edges rolled terribly. The problem is that as the triangles get larger, more stitches are needed to ensure they will lay flat. It's a cute baby blanket, but I'm not 100% pleased with the results.
Report Inappropriate Comment
Are you sure you would like to report this comment? It will be flagged for our moderators to take action.
Thank you for taking the time to improve the content on our site.