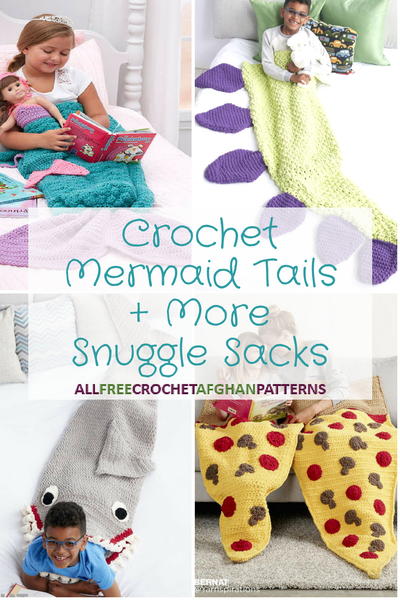
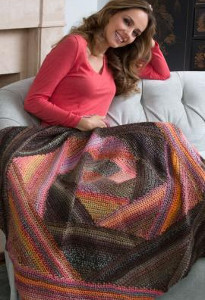
Sweet Dreams Snuggle Sack

Crochet snuggle sacks are becoming increasingly popular, so make sure to work up this delightfully sweet Sweet Dreams Snuggle Sack pattern for your little one. Perfect for ages 4-8, this kiddie-sized crochet blanket pattern features a waffle cone and two scoops of ice cream. Choose from a variety of colors or "flavors" for your ice cream and give your child a sweet surprise for their birthday or for Christmas. If they've been extra good, maybe you can even add a third scoop on top!
Note: Thanks to user Tammy Parmer for her winning suggestion of the name "Sweet Dreams Snuggle Sack" - we love it!
NotesNote: Ch 3 at beg of rows counts as dc throughout. The pattern chart is included at the end of the first section for your reference.

Crochet HookL/11 or 8 mm hook
Yarn Weight(5) Bulky/Chunky (12-15 stitches for 4 inches)
Crochet Gauge7 sc and 8 rows = 4" [10 cm]. 8½ sts and 4 rows = 4" [10 cm] in Waffle St Pat
Finished SizeApprox 26" [66 cm] wide x 62" [157.5 cm] long. To fit Chid ages 4 to 8 years
Materials List
- Bernat® Baby Blanket™ (10.5 oz/300 g; 220 yds/201 m) Contrast A Baby Sand (04010) 4 balls or 705 yds/645 m
- Bernat® Baby Blanket™ (3.5 oz/100 g; 72 yds/65 m): Contrast B Seafoam (03736) 6 balls or 387 yds/354 m; Contrast C Baby Pink (03200) 6 balls or 387 yds/354 m
- Size U.S. L/11 (8 mm) crochet hook or size needed to obtain gauge
- 3 stitch markers
Cone
Make 2 pieces alike
-
With A, ch 29.
1st row: (WS). 1 dc in 4th ch from hook (skipped ch-3 counts as dc). 1 dc in each ch to end of chain. 27 dc. Turn.
2nd row: (RS). Ch 3. 1 dc in first dc (counts as 2 dc). Dcfp around next dc. *1 dc in each of next 2 dc. 1 dcfp around next dc. Rep from * to last st. 2 dc in top of ch 3. 29 sts. Turn.
3rd row: Ch 3. 1 dc in each of next 2 dc. *Dcfp around each of next 2 dc. 1 dc in next dcfp. Rep from * to last 2 sts. 1 dc in each next dc. 1 dc in top of ch 3. Turn.
4th row: Ch 3. 1 dc in first dc (counts as 2 dc). 1 dc in next dc. 1 dcfp around next dc. *1 dc in each of next 2 dcfp. 1 dcfp around next dc. Rep from * to last 2 sts. 1 dc in next dc. 2 dc in top of ch 3. 31 sts. Turn.
5th row: Ch 3. 1 dcfp around each of next 2 dc. *1 dc in next dcfp. 1 dcfp around each of next 2 dc. Rep from * to last st. 1 dc in top of ch 3. Turn.
6th row: Ch 3. 1 dc in first dc (counts as 2 dc). 1 dc in each of next 2 dcfp. *1 dcfp around next dc. 1 dc in each of next 2 dcfp. Rep from * to last st. 2 dc in top of ch 3. 33 sts. Turn.
7th row: Ch 3. 1 dc in next dc. 1 dcfp around each of next 2 dc. *1 dc in next dcfp. 1 dcfp around each of next 2 dc. Rep from * to last 2 sts. 1 dc in next dc. 1 dc in top of ch 3. Turn.
Rep 2nd to 7th rows twice more, then 2nd to 6th rows once. 51 sts.
Next row: (WS). Ch 3. 1 dcfp around next st. 1 dcfp around each st to end of row. Place marker at end of row. Turn.
Next row: (RS). Ch 2 (counts as hdc). 2 hdc in first st. 1 hdc in each st to last st. 3 hdc in top of ch 3. 55 hdc. Turn.
Next row: Ch 2 (counts as hdc). 1 hdc in each hdc to end of row. Turn. Rep last row until work from marked row measures approx 11" [28 cm], ending on a WS row. Fasten off.
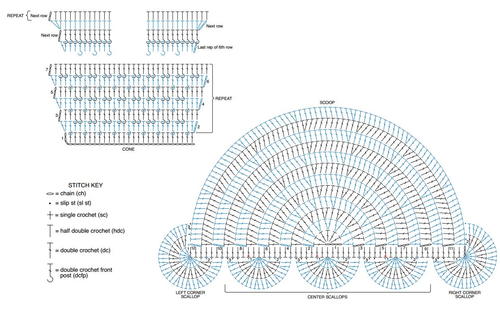
Scoop
Make 4 total – 2 each in B and C
-
Ch 4.
1st row: 6 dc in 4th ch from hook (skipped ch-3 counts as dc). 7 dc. Turn.
2nd row: Ch 3. 1 dc in first dc (counts as 2 dc). 2 dc in each dc to end of row. 14 dc. Turn.
3rd row: Ch 3. 2 dc in next dc. *1 dc in next dc. 2 dc in next dc. Rep from * to end of row. 21 dc. Turn.
4th row: Ch 3. 1 dc in next dc. 2 dc in next dc. *1 dc in each of next 2 dc. 2 dc in next dc. Rep from * to end of row. 28 dc. Turn.
5th row: Ch 3. 1 dc in each of next 2 dc. 2 dc in next dc. *1 dc in each of next 3 dc. 2 dc in next dc. Rep from * to end of row. 35 dc. Turn.
6th row: Ch 3. 1 dc in each of next 3 dc. 2 dc in next dc. *1 dc in each of next 4 dc. 2 dc in next dc. Rep from * to end of row. 42 dc. Turn.
7th row: Ch 3. 1 dc in each of next 4 dc. 2 dc in next dc. *1 dc in each of next 5 dc. 2 dc in next dc. Rep from * to end of row. 49 dc. Turn.
8th row: Ch 3. 1 dc in each of next 5 dc. 2 dc in next dc. *1 dc in each of next 6 dc. 2 dc in next dc. Rep from * to end of row. 56 dc. Turn.
9th row: Ch 3. 1 dc in each of next 6 dc. 2 dc in next dc. *1 dc in each of next 7 dc. 2 dc in next dc. Rep from * to end of row. 63 dc. Turn.
10th row: Ch 3. 1 dc in each of next 7 dc. 2 dc in next dc. *1 dc in each of next 8 dc. 2 dc in next dc. Rep from * to end of row. 70 dc. Turn.
11th row: Ch 3. 1 dc in each of next 8 dc. 2 dc in next dc. *1 dc in each of next 9 dc. 2 dc in next dc. Rep from * to end of row. 77 dc. Turn.
12th row: Ch 3. 1 dc in each of next 9 dc. 2 dc in next dc. *1 dc in each of next 10 dc. 2 dc in next dc. Rep from * to end of row. 84 dc. Do not turn.
Bottom Edge row: Cont across bottom edge of Scoop (flat edge), ch 3 (counts as dc). Work 52 dc evenly across bottom edge. 53 dc. Fasten off.
Place markers on 16th, 29th and 42nd sts of Bottom Edge row.
Scallop Edge
-
Left Corner Scallop: With RS facing, join yarn with sl st to last st of 12th row (before bottom edge).
1st row: 11 dc in top of ch-3 at beg of Bottom Edge row. Sl st in 3rd dc of Bottom edge row. Sl st in next 2 sts of Bottom Edge row. Turn.
2nd row: Working into Left Corner Scallop, 2 dc in first dc. *2 dc in next dc. Rep from * to end of row. 22 dc. Sl st in 12th row, 2 dc up from previous sl st. Sl st in each of next 2 dc up from last sl st. Turn.
3rd row: Working into Left Corner Scallop, 2 dc in first dc. 1 dc in next dc. *2 dc in next dc. 1 dc in next 2 dc. Rep from * to end of row. 33 dc. Sl st in 7th dc Bottom Edge row. Fasten off. -
Right Corner Scallop: With RS facing, join yarn with sl st to 3rd last st of Bottom Edge Row.
1st row: Skip next dc. 11 dc in last dc of Bottom Edge row. Sl st in 2nd dc of 12th row. Sl st in each of next 2 sts of 12th row. Turn.
2nd row: Working into Right Corner Scallop, 2 dc in first dc. *2 dc in next dc. Rep from * to end of row. 22 dc. Sl st in Bottom Edge row, 2 dc to the left from previous sl st. Sl st in each of next 2 dc to the left of last sl st. Turn.
3rd row: Working into Right Corner Scallop, 2 dc in first dc. 1 dc in next dc. *2 dc in next dc. 1 dc in next dc. Rep from * to end of row. 33 dc. Sl st in 6th dc of 12th row. Fasten off. -
Center Scallops: With RS facing, join yarn with sl st to first marked st at Bottom Edge row.
1st row: Skip next st. 7 dc in next st. Skip next st. Slip st in each of next 3 sts. Turn.
2nd row: Working into Center Scallop, 2 dc in each dc to end of row. Working into Bottom edge row, sl st in 2nd dc to the left of marked st. Sl st in each of next 2 sts to left of last sl st. 14 dc. Turn.
3rd row: Working into Center Scallop, 2 dc in first dc. 1 dc in next dc. *2 dc in next dc. 1 dc in next dc. Rep from * to end of row.
Working into Bottom Edge row, skip next st. Sl st in next st. 21 dc. Fasten off. Rep for 2nd and 3rd marked sts along Bottom Edge row.
Finishing
Sew Bottom Edge Row of one C Scoop to top edge of one Cone, allowing Scallops to overhang Cone. Sew B Scoop to top of C Scoop, overlapping approx 6" [15 cm]. Rep for 2nd Cone and 2nd B and C Scoops.
With WS facing each other, sew sides and bottom of Cone together leaving top B Scoops open. Sew Scallop edges to secure.
Read NextAncient Mariner Wheel Stitch Lapghan
Your Recently Viewed Projects
Thanks for your comment. Don't forget to share!
Zeemer
Oct 29, 2018
OMG. This is so beautiful. My first time to see this kind of sack. I would always see the mermaid tail and other animal sack but this one is really so sweet. Perfect for my granddaughter. She will definitely like this.
Cheryl Y
Sep 29, 2016
I would call this pattern "Ice cream dreams". And I need to say this pattern is a dream to create! After reading this written pattern is sound so easy and quick to make with the bulky yarns. I will be making one or two of these beauties. Looking forward to seeing the winning name. Thank you so much for sharing this free crochet pattern.
sgpnbama 3122013
Sep 26, 2016
My 5 year-old Granddaughter would be so happy to have a Snuggle Sack like this one. I would call this pattern"Sweet Dreams from Granny Crochet Cuddle Sack."
jamaynard1969 0419 954
Sep 20, 2016
Sweet love, two scoops of love, two scoops of warmth, sugar and spice cuddle sack
cattybee
Sep 19, 2016
I'd call it "Two Scoops of Cozy" -) Only rated as a 4 so far since I haven't actually made it yet.... the pattern has been saved to my TBC (To Be Crocheted) file for when I finish the other 8 or 9 projects I have going at the moment.
Report Inappropriate Comment
Are you sure you would like to report this comment? It will be flagged for our moderators to take action.
Thank you for taking the time to improve the content on our site.