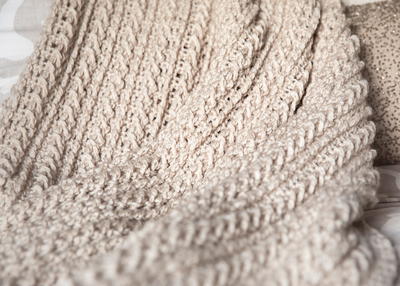
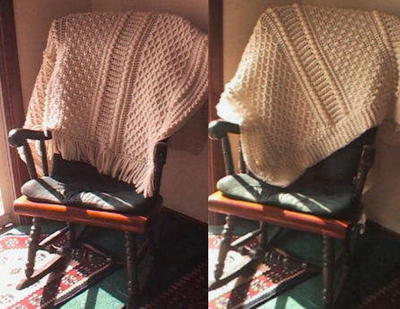
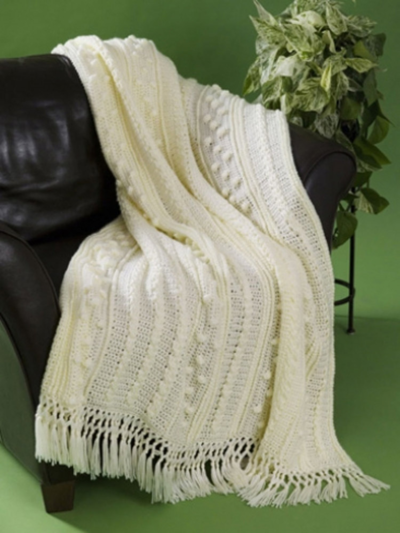
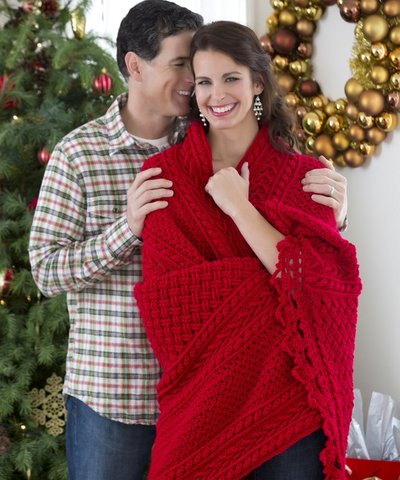
Eugene Throw

The Eugene Throw is an intermediate crochet pattern that is worth the effort. This afghan has a cable-like effect and it's perfect for tea time in your favorite chair. Using the front post double crochet stitch you'll be able to crochet this afghan and broaden your crocheting skills.

Crochet HookJ/10 or 6 mm hook
Yarn Weight(4) Medium Weight/Worsted Weight and Aran (16-20 stitches to 4 inches)
YARN
Naturally Caron.com Country patterns can be made with Caron Simply Soft
75% Microdenier acrylic, 25% Merino wool; 3oz/100 g, 185 yds/170 m ball): 36 oz.
Shown in: #0017 Claret
One size US J-10 (6mm) crochet hook, or size to obtain gauge.
Yarn needle
FINISHED MEASUREMENTS: Throw measures approximately 40"/101.5 cm wide x 55"/139.5 cm long.
GAUGE: 13 sc and 14 rows = 4"/10cm.
STITCHES USED Chain (ch), single crochet (sc), slip stitch (sl st).
SPECIAL TERMS
FP-Cl: Front-post cluster—Yarn over, insert hook from front to back and then to front again around post of stitch, yarn over and draw up loop, yarn over and draw through 2 loops on hook (2 loops on hook), [yarn over, insert hook from front to back and then to front again around post of same stitch, yarn over and draw up loop, yarn over and draw through 2 loops on hook] twice, yarn over and draw through all loops on hook, chain 1.
FPdc: Front-post double crochet—Yarn over, insert hook from front to back and then to front again around post of stitch, yarn over and draw up loop, [yarn over and draw through 2 loops on hook] twice.
Cross-Over: Skip next 2 FPdc 2 rows below, FPdc around next FPdc 2 rows below; working in front of the FPdc just made, FPdc around 2nd skipped FPdc, FPdc around first skipped FPdc.
NOTES
1. When working FPdc, be sure to draw first loop up to height of working row, to avoid puckering the fabric.
2. The FPdc are worked around the post of FPdc 2 rows below the current row, except in Row 4 (where FPdc are worked around the post of sc in Row 2). Do not work into the single crochet stitches behind FPdc.
3. FP-Cl are worked around the sc 3 rows below, in the row immediately above the previous FP-Cl, except in Row 4 (where FP-Cl are worked around the post of sc in Row 2). Do not work into the single crochet stitches behind FP-Cl.
THROW
Ch 116.
Row 1 (RS): Work in back bumps of ch, sc in 2nd ch from hook, sc in each remaining ch across, turn—115 sc.
Rows 2 and 3: Ch 1, sc in each st across, turn.
Row 4: Ch 1, sc in first sc, *[FPdc around next sc 2 rows below, sc in next sc] 9 times, sc in next 2 sc, FP-Cl around next sc 2 rows below, sc in next 3 sc; repeat from * 3 more times, [FPdc around next sc 2 rows below, sc in next sc] 9 times, turn—66 sc, 45 FPdc, and 4 FP-Cl.
Rows 5 and all odd-numbered (WS) rows: Ch 1, sc in each st across, turn—115 sc.
Notes:
1. When working WS rows, work into the top of each FP-Cl only, skip the ch-1's that are part of the FP-Cl.
2.All odd-numbered rows (WS) are a repeat of Row 5. The following instructions are for the RS rows only.
Row 6: Ch 1, sc in first sc, *[FPdc around next FPdc 2 rows below, sc in next sc] 9 times, sc in next 6 sc; repeat from * 3 more times, [FPdc around next FPdc 2 rows below, sc in next sc] 9 times, turn.
Row 8: Ch 1, sc in first sc, *[FPdc around next FPdc 2 rows below, sc in next sc] 3 times, sc in next sc, FPdc around next 3 FPdc 2 rows below, sc in next 2 sc, [FPdc around next FPdc 2 rows below, sc in next sc] 3 tmes, sc in next 2 sc, FP-Cl around next sc 3 rows below, sc in next 3 sc, [FPdc around next FPdc 2 rows below, sc in next sc] 9 times, sc in next 2 sc, FP-Cl around next sc 3 rows below, sc in next 3 sc ; repeat from * once more, [FPdc around next FPdc 2 rows below, sc in next sc] 3 times, sc in next sc, FPdc around next 3 FPdc 2 rows below, sc in next 2 sc, [FPdc around next FPdc 2 rows below, sc in next sc] 3 times.
Row 10: Ch 1, sc in first sc, [FPdc around next FPdc 2 rows below, sc in next sc] 3 times, sc in next sc, Cross-Over, sc in next 2 sc, [FPdc around next FPdc 2 rows below, sc in next sc] 3 times, *sc in next 6 sc, [FPdc around next FPdc 2 rows below, sc in next sc] 9 times, sc in next 6 sc, [FPdc around next FPdc 2 rows below, sc in next sc] 3 times, sc in next sc, Cross-Over, sc in next 2 sc, [FPdc around next FPdc 2 rows below, sc in next sc] 3 times; repeat from * once more, turn.
Row 12: Ch 1, sc in first sc, [FPdc around next FPdc 2 rows below, sc in next sc] 3 times, FPdc around first FPdc under Cross-Over, sc in next sc, FPdc around center FPdc of Cross-Over, sc in next sc, FPdc around 3rd FPdc of Cross-Over, sc in next sc, [FPdc around next FPdc 2 rows below, sc in next sc] 3 times, *sc in next 2 sc, FP-Cl around next sc 3 rows below, sc in next 3 sc, [FPdc around next FPdc 2 rows below, sc in next sc] 9 times, sc in next 2 sc, FP-Cl around next sc 3 rows below, sc in next 3 sc, [FPdc around next FPdc 2 rows below, sc in next sc] 3 times, FPdc around first FPdc under Cross-Over, sc in next sc, FPdc around center FPdc of Cross-Over, sc in next sc, FPdc around 3rd FPdc of Cross-Over, sc in next sc, [FPdc around next FPdc 2 rows below, sc in next sc] 3 times; repeat from * once more, turn.
Row 14: Repeat Row 6.
Row 16: Ch 1, sc in first 2 sc, *FPdc around next 3 FPdc 2 rows below, sc in next 2 sc, [FPdc around next FPdc 2 rows below, sc in next sc] 3 times, sc in next sc, FPdc around next 3 FPdc 2 rows below, sc in next 4 sc, FP-Cl around next sc 3 rows below, sc in next 4 sc; repeat from * 3 more times, FPdc around next 3 FPdc 2 rows below, sc in next 2 sc, [FPdc around next FPdc 2 rows below, sc in next sc] 3 times, sc in next sc, FPdc around next 3 FPdc 2 rows below, sc in last 2 sc, turn.
Row 18: Ch 1, sc in first 2 sc, *Cross-Over, sc in next 2 sc, [FPdc around next FPdc 2 rows below, sc in next sc] 3 times, sc in next sc, Cross-Over, sc in next 9 sc; repeat from * 3 more times, Cross-Over, sc in next 2 sc, [FPdc around next FPdc 2 rows below, sc in next sc] 3 times, sc in next sc, Cross-Over, sc in last 2 sc, turn.
Row 20: Ch 1, sc in first sc, [FPdc around next FPdc 2 rows below, sc in next sc] 9 times, *sc in next 2 sc, FP-Cl around next sc 3 rows below, sc in next 3 sc, [FPdc around next sc, sc in next sc] 9 times; repeat from * 3 more times, turn.
Rows 22, 24, 26, 28, and 30: Repeat Rows 6, 8, 10, 12, and 14.
Row 32: Ch 1, sc in first sc, [FPdc around next FPdc 2 rows below, sc in next sc] 9 times, *sc in next 2 sc, FP-Cl around next sc 3 rows below, sc in next 3 sc, [FPdc around next FPdc 2 rows below, sc in next sc] 3 times, sc in next sc, FPdc around next 3 FPdc 2 rows below, sc in next 2 sc, [FPdc around next FPdc 2 rows below] 3 times, sc in next 2 sc, FP-Cl around next sc 3 rows below, sc in next 3 sc, [FPdc around next FPdc 2 rows below, sc in next sc] 9 times; repeat from * once more, turn.
Row 34: Ch 1, sc in first sc, [FPdc around next FPdc 2 rows below, sc in next sc] 9 times, *sc in next 6 sc, [FPdc around next FPdc 2 rows below, sc in next sc] 3 times, sc in next sc, Cross-Over, sc in next 2 sc, [FPdc around next FPdc 2 rows below] 3 times, sc in next 6 sc, [FPdc around next FPdc 2 rows below, sc in next sc] 9 times; repeat from * once more, turn.
Row 36: Ch 1, sc in first sc, [FPdc around next FPdc 2 rows below, sc in next sc] 9 times, *sc in next 2 sc, FP-Cl around next sc 3 rows below, sc in next 3 sc, [FPdc around next FPdc 2 rows below, sc in next sc] 3 times, sc in next sc, FPdc around next 3 FPdc 3 rows below, sc in next 2 sc, [FPdc around next FPdc 2 rows below, sc in next sc] 3 times, sc in next 2 sc, FP-Cl around next sc 3 rows below, sc in next 3 sc, [FPdc around next FPdc 2 rows below, sc in next sc] 9 times; repeat from * once more, turn.
Rows 38, 40, 42, 44, and 46: Repeat Rows 14, 16, 18, 20, and 22.
Rows 48 and 50: Repeat Rows 32 and 34.
Row 52: Repeat Row 36.
Repeat Rows 5–52 two more times.
Repeat Rows 5–33 one more time. Do not fasten off.
EDGING
Round 1 (RS): Ch 1, 2 sc in corner, sc evenly spaced along all edges of throw, working 3 sc in each of 3 remaining corners, sc in same corner as beginning; join with sl st in first sc, turn.
Rounds 2-5: Ch 1, 2 sc in first sc, sc in each st around, working 3 sc in each of 3 remaining corners, sc in same st as beginning; join with sl st in first sc, turn. Do not turn at the end of Round 5.
Round 6 (RS): Ch 1, 2 sc in first sc, [FPdc around next sc 2 rounds below, sc in next sc] across to next corner 3-sc, *sc in first sc of corner 3-sc, 3 sc in center sc of corner 3-sc, sc in last sc of corner 3-sc, [FPdc around next sc 2 rounds below, sc in next sc] to next corner 3-sc; repeat from * around, sc in same st as beginning; join with sl st in first sc, do not turn.
Round 7 (RS): *Sc in corner sc, FPdc around sc directly below in Round 5, sc in same st as first sc (corner turn made), [sc in next sc, FPdc around next FPdc] across to next corner sc; repeat from * around; join with sl st in first sc. Fasten off.
FINISHING
Using yarn needle, weave in all ends.
Read NextLattice Crochet Cable Pattern
Your Recently Viewed Projects
Thanks for your comment. Don't forget to share!
JFK4995
Apr 12, 2019
Would love to try this but I don't see how many skeins of yarn we need. Did I miss this?
Zeemer
Mar 16, 2018
The Eugene Throw is another not-so-easy project but easy for veteran crocheters. It's very detailed, you need your patience here. You may also change the colors to your preference. I love the texture of this throw.
PA CHROCHET GIRL
May 20, 2016
Hello i do not know where to go to print this pattern so I can start the project. Pls help/ Diana
Cheryl Y
May 20, 2016
Wow, what a beautiful Eugene Throw. I can't wait to get the yarn to crochet this one. I love a challenge and learning new stitches. The Front-post cluster looks very interesting. I want to make one in Royal Blue. Looking forward to this one. Thank you for this free pattern.
annegeier 1396640
Apr 07, 2014
I'm trying to make this but am having a problem with row 16 - after I've completed the row and go on to row 17 - should be 115 sc but I'm losing 10 sc somewhere and so the row is only 105 - what am I doing worng? Thanks
BarbieofBorg
Mar 16, 2014
It looks like 115 stitches per row with 24 stitches per repeat. Just add 24 stitches to beginning chain and repeat 4 times instead of 3 times.
rollinsj6 8980160
Dec 01, 2013
We need a "print" button for this beautiful throw. Each time I printed it it came out missing a few rows (different rows each time).
chellmers 6739922
Nov 06, 2020
May I suggest that you copy and paste the picture and the text to a format such as Microsoft Word. You may have to/want to adjust the font and formatting, but in the end you will not lose any of the pattern when you print it. If you would like you may email me at chellmers@hotmail.com and I will do my best to assist you with this process.
rollinsj6 8980160
Dec 01, 2013
I would love to make this into a full-size afghan. My family are all tall and love to snuggle under afghans from head to toe. How many more chains would each pattern repeat need?
pinkcaddy7
Feb 13, 2013
I LOVE the Eugene Throw, but I'd like to make an afghan -- wider -- at least another 8-12 inches. I like my afghans at least 48 inches wide -- could you tell me how many more I would have to chain ?
Report Inappropriate Comment
Are you sure you would like to report this comment? It will be flagged for our moderators to take action.
Thank you for taking the time to improve the content on our site.