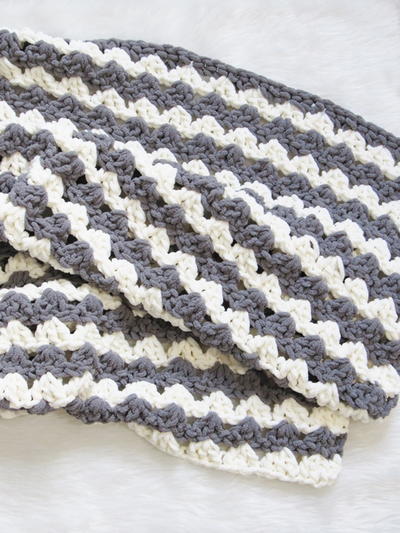
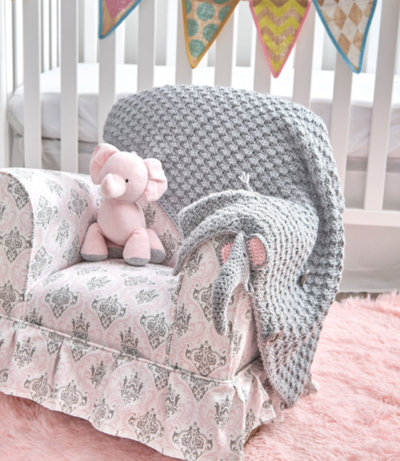
Friendly Elephant Crochet Blanket

When they first start learning about the world, children are often fascinated by animals. They're so interesting — other living beings that don't look anything like humans? It's an imagination gold-mine. If you want to set your child on that track early, you want to introduce animals into their lives as soon as possible. This Friendly Elephant Crochet Blanket makes it easy. This warm, cuddly blanket is perfect for raising your baby's sense of wonder at the world. Plus, it rolls up into an elephant, making it the ideal travel blanket. You'll never go anywhere without it!

Crochet HookF/5 or 3.75 mm hook
Crochet Gauge18 sts= 5” (12.5 cm); 13 rows = 5” (12.5 cm) in pattern with size K hook
Finished SizeBlanket measures approximately 24" (61 cm) x 35" (89 cm)
Materials List
- RED HEART® Baby Hugs™ Light: 3 balls 3410 Dolphin, A, 1 ball each 3724 Pinkie B and 3012 Ink C Note: Only small quantities of B and C are needed for this project.
- Susan Bates® Crochet Hooks: 3.75 mm [US F-5] and 6.5 mm [US K-10½]
- Yarn needle
- Removable stitch marker
- Two - 13/16" (30mm) buttons
- Small amount of polyester fiberfill for stuffing
Instructions
ABBREVIATIONS
A, B, C = Color A, Color B, Color C etc.; ch = chain; g = grams; hdc = half double crochet; cm = centimeters; m = meters, mm = millimeters; oz – ounces, sc = single crochet; st(s) = stitch(es), yd = yards, * or ** = repeat whatever follows the * or ** as indicated.
Special Stitches
sc2tog (single crochet 2 together) = [Draw up a loop in next st] twice, yarn over and draw through all 3 loops on hook.
sc3tog (single crochet 3 together) = [Draw up a loop in next st] three times, yarn over and draw through all 4 loops on hook
NOTES
1. Blanket is worked flat, then rolled up to determine placement of Head, Ears, Buttons and Tail.
2. For Blanket, the ch-2 worked at the beginning of a row counts as a stitch.
3. To work Border evenly around Blanket, work one sc in the side of each row beginning with a sc, work two sc in the side of each row beginning with a chain-2, work one sc in the back of each foundation ch, work one sc in each st of the top row, and work 3 sc in each corner.
4. When making Head, use a stitch marker to mark the first stitch of each round. To keep the seam more even, every 8th round slip st in the first stitch and mark the next stitch as the first stitch of the new round.
Blanket
With larger hook and A, ch 126
-
Row 1 (wrong side): 2 dc in 3rd ch from hook, *skip 2 ch, (sc, 2 dc) in next ch; repeat from * to last 3 ch, skip 2 ch, sc in last ch; turn—124 sts.
-
Row 2 (right side): Ch 2, 2 dc in first sc, *skip 2 dc, (sc, 2 dc) in next sc; repeat from * to last 3 sts, skip 2 dc, sc in top of ch-2; turn—124 sts
-
Rows 3-60: Repeat Row 2. Do not turn at end of Row 60.
-
Border (right side): Ch 1, sc evenly around Blanket (see Notes). Join to first sc with slip st. Fasten off and weave in ends.
Head
With smaller hook and A, ch 2
-
Round 1 (right side): 4 sc in 2nd ch from hook, join with slip st and mark first st of each round. Do not join or turn—4 sc.
-
Round 2: 2 sc in each sc—8 sc
-
Rounds 3-6: Sc in each sc around
-
Round 7: Sc in first 2 sts, hdc in next 4 sts, sc in last 2 sts—8 sts
-
Round 8: Slip st in first st and move marker (see Notes), sc in first 2 sts, hdc in next 4 sts, sc in last 2 sts—8 sts
-
Rounds 9-10: Sc in first 2 sts, hdc in next 4 sts, sc in last 2 sts—8 sts
-
Round 11: 2 sc in first st, sc in next st, hdc in next st, 2 hdc in each of next 2 sts, hdc in next st, sc in next st, 2 sc in last st—12 sts
-
Rounds 12-15: Sc in next 3 sts, hdc in next 6 sts, sc in last 3 sts—12 sts
-
Round 16: Slip st in first st and move marker (see Notes), sc in first 3 sts, hdc in next 6 sts, sc in last 3 sts—12 sts.
-
Round 17: 2 sc in first st, sc in next 2 sts, hdc in next 2 sts, 2 hdc in each of next 2 sts, hdc in next 2 sts, sc in next 2 sts, 2 sc in last st—16 sts.
Stuff Trunk lightly with fiberfill -
Rounds 18-20: Sc in first 4 sts, hdc in next 8 sts, sc in last 4 sts—16 sts
-
Round 21: 2 sc in first st, sc in next 3 sts, hdc in next 3 sts, 2 hdc in each of next 2 sts, hdc in next 3 sts, sc in next 3 sts, 2 sc in last st—20 sts
-
Round 22: Sc in first 5 sts, hdc in next 10 sts, sc in last 5 sts—20 sts.
-
Round 23: 2 sc in first st, sc in next 4 sts, hdc in next 4 sts, 2 hdc in each of next 2 sts, hdc in next 4 sts, sc in next 4 sts, 2 sc in last st—24 sts
-
Round 24: Slip st in first st and move marker (see Notes), 2 sc in first st, sc in next 10 sts, 2 sc in each of next 2 sts, sc in next 10 sts, 2 sc in last st—28 sts.
-
Round 25: 2 sc in first st, sc in next 12 sts, 2 sc in each of next 2 sts, sc in next 12 sts, 2 sc in last st—32 sts
-
Round 26: 2 sc in first st, sc in next 14 sts, 2 sc in each of next 2 sts, sc in next 14 sts, 2 sc in last st—36 sts
-
Round 27: 2 hdc in first st, hdc in next 16 sts, 2 hdc in each of next 2 sts, hdc in next 16 sts, 2 hdc in last st—40 hdc. Fasten off.
Ear
(make 2 with A and 2 with B)
With smaller hook, ch 7
-
Row 1 (wrong side): Sc in 2nd ch from hook and each ch across; turn—6 sc
-
Row 2 (right side): Ch 1, 2 sc in first sc, sc in next 4 sc, 2 sc in last sc; turn—8 sc
-
Rows 3-5: Ch 1, sc across; turn—8 sc
-
Row 6: Ch 1, sc2tog, sc in next 4 sc, sc2tog; turn—6 sts.
-
Row 7: Ch 1, sc2tog, sc in next 2 sc, sc2tog—4 sts. Fasten off
Tail
With smaller hook and A, ch 5
-
Row 1 (wrong side): Sc in 2nd ch from hook and each ch across; turn—4 sc
-
Row 2 (right side): Ch 1, sc, sc2tog, sc; turn—3 sts
-
Row 3: Ch 1, sc across; turn—3 sc
-
Row 4: Ch 1, sc3tog; turn—1 st
-
Row 5: Ch 1, sc—1 sc.
-
Fasten off, leaving long ends for sewing and adding Fringe
Add Fringe: Cut 2 lengths of A, 3" (7.5 cm) each, and fold in half. Using crochet hook, pull folded edge through tip of Tail. Referring to photo, draw ends through folded loop, pull to secure, and cut ends evenly
Finishing
-
To join Ears, hold one of each color together with B on top. With smaller hook, join A at end of starting ch, and referring to photo, sc evenly around side, top, and opposite side of Ear, leaving bottom open. Fasten off, leaving long end for sewing. Repeat for other Ear.
-
Referring to photo for placement, with C, embroider Eyes on either side of Head. Sew Ears onto each side of Head. Stuff Head very lightly with fiberfill. Fold Head in half and match sts on open sides. With A, sc open sides together. Fasten off, leaving long end to slip st Head to Blanket.
-
Fold Blanket in half widthwise, then in half widthwise again. Roll up tightly.
-
Referring to photo for placement, position Head at end and slip st in place.
-
Sew Tail in place. Weave in all ends
-
Referring to photo for placement, sew Buttons to Blanket. To create Button Loops on edge of Blanket, work Loops opposite Buttons on rolled-up Blanket as follows: With smaller hook and A, join yarn to edge. Ch 5, skip 3 sts on edge of Blanket, slip st in next st on edge; turn. Ch 1, sc in each ch, slip st to first st. Fasten off and weave in ends. Repeat for second Button Loop.
Read NextHenry Blanket
Your Recently Viewed Projects
Thanks for your comment. Don't forget to share!
mulberrygalprinces s
Sep 27, 2017
This is so cute. I really like the idea. I usually make lovies but I am going to try my hand at this. I think my grand son would really love it. It's a real cuddly looking little fellow and he will certainly give it all the cuddles. Thank you for offering this great idea.
Cheryl Y
Sep 14, 2017
Oh my gosh, how cute is this Friendly Elephant Crochet Blanket! I love the stitch pattern in this fun blanket, that folds into a cute little elephant. I so have to make this one! I like that the pattern is right here on this page and is so easy to follow and understand. Now to figure out which grandchild to get it to? I'm thinking this would be a great one to keep in a car for that just incase cool time. The way it folds up and is compact makes it perfect for a small corner in the back of the car seat. If not used as a blanket, it can be used as a pillow. Wow, I will be making this one for sure! Thank you so much for sharing this free crochet pattern.
Report Inappropriate Comment
Are you sure you would like to report this comment? It will be flagged for our moderators to take action.
Thank you for taking the time to improve the content on our site.