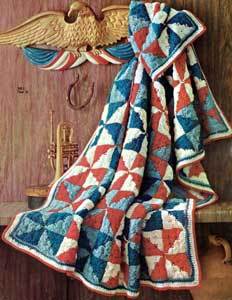
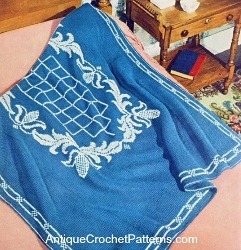
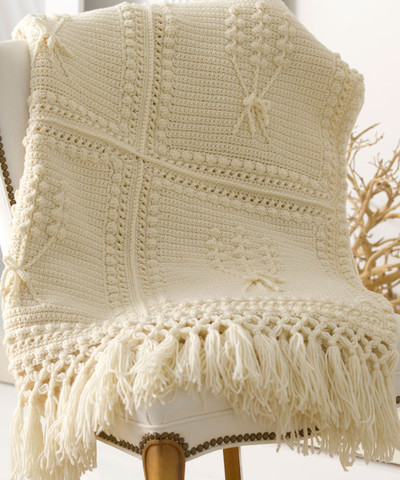
Dresden Plate Throw

This free crochet afghan pattern is especially unique because it actually resembles a quilt. The Dresden Plate Throw, also sometimes called Grandmother's Sunburst, is made with the advanced crocheter in mind. Use Red Heart yarn for this pattern from Coats & Clark.

Crochet HookJ/10 or 6 mm hook
Yarn Weight(4) Medium Weight/Worsted Weight and Aran (16-20 stitches to 4 inches)
Materials:
- 3 balls Red Heart Super Saver Yarn-Buff (A)
- 3 balls Red Heart Super Saver Yarn-Warm Brown (B)
- 3 balls Red Heart Super Saver Yarn-Coffee (C)
- 2 balls Red Heart Super Saver Yarn-Country Blue (D)
- 1 ball Red Heart Super Saver Yarn-Ranch Red (E)
- 1 ball Red Heart Super Saver Yarn-Aran (F)
- 1 ball Red Heart Super Saver Yarn-Gold (G)
- 6mm [US J-10] crochet hook
- Yarn needle
Notes:
GAUGE: Petal 1, Rows 1-10 = 1¾” wide x 4” long; completed block = 12”. CHECK YOUR GAUGE. Use any size hook to obtain the gauge.
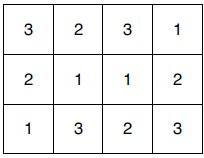
Work is started by making the petals that form the center of each finished block. Petals are joined and worked into a finished block – 12 blocks total; 4 each of Blocks 1, 2, and 3 (see Assembly Diagram).
Special Term: Shell = 3 dc.
Instructions:
Throw measures 45” x 58”.
Petal 1 (make 16 in each of the following colors)
- Block 1: C
- Block 2: F
- Block 3: A
Ch 2.
Row 1 (Right Side): Sc in 2nd ch from hook. Ch 1, turn.
Row 2: 2 sc in sc. Ch 1, turn – 2 sc.
Row 3: Sc in each sc. Ch 1, turn.
Row 4: Sc in first sc, ch 1, sc in last sc. Ch 1, turn.
Row 5: Sc in first sc, ch-1 space and next sc. Ch 1, turn – 3 sc.
Row 6: Sc in first sc, 2 sc in next sc, sc in last sc.
Ch 1, turn – 4 sc.
Row 7: Sc in each sc across. Ch 1, turn.
Row 8: Sc in first 2 sc, ch 1, sc in last 2 sc. Ch 1, turn.
Row 9: Sc in each sc and ch-1 space. Ch 1, turn – 5 sc.
Row 10: Sc in each sc across. Ch 1, turn.
Row 11: Sc in first sc, skip next sc, 5 dc in next sc, skip 1 sc, sc in last sc – 7 sts. Fasten off.
Petal 2 (make 16 in each of the following colors)
Block 1: B
Block 2: D
Block 3: E
Ch 2.
Row 1 (Right Side): Sc in 2nd ch from hook. Slip st to Row 1 of Petal 1. Ch 1, turn.
Rows 2-6: Work as for Petal 1, joining to Petal 1 with a slip st on odd rows.
Row 7: Sc in first 2 sc, ch 1, sc in last 2 sc, slip st to Row 7 of Petal 1. Ch 1, turn.
Row 8: Sc in each sc and in ch-1 space – 5 sc. Ch 1, turn.
Row 9: Sc in first sc, 2 sc in next sc, sc in next sc, 2 sc in next sc, sc in last sc – 7 sc. Slip st to Row 9 of Petal 1.
Row 10: Sc in each sc across. Ch 1, turn.
Row 11: Sc in first sc, skip next sc, hdc in next sc, 5 dc in next sc, hdc in next sc, skip next sc, sc in last sc – 9 sts.
Slip st to Row 11 of Petal 1. Fasten off.
Petal 3 (make 16 in each of the following colors)
- Block 1: E
- Block 2: G
- Block 3: B
Work as for Petal 1, joining to Petal 2 with a slip st on odd rows.
Petal Border (work around each 3-petal group in colors as follows)
- Block 1: A
- Block 2: B
- Block 3: D
With appropriate color, draw up a loop under end sc of Petal 2 and ch 1. (Sc, ch 3, sc) in same sc, sc in end of each row of Petal 3, working 2 sc in end right top sc. Work sc in each st across top of petals, working 2 sc in center dc of each of the 3 petals and 2 sc in last sc at top left. Sc in remaining rows to bottom. Join to beginning sc and fasten off – 50 sc.
Join Petals into Block
With same color as Petal Border and right side facing, sew petal groups together in groups of 4 using a whipstitch and matching colors.
Block Border
Round 1 (Block 1, D; Block 2, A; Block 3, F): Draw up a loop in 2nd corner sc (at right corner) of any Petal 3 (left of seam) and ch 1. Sc in same sc and in each sc around, working 2 sc in each of the 2 sc at each petal point around. Join and fasten off – 10 sc across Petals 1 and 3, 12 sc across Petal 2.
Round 2 (Block 1, F; Block 2, E; Block 3, G): Draw up a loop in first sc to the left of 2 center sc at any joining seam and ch 1. Sc in each sc around, working at point of Petal 2: (sc in sc to the right of point, ch 1, sc in sc to the left of point). Skip 2 sc between each petal at joining seams. Join last sc to first and fasten off – 8 sc across Petals 1 and 3, 10 sc across Petal 2.
Round 3 (All blocks A): Work across each 3-petal section between seams: *hdc in first 2 sc, sc in next sc, slip st in next 2 sc, sc in next sc, hdc in next sc, dc in next sc, tr in next 5 sc, (2 tr, ch 2, 2 tr) in next ch-1 space, tr in next 5 sc, dc in next sc, hdc in next sc, sc in next sc, slip st in next 2 sc, sc in next sc, hdc in next 2 sc; repeat from * around, joining last hdc to first – 30 sts each side between corner ch-2 spaces. Fasten off.
Work all blocks through Round 3, weave in ends.
Join Blocks
-
Arrange blocks as shown on Assembly Diagram.
Work Round 4 on first block, then join remaining blocks as follows.
Round 4: With C, draw up a loop in 2nd tr to the left of any corner ch-2 space, *ch 2, skip 1 st, slip st in next st; repeat from * around, working at each corner: ch 2, (slip st, ch 4, slip st) in corner ch-2 space. At end of round, ch 2, skip last st, slip st in beginning st and fasten off.
Connect remaining blocks as follows, joining on 1 or 2 sides as necessary in 3 rows of 4 blocks: Continuing in pattern st for Round 4, join ch-2 spaces as follows: ch 1, drop loop, draw loop under to over through opposite ch-2 space, ch 1 and continue. To join ch-4 spaces, ch 2, drop loop, draw loop under to over through opposite ch-4 space, ch 2 and continue. Where 4 corners meet: ch 4, drop loop, draw loop under to over through opposite ch-4 space, ch 1, drop loop, skip next ch-4 space, draw loop under to over through next ch-4 space, ch 2 and continue.
When all squares are joined, work border.
Border
With C and right side facing, draw up a loop in a ch-2 space to the left of any corner.
Round 1 (Right Side): *Ch 2, slip st in next ch-2 space or in next corner space at joining seams; repeat from * around, working at each corner: ch 2, (slip st, ch 4, slip st) in corner ch-4 space. At end of round, ch 2, slip st in same space as beginning. Turn, slip st in next ch-2 space and ch 1.
Round 2 (Wrong Side): Sc in same space, work corner: 5 dc in corner ch-4 space, *sc in next space, shell in next space; repeat from * around, working at remaining corners: sc in next space, 5 dc in corner ch-4 space. At end of round, join last shell to beginning sc. Turn, slip st to center dc of next shell and ch 1.
Round 3 (Right Side): Sc in same dc, *shell in next sc, sc in center dc of next shell; repeat from * around, working at each corner: shell in next sc, skip next dc, sc in next dc, 5 dc in next dc, sc in next dc, skip next dc. At end of round, join last shell to beginning sc, ch 3. (Counts as first dc of Round 4).
Round 4 (Right Side): *Hdc in next dc, sc in next dc, hdc in next dc, dc in next sc; repeat from * around, working at each corner: hdc in next dc, sc in next dc, (sc, ch 3, sc) in next (corner) dc, sc in next dc, hdc in next dc, dc in next sc. At end of round, join last hdc to top of beginning ch-3 and fasten off.
Round 5 (Right Side): With B and right side facing, draw up a loop in a sc away from corner and ch 1. Sc in same sc, *ch 1, skip 1 st, sc in next st; repeat from * around, working at each corner: ch 1, skip 1 st, (sc, ch 3, sc) in corner ch-3 space. At end of round, ch 1, skip last st, join to beginning sc and fasten off.
Round 6 (Wrong Side): With A, draw up a loop in a ch-1 space away from corner and ch 1. Sc in same space, *ch 1, skip next sc, sc in next ch-1 space; repeat from * around, working at each corner: ch 1, skip next sc, (sc, ch 3, sc) in corner ch-3 space. At end of round, ch 1, skip last sc, join to beginning sc and fasten off.
Round 7 (Right Side): With D, repeat Round 6.
Round 8 (Wrong Side): With F, repeat Round 6.
Round 9 (Right Side): With B and right side facing, draw up a loop in 2nd ch-1 space to the left of any corner ch-3 space. Ch 1. Repeat Round 6. At end of round, join and ch 1.
Round 10 (Right Side): Sc in first sc. Skipping over ch-1 space and working in sc and corner spaces only, *shell in next sc, sc in next sc; repeat from * around, working at each corner: 5 dc in corner ch-3 space, sc in next sc. At end of round, join last shell to beginning sc. Turn, slip st to center dc of next shell and ch 1.
Round 11 (Wrong Side): Sc in same dc, shell in next sc, work corner: skip next dc, sc in next dc, 5 dc in next dc, sc in next dc, skip next dc. Repeat from * of Round 3, working corners at set. At end of round, join, turn, slip st to center dc of next shell and ch 1.
Round 12 (Right Side): Repeat Round 11. At end of round, join, turn, slip st to center dc of next shell and ch 1.
Round 13 (Wrong Side): Repeat Round 11. At end of round, join and fasten off.
Round 14 (Right Side): With A and right side facing, draw up a loop in any sc between 2 shells (away from corner) and ch 1. Sc in same sc, *ch 1, skip 1 dc, (sc, ch 2, sc) in next dc, ch 1, skip 1 dc, sc in next sc; repeat from * around, working at each corner: ch 1, skip 1 dc, (sc, ch 2, sc) in next dc, (sc, ch 3, sc) in next dc, (sc, ch 2, sc) in next dc, ch 1, skip 1 dc, sc in next sc. At end of round, join last ch 1 to beginning sc and fasten off. Weave in ends. Block.
Read NextQueen Anne Blanket
Your Recently Viewed Projects

Thanks for your comment. Don't forget to share!
chilili4620 600302 5
Mar 19, 2017
How long does it take to do this pattern? It is so beautiful
KLC
Mar 20, 2017
It's difficult to say since it's a more advanced pattern and it's dependent on the individual crocheter's skill level. Perhaps someone has completed this pattern and can comment? Thanks, Krista, Editor
Report Inappropriate Comment
Are you sure you would like to report this comment? It will be flagged for our moderators to take action.
Thank you for taking the time to improve the content on our site.