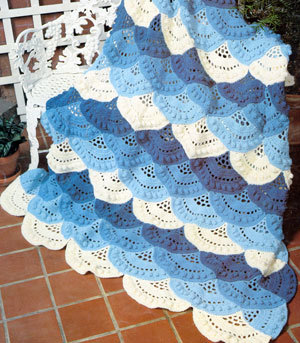
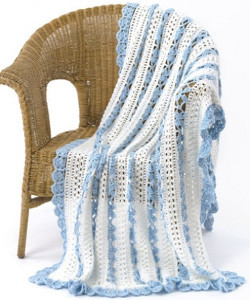
Lacy Eyelet Crochet Blanket Pattern
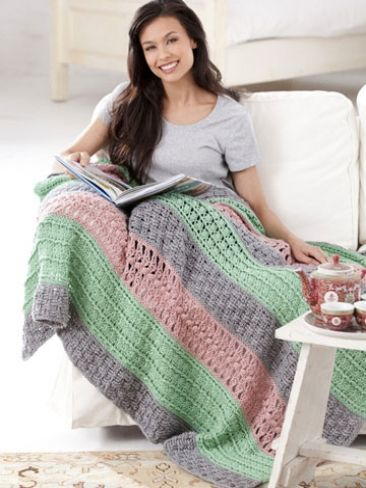
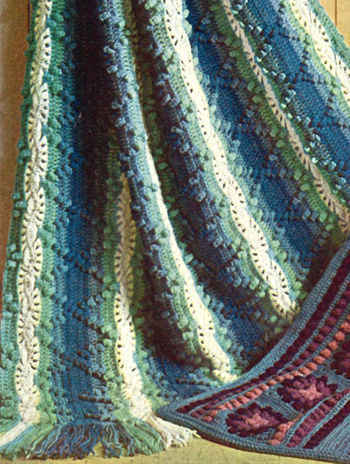
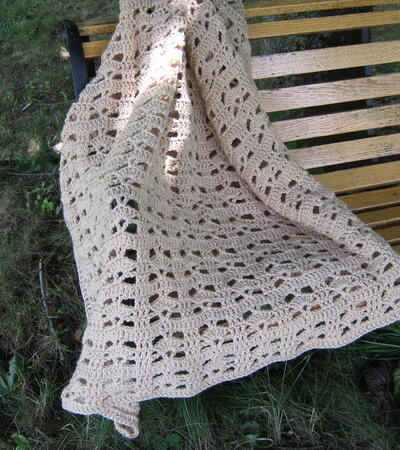
Create a lovely, airy throw with this Lacy Eyelet Crochet Blanket Pattern. With a light, loose stitch, this crochet lace pattern will give an antique feel to any room. On those warm summer nights, this throw will keep you comfy and cool. A beautiful powder blue and ivory make this lace crochet pattern a delicate classic. Throw this vintage crochet blanket over any chair or couch to add instant character to your home!

Crochet HookI/9 or 5.5 mm hook
Yarn Weight(4) Medium Weight/Worsted Weight and Aran (16-20 stitches to 4 inches)
Materials:
- Caron Simply Soft: Contrast A White (9701), Contrast B Soft Blue (9712)
- Hook: US I-9 (5.5mm), or size to obtain gauge.
- Yarn needle
Size: Approx. 47"/119.5 cm wide x 56"/142 cm long
Gauge: In double crochet, using US I-9 (5.5mm) hook, 10sts=4"/10cm in floral lace pattern (as established), using US I-9 (5.5mm) hook, 6 rows=4"/10cm in floral lace pattern, using US I-9 (5.5mm) hook, (3 ch-5 space and 2 flowers)=8"/20.5cm
SPECIAL TERMS: cl:Cluster—Yarnover, insert hook in indicated st and draw up a loop, yarn over and draw through 2 loops on hook, [yarn over, insert hook in same st and draw up a loop, yarn over and draw through 2 loops on hook] twice, yarn over and draw through all 4 loops on hook. sc2tog: Single crochet 2 together—Insert hook in next stitch, yarn over and pull up a loop, (two loops on hook), insert hook in next stitch, yarn over and pull up a loop, yarn over and draw through all three loops on hook.
THROW
With A, ch 153 loosely.
Row 1 (RS): Dc in 4th ch from hook (beginning ch counts as first dc) and in each remaining ch across, turn—151 dc.
Row 2: Ch 4 (counts as hdc, ch 2), skip next 2 sts, hdc in next st,*ch 2,skip next 2 sts, hdc in next st; repeat from * across, turn—51 hdc and 50 ch-2 space. Fasten off A.
Row 3: Join B with slip st in first st, ch 8 (counts as dc, ch 5), skip first 2 ch-2 space,*(sc, ch 3, cl) in next hdc (petal made),skip next ch-2 space, (cl, ch3, sc) in next hdc (petal made),ch 5, skip next 2 ch-2 space; repeat from * 15 more times, dc in 3rd ch of turning ch,turn—2 dc, 32 petals, and 17 ch-5 space.
Row 4: Ch 5 (counts as dc, ch 2), sc in center ch of next ch-5 space, ch 2,* (cl, ch 3, sc, ch 3, cl) in space between next 2 petals (2 petals made), ch 2, sc in center ch of next ch-5 space, ch 2; repeat from * 15 more times, dc in 3rd ch of turning ch, turn—2 dc, 32 petals, and 17 sc. Fasten off B.
Row 5: Join A with slip st in first st, ch 5 (counts as dc, ch 2), skip first ch-2 space, dc in next sc, ch 2, * skip next ch-2 space, sc in ch-3 space of next petal, ch 2, sc inch-3 space of next petal, ch 2, skip next ch-2 space, dc in next sc, ch 2; repeat from * 15 more times, dc in 3rd ch of turning ch, turn—19 dc, 50 ch-2 space and 32 sc.
Row 6: Ch 1, sc in first st, * 2 sc in next ch-2 space, sc in next st; repeat from * across, turn—151 sts.
Row 7: Ch 3, dc in each st across, turn.
Rows 8–67: Repeat Rows 2–7 ten times. Fasten off.
FINISHING
Top Edging
Note: Top Edging is worked along one short edge of Throw, beginning in the edge of Row 1. With RS facing, hold piece to work in ends of rows along short edge of Throw. Join A with sc in end of Row1, sc in end of same row, 2 sc in end of next 2 rows, * [sc in end of next row, 2 sc in end of next row] twice, 2 sc in end of next 2 rows; repeat from * 9 more times, sc in end of next 2 rows, 2 sc in end of last 2 rows—112 sc. Fasten off.
Lower Edging
Note: Lower Edging is worked along short edge opposite Top Edging, beginning in the edge of Row 67. With RS facing, hold piece to work in ends of rows along opposite short edge of Throw. Join A with sc in end of Row 67 row, sc in end of same row, * [sc in end of next row, 2 sc in end of next row] twice, 2 sc in end of next 2 rows; repeat from * 10 more times—112 sc. Fasten off.
Border
With RS facing, join B with sc in first st of top edging.
Round 1: Sc2tog, sc in next 109 sts; pivot to work along side of Throw, sc in end of top edging row, sc in next 151 sts, sc in end of lower edging row; pivot to work along lower edging, sc in next st, sc2tog, sc in next 109 sts; pivot to work along side of Throw, sc in end of lower edging row, working in free loops along opposite side of foundation ch, sc in next 151 ch, sc in end of top edging row; join with slip st in first sc—528 sc.
Round 2: Slip st in next st, ch 1, sc in same st, sc in next 4 sts, ch 5, skip next 3 sts, * sc in next 5 sts, ch 5, skip next 3 sts; repeat from * around; join with slip st in first sc—330 sc and 66 ch-5 space.
Round 3: Sl st in next st, ch 1, sc in same st, sc in next 2 sts, ch 7, skip next st, skip next ch-5 space, * skip next st, sc in next 3 sts, ch 7, skip next st, skip next ch-5 space; repeat from * around; join with slip st in first sc—198 sc and 66 ch-7space.
Round 4: Sl st in next st, ch 1, sc in same st, ch 4, insert hook in center ch of next ch-5 space of Round 2 and in center ch of next ch-7 space of Round 3, yarn over and draw through all loops on hook (slip st at the same time made), ch 4, * skip next sc, sc in next sc, ch 4, slip st at the same time in center ch of next ch-5 space of Round 2 and center ch of next ch-7 space of Round 3, ch 4; repeat from * around; join with slip st in first sc—66 sc, 66 slip st, and 132 ch-4 space.
Round 5: Ch 5, skip first ch-4 space, (slip st, ch 5, slip st, ch 5, slip st) in next slip st, ch 5, skip next ch-4 space, * slip st in next sc, ch 5, skip next ch-4 space, (slip st, ch 5, slip st, ch 5, slip st) in next slip st, skip next ch-4 space; repeat from * around; join with slip st in same sc as beginning slip st. Fasten off. Using yarn needle, weave in ends.
Read NextSimply Elegant Crochet Afghan
Your Recently Viewed Projects
Thanks for your comment. Don't forget to share!
shikshamahtani
Oct 14, 2021
I tried this pattern and was disappointed because it didnt come out the way the picture looked. I was making it for my grandmother and was so excited, it seemed perfect. It came out the size of a baby blanket, and Im not sure how to extend the pattern to make it longer. If I add on rows, then the border wont be right because the numbers will be off. The small blanket is gorgeous, dont get me wrong, but I have no use for a baby blanket, and no one to give it to. So I am extremely disappointed.
AuntKarolyn
Jan 20, 2018
This Lacy Eyelet Crochet Blanket is absolutely the perfect addition to the decor of any room. Either draped over a chair in the living room, or the edge of the bed, it is beautifully light and lacy. I'm working on it now and it is turning out great. You don't want to rush with this pattern. Take your time and enjoy the process, as this terrific pattern unfolds.
morganna419
Mar 27, 2017
I am confused about the hook to use. In the materials list it states an F-5/4mm hook and in the pattern itself it states an I-9/5.5mm. these are vastly different in size and there is no explanation as to why they switched hook sizes, if in fact they did and this is not just a typo.
KLC
Mar 28, 2017
I checked the original pattern at Yarnspirations (http//www.yarnspirations.com/patterns/open-lacy-throw.html?id=195802) and it's the same. The gauge is where it mentions the larger hook so perhaps that is the correct hook. (Gauge says, In double crochet, using US I-9 (5.5 mm) hook, 10 sts = 4"/10 cm In floral lace pattern (as established), using USbr /I-9 (5.5 mm) hook, 6 rows = 4"/10 cmbr /In floral lace pattern, using US I-9 (5.5 mm) hook, (3 ch-5 space and 2 flowers) = 8"/20.5 cm). -Krista, Editor
melissasea22
Apr 01, 2017
It was a mistake in the original pattern, they never did a correction on it probably because the designer could either not be available anymore, or that they just simply left it to us to figure out it actually uses an I-9 crochet hook lol!
Zeemer
Aug 26, 2016
I can imagine this lacy project being created for a boy or a girl who's going to college. Great dormitory stuff. Thanks for the free pattern which can be found right on this same page.
Zeemer
Apr 04, 2016
Congratulations Cheryl, Furya for having started this project. Cheryl, this is very appropriate for your mom who lives in Florida where the whether is not very cold. What a lovely gift for her. Happy for you as the pattern is right on this page an you don't have to go to a link to a blog or another site. I'm giving this a four because Furya said some instructions are missing.
Cheryl Y
Apr 01, 2016
I'm looking forward to making this blanket this summer. It would be a nice gift to send to my mom in Florida, and I won't be over heated making it. The pattern is a repeat rows so i'm hoping it will be easy to remember. Here is hoping mine looks like the one in the photo.. Thank you for the free pattern.
Furya
Feb 16, 2015
I'm working on this pattern, and the written pattern is NOT what is in the picture, as it's not complete. Can we please get the FULL pattern? There's a few rows missing from it... about 5 rows missing from each repeat of the pattern.
sarajg 0540993
Jun 01, 2019
Furya,I was just going to post the same thing. I made a sample swatch and the pattern and edging were different than the blue and white blanket pictured. The pattern printed is okay, but I would like to get the correct pattern for this picture.
Report Inappropriate Comment
Are you sure you would like to report this comment? It will be flagged for our moderators to take action.
Thank you for taking the time to improve the content on our site.