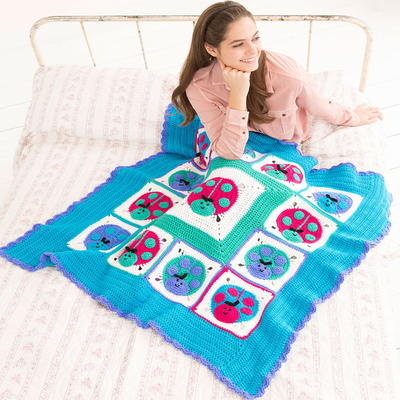
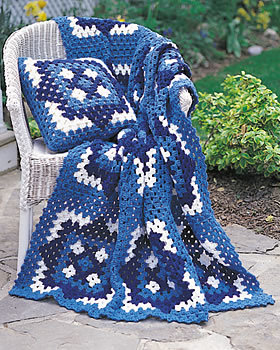
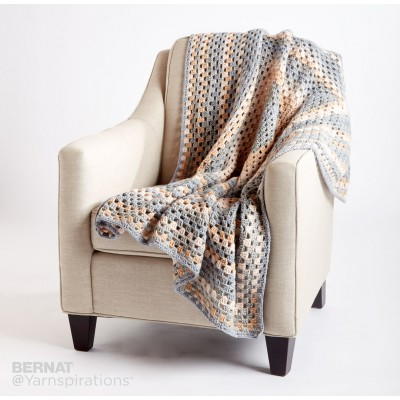
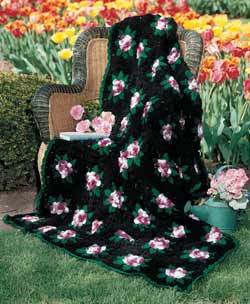
Gotta Love Granny Throw

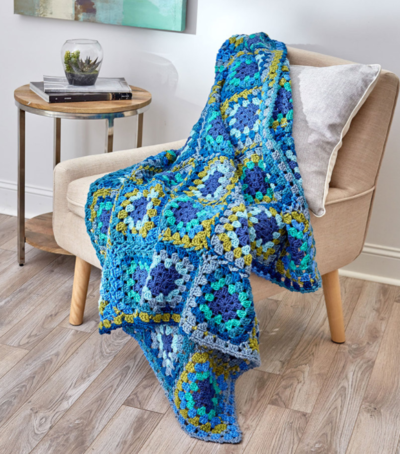
Granny squares are definitely a fun crochet project, and they can be put towards a variety of uses. You can use them individually as pot holders or other similar objects, or you can join them together like with this Gotta Love Granny Throw. This gorgeous granny square blanket comes in shades of blue and green, resembling the sea. You get to work on your crochet granny square skills and you get to make a full blanket in the process. Whether you prefer to join as you go or stitch them all together at the end, you have quite a project on your hands.

Crochet HookJ/10 or 6 mm hook
Crochet Gauge Rounds 1 and 2 = 3" [7.5 cm]. One Granny Square = 7½" [19 cm]
Finished SizeThrow measures about 46 x 54" [117 x 137 cm]
Materials List
- RED HEART® With Love®: 6 skeins 1974 Rainforest Stripe A, and 1 skein each of 1814 True Blue B, 1562 Jadeite C, and 1502 Iced Aqua D
- Susan Bates® Crochet Hook: 6mm [US J-10]
- Yarn needle
Instructions
Notes
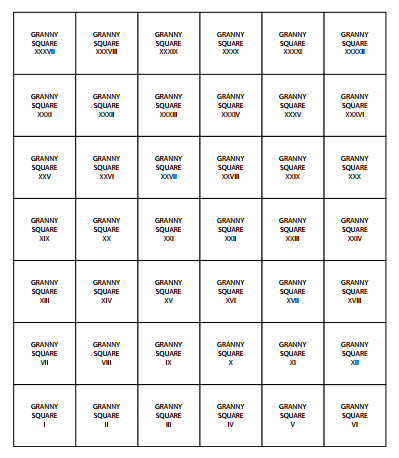
1. Throw is made from 42 Granny Squares, arranged into 6 rows of 7 squares each.
2. Granny Squares are joined together, while Round 6 is worked, using a joinas-you-go technique.
3. Each Granny Square is worked in joined rounds with right side always facing.
4. The yarn color is changed by fastening off the old color and joining the new color. To reduce the number of yarn tails to weave in during the finishing stage, work over the tails as you go.
5. A border is worked all the way around outer edges of completed Throw.
Special Stitches
corner-join = Ch 3, drop loop from hook, insert hook from front to back through corresponding corner ch-6 space of neighboring Granny Square, return dropped loop to hook and draw the loop to front, ch 3.
4-corner-join = Ch 3, drop loop from hook, insert hook from front to back through corner ch-6 space of first neighboring Granny Square, return dropped loop to hook and draw the loop to front, ch 1, drop loop from hook, skip next neighboring Granny Square (diagonally across from Square being made), insert hook from front to back through corner ch-6 space of next neighboring Granny Square, return dropped loop to hook and draw the loop to front, ch 3. Note: This is a variation of corner-join, used only when joining at a corner where four Granny Squares meet.
side-join = Ch 2, drop loop from hook, insert hook from front to back through corresponding ch-4 space of neighboring Granny Square, return dropped loop to hook and draw the loop to front, ch 2.
ABBREVIATIONS
A, B, C, and D. = Color A, Color B, Color C, and Color D; ch = chain; dc = double crochet; sc = single crochet; st(s) = stitch(es); () = work directions in parentheses into same st; [ ] = work directions in brackets the number of times specified; * = repeat whatever follows the * as indicated.
Granny Square I
With B, ch 4; join with slip st in first ch to form a ring
-
Round 1 (right side): Ch 3 (counts as dc here and throughout), 2 dc in ring, [ch 2, 3 dc in ring] 3 times, ch 2; join with slip st in top of beginning ch-3—12 dc and 4 ch-2 spaces.
-
Round 2: Ch 3, (2 dc, ch 3, 3 dc) in last ch-2 space made (first corner made), [ch 1, (3 dc, ch 2, 3 dc) in next ch-2 space (corner made)] 3 times, ch 1; join with slip st in top of beginning ch-3—24 dc, 4 ch-1 spaces, and 4 corner ch-2 spaces (two 3-dc groups along each of 4 sides between corner ch-2 spaces). Fasten off.
-
Round 3: With right side facing, draw up a loop of C in any ch-1 space, ch 3, 2 dc in same ch-1 space, ch 1, (3 dc, ch 2, 3 dc) in next corner ch-2 space, *ch 1, 3 dc in next ch-1 space, ch 1, (3 dc, ch 2, 3 dc) in next corner ch-2 space; repeat from * around, ch 1; join with slip st in top of beginning ch-3—36 dc, 8 ch-1 spaces, and 4 corner ch-2 spaces (three 3-dc groups along each of 4 sides between corner ch-2 spaces). Fasten off.
-
Round 4: With right side facing, draw up a loop of A in ch-1 space immediately following any corner ch-2 space, ch 3, 2 dc in same ch-1 space, ch 1, 3 dc in next ch-1 space, ch 1, (3 dc, ch 2, 3 dc) in next corner ch-2 space, *[ch 1, 3 dc in next ch-1 space] twice, ch 1, (3 dc, ch 2, 3 dc) Find more ideas & inspiration: redheart.com ©2017 Coats & Clark Page 2 of 3 in next corner ch-2 space; repeat from * around, ch 1; join with slip st in top of beginning ch-3—48 dc, 12 ch-1 spaces, and 4 corner ch-2 spaces (four 3-dc groups along each of 4 sides between corner ch-2 spaces).
-
Round 5: Ch 3, 2 dc in last ch-1 space made, [ch 1, 3 dc in next ch-1 space] twice, ch 1, (3 dc, ch 2, 3 dc) in next corner ch-2 space, *[ch 1, 3 dc in next ch-1 space] 3 times, ch 1, (3 dc, ch 2, 3 dc) in next corner ch-2 space; repeat from * around, ch 1; join with slip st in top of beginning ch-3—60 dc, 16 ch-1 spaces, and 4 corner ch-2 spaces (five 3-dc groups along each of 4 sides between corner ch-2 spaces).
-
Round 6: [*Ch 4, slip st in next ch-1 space; repeat from * to next corner ch-2 space, ch 4, (slip st, ch 6, slip st) in corner ch-2 space] 4 times, ch 4; join with slip st in slip st at base of beginning ch-4—20 ch-4 spaces and 4 corner ch-6 spaces (5 ch-4 spaces along each of 4 sides between corner ch-6 spaces).
Fasten off.
Granny Square II
All following Granny Squares are worked the same as Granny Square I, as follows:
- Round 3 is worked with C in every other Square and with D in every other Square.
- Refer to diagram for arrangement of Squares.
- Join edge(s) of Square being made to neighboring Square(s) while Round 6 is worked, using corner-join, sidejoin, and 4-corner-join (see Special Stitches) as instructed.
- Detailed instructions are provided for the next few Squares. If you are familiar with join-as-you-go techniques, you may not need to read all of the instructions.
With B, ch 4; join with slip st in first ch to form a ring.
-
Rounds 1–5: Work same as Rounds 1–5 of Granny Square I using B for Rounds 1 and 2, D for Round 3, and A for Rounds 4 and 5. Do not fasten off.
-
Round 6 (Joining Round): Continuing with A, *Ch 4, slip st in next ch-1 space; repeat from * to next corner ch-2 space, ch 4; hold Granny Square I and Granny Square II side by side;
-
Join to side of Granny Square I: (slip st, corner-join, slip st) in corner ch-2 space, [side-join, slip st in next ch-1 space] 4 times, side-join, (slip st, corner-join, slip st) in corner ch-2 space;
-
Complete Round: [*ch 4, slip st in next ch-1 space; repeat from * to next corner ch-2 space, ch 4, (slip st, ch 6, slip st) in corner ch-2 space] twice, ch 4; join with slip st in slip st at base of beginning ch-4. Fasten off
Granny Square III
Note: Granny Square III is worked the same as Granny Square II, EXCEPT that C is used for Round 3 (instead of D) and one edge of Granny Square III is joined to the edge of Granny Square II that is opposite the Granny Square II side edge attached to Granny Square I. When all three Squares are joined together, they form a strip.
With B, ch 4; join with slip st in first ch to form a ring.
-
Rounds 1–5: Work same as Rounds 1–5 of Granny Square I using B for Rounds 1 and 2, C for Round 3, and A for Rounds 4 and 5. Do not fasten off.
-
Round 6 (Joining Round): Continuing with A, *Ch 4, slip st in next ch-1 space; repeat from * to next corner ch-2 space, ch 4; hold Granny Square II and Granny Square III side by side so that Granny Squares I–III form a strip;
-
Join to side of Granny Square II: (slip st, corner-join, slip st) in corner ch-2 space, [side-join, slip st in next ch-1 space] 4 times, side-join, (slip st, corner-join, slip st) in corner ch-2 space;
-
Complete Round: [*ch 4, slip st in next ch-1 space; repeat from * to next corner ch-2 space, ch 4, (slip st, ch 6, slip st) in corner ch-2 space] twice, ch 4; join with slip st in slip st at base of beginning ch-4. Fasten off
Granny Square IV
Make same as Granny Square II, joining side edge of Granny Square IV to side edge of Granny Square III opposite edge attached to Granny Square II.
Granny Square V
Make same as Granny Square III, joining side edge of Granny Square V to side edge of Granny Square IV opposite edge attached to Granny Square III.
Granny Square VI
Make same as Granny Square II, joining side edge of Granny Square VI to side edge of Granny Square V opposite edge attached to Granny Square IV.
Granny Square VII
Make same as Granny Square II, joining side edge of Granny Square VII to side (top) edge of Granny Square I to begin second row of Squares
Granny Square VIII
Make same as Granny Square III to Round 6
-
Round 6 (Joining Round): Continuing with A, *Ch 4, slip st in next ch-1 space; repeat from * to next corner ch-2 space, ch 4; hold Granny Square VIII and Granny Square VII side by side with Granny Square VIII immediately above Granny Square II,
-
Join to side of Granny Square VII: (slip st, corner-join, slip st) in corner ch-2 space, [side-join, slip st in next ch-1 space] 4 times, side-join;
-
Join to corners of Granny Squares VII and II: (slip st, 4-corner-join, slip st) in corner ch-2 space;
-
Join to side (top) of Granny Square II: [side-join, slip st in next ch-1 space] 4 times, side-join, (slip st, corner-join, slip st) in corner ch-2 space;
-
Complete Round: *ch 4, slip st in next ch-1 space; repeat from * to last corner ch-2 space, ch 4, (slip st, ch 6, slip st) in corner ch-2 space, ch 4; join with slip st in slip st at base of beginning ch-4. Fasten off.
Next Granny Square
Make and join 34 more Squares
Continue to make and join Granny Squares in the same way that previous Squares were made and joined. Refer to diagram for arrangement of Squares. Remember to use C for Round 3 of every other Square and D for Round 3 of every other square. Also remember to use 4-corner-join (instead of cornerjoin) whenever you are joining in a corner where four Squares meet
Border
With right side facing, draw up a loop of A in ch-4 space immediately following any corner ch-6 space.
-
Round 1 (right side): Ch 3, 2 dc in same ch-4 space, *ch 1, 3 dc in next ch-4 space; repeat from * around working as follows at joins between Squares and corners:
-
Join between Squares: Ch 1, dc in first ch-3 space of join, dc in 3rd ch of next ch-3 space of join, dc in same ch-3 space.
-
Corner: Ch 1, (3 dc, ch 2, 3 dc) in corner ch-6 space. At end of round, join with slip st in top of beginning ch-3
-
Round 2: Slip st in next 2 dc, (slip st, ch 1, sc, ch 2, sc) in first ch-1 space, *ch 3, (sc, ch 2, sc) in next ch-1 space; repeat from * around working (sc, ch 2, sc, ch 3, sc, ch 2, sc) in each corner ch-2 space; join with slip st in first sc. Fasten off.
Finishing
Weave in any remaining ends.
Read NextWinter Jewels Lapghan
Your Recently Viewed Projects
Thanks for your comment. Don't forget to share!
Zeemer
Apr 24, 2018
Another irresistibly gorgeous granny square throw. How can I make them all? I want to but where's time and where's determination? I know in time I will be able to do them all. Crazy about crochet!!!
Report Inappropriate Comment
Are you sure you would like to report this comment? It will be flagged for our moderators to take action.
Thank you for taking the time to improve the content on our site.