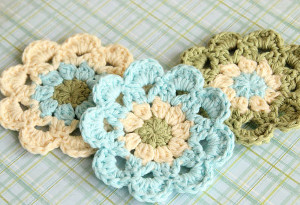
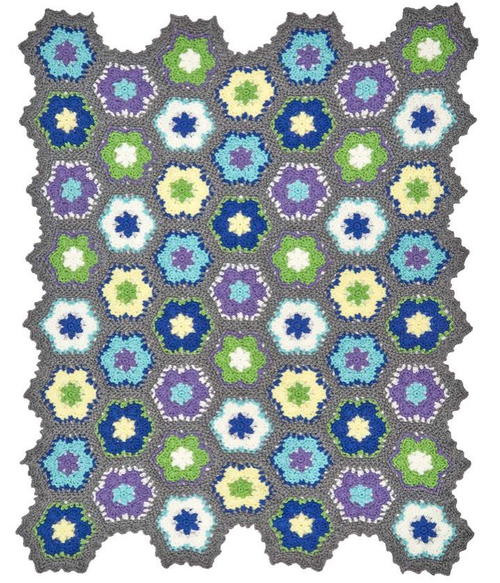
Blooming Flowers Crochet Throw

Welcome spring in style with this Blooming Flowers Crochet Throw. The soft gray background makes the hexagon flowers stand out even more in this crochet afghan pattern. Also, because the floral hexagons are made separately and joined in, it's a fun project that is great for when you are traveling but still wish to crochet.
This intermediate pattern uses half double crochet as well as the cluster and shell stitch. Motif patterns like this are one of the best aspects of crochet, so work this beautiful flower blanket up today to get blooming!
NotesNOTES:
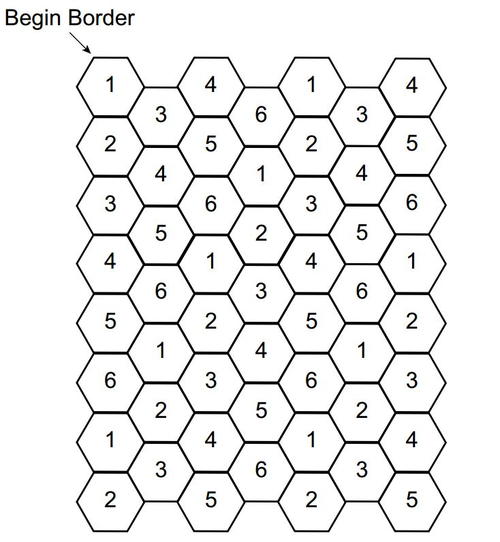
Throw is made from 53 Hexagon motifs
in varying color patterns. Hexagons are
worked in joined rounds with right side
facing throughout. First Hexagon is at
the upper left-hand corner. Hexagons
are added in rows from top to bottom.
Rows are added from left to right. There
are 6 color variations of Hexagons. First
Hexagon is worked through Round 8.
Remaining Hexagons are worked the
same using different colors through
Round 7 then joined to previous
Hexagon on Round 8 following an
assembly diagram (shown below). Round 7 and 8 on all
Hexagons are all worked with A.

Crochet HookI/9 or 5.5 mm hook, J/10 or 6 mm hook
Yarn Weight(4) Medium Weight/Worsted Weight and Aran (16-20 stitches to 4 inches)
Crochet GaugeHexagon = 8" [20.5 cm] across; each side of Hexagon = 4" [10 cm] using larger hook. CHECK YOUR GAUGE. Use any size hook to obtain the gauge.
Finished Size44" x 56" [112 cm x 142 cm]
Materials List
- 3 skeins 400 Grey Heather A, 1 skein each 385 Royal Blue B, 316 Soft White C, 358 Lavender D, 322 Pale Yellow E, 672 Spring Green F and 505 Aruba Sea G
- Susan Bates® Crochet Hook: 6mm [US J-10] and 5.5mm [US I-9]
- Yarn needle
Instructions:
Instructions for HEXAGONS:
-
HEXAGON 1:
(Make 9 total worked through Round 6)
With D, ch 3, slip st in first ch to join.
Round 1:Ch 1, work 6 sc in ring, slip st in first sc to join – 6 sc.
Round 2: Work Beg Cluster in first sc, [ch 3, Cluster in next sc] 5 times, ch 3, slip st in top of Beg Cluster – 6 Clusters.
Fasten off.
Round 3: With G, slip st in any ch-3 space, ch 1, (2 sc, ch 2, 2 sc) in ch-3 space, *ch 1, (2 sc, ch 2, 2 sc) in next ch-3 space; repeat from * around, ch 1, slip st in first sc.
Round 4: Ch 1, sc in first sc, *skip next sc, Shell in next ch-2 space, skip next sc, sc in next sc, slip st in next ch-1 space**, sc in next sc; repeat from * around, ending last repeat at **, slip st in first sc.
Round 5: Ch 1, sc in first sc, *sc in next 2 dc, 3 sc in next dc, sc in next 2 dc, sc in next sc, slip st in next slip st**, sc in next sc; repeat from * around, ending last repeat at **, slip st in first sc.
Fasten off.
Round 6: With B, slip st in sc to left of any slip st, ch 1, sc in same sc,*ch 1, skip next sc, sc in next sc, ch 1, skip next sc, (sc, ch 2, sc) in next sc, [ch 1, skip next sc, sc in next sc] twice, skip next slip st**, sc in next sc; repeat from * around, ending last repeat at **, slip st in first sc.
Fasten off. -
HEXAGON 2:
(Make 9 total worked through Round 6)
Working as for Hexagon 1, work Rounds 1-2 with E, Rounds 3-5 with B and Round 6 with F. -
HEXAGON 3:
(Make 9 total worked through Round 6)
Working as for Hexagon 1, work Rounds 1-2 with G, Rounds 3-5 with D and Round 6 with C. -
HEXAGON 4:
(Make 9 total worked through Round 6)
Working as for Hexagon 1, work Rounds 1-2 with C, Rounds 3-5 with F and Round 6 with D. -
HEXAGON 5:
(Make 9 total worked through Round 6)
Working as for Hexagon 1, work Rounds 1-2 with B, Rounds 3-5 with C and Round 6 with G. -
HEXAGON 6:
(Make 8 total worked through Round 6)
Working as for Hexagon 1, work Rounds 1-2 with F, Rounds 3-5 with E and Round 6 with B.
Instructions for ASSEMBLY:
-
Hexagons are joined to previous Hexagon in 7 vertical rows beginning at top left side corner. Rows alternate with having 8 or 7 Hexagons in each row. First row of Hexagons are joined along one opposite side. First Hexagons of Second, Fourth and Sixth Rows are joined along two sides with Hexagons of previous row.
Remaining Hexagons of row are joined along one side to previous Hexagon of working row and two sides of Hexagons of previous row. First Hexagon of Third, Fifth and Seventh Rows are joined along one side with Hexagons of previous row.
Remaining Hexagons of row joined along one side to previous Hexagon of working row and two sides of Hexagons of previous row. Follow diagram below for placement.
Instructions for FIRST ROW:
-
FIRST HEXAGON:
Round 7: With A and working on Hexagon 1, slip st in any corner ch-2 space, ch 1, (sc, ch 2, sc) in same ch-2 space,*ch 1, skip next sc, sc in next ch-1 space, ch 1, skip next sc, hdc in next ch-1 space, ch 1, skip next 2 sc, hdc in next ch-1 space, ch 1, skip next sc, sc in next ch-1 space, ch 1, skip next sc**, (sc, ch 2, sc) in next ch-2 space; repeat from * around, ending last repeat at **, slip st in first sc – 6 sts across each side between corner ch-2 spaces.
Round 8: (Slip st, ch 4, slip st) all in next corner ch-2 space, *[ch 2, skip next st, slip st in next ch-1 space] across to next ch-2 space, ch 2, skip next sc**, (slip st, ch 4, slip st) all in corner ch-2 space; repeat from * around, ending last repeat at **, slip st in first slip st – 6 ch-2 spaces on each side between corner ch-4 spaces.
Fasten off. -
SECOND-EIGHTH HEXAGONS:
One-Side Join (Join new Hexagon along opposite edge of previous join)
Following assembly diagram below, repeat Round 7 as for First Hexagon.
Round 8: (Slip st, ch 2, slip st in corresponding ch-4 space of previous Hexagon, ch 2, slip st) all in next corner ch-2 space of working Hexagon, [ch 1, slip st in ch-1 space of previous Hexagon, ch 1, skip next st, slip st in next ch-1 space of working Hexagon] across to next ch-2 space, ch 1, slip st in ch-1 space of previous Hexagon, ch 1, skip next st, (slip st, ch 2, slip st in ch-4 space of previous Hexagon, ch 2, slip st) all in corner ch-2 space of working Hexagon, *[ch 2, skip next st, slip st in next ch-1 space] across to next ch-2 space, ch 2, skip next sc**, (slip st, ch 4, slip st) all in corner ch-2 space; repeat from * around, ending last repeat at **, slip st in first slip st.
Fasten off.
Instructions for SECOND, FOURTH, and SIXTH ROWS:
-
FIRST HEXAGON OF ROW:
Fit first Hexagon of row along two adjacent sides of previous row.
Two-Side Join (Join new Hexagon along two corresponding edges of previous Hexagons)
Following assembly diagram below, repeat Round 7 as for First Hexagon.
Round 8: [(Slip st, ch 2, slip st in corresponding ch-4 space of previous Hexagon, ch 2, slip st) all in next corner ch-2 space of working Hexagon, [ch 1, slip st in ch-1 space of previous Hexagon, ch 1, skip next st, slip st in next ch-1 space of working Hexagon] across to next ch-2 space, ch 1, slip st in ch-1 space of previous Hexagon, ch 1, skip next st, (slip st, ch 2, slip st in ch-4 space of previous Hexagon, ch 2, slip st) all in corner ch-2 space of working Hexagon] twice, *[ch 2, skip next st, slip st in next ch-1 space] across to next ch-2 space, ch 2, skip next sc**, (slip st, ch 4, slip st) in corner ch-2 space; repeat from * around, ending last repeat at **, slip st in first slip st.
Fasten off. -
REMAINING 6 HEXAGONS OF ROW:
Fit Hexagon along three adjacent sides of previous Hexagon and previous row.
Three Side Join (Join new Hexagon along corresponding edges of previous Hexagons)
Following assembly diagram below, repeat Round 7 as for First Hexagon.
Round 8: [(Slip st, ch 2, slip st in corresponding ch-4 space of previous Hexagon, ch 2, slip st) all in next corner ch-2 space of working Hexagon, [ch 1, slip st in ch-1 space of previous Hexagon, ch 1, skip next st, slip st in next ch-1 space of working Hexagon] across to next ch-2 space, ch 1, slip st in ch-1 space of previous Hexagon, ch 1, skip next st, (slip st, ch 2, slip st in ch-4 space of previous Hexagon, ch 2, slip st) all in corner ch-2 space of working Hexagon] 3 times, *[ch 2, skip next st, slip st in next ch-1 space] across to next ch-2 space, ch 2, skip next sc**, (slip st, ch 4, slip st) in corner ch-2 space; repeat from * around, ending last repeat at **, slip st in first slip st.
Fasten off.
Instructions for THIRD, FIFTH, and SEVENTH ROWS:
-
FIRST HEXAGON OF ROW:
Fit first Hexagon of row along one adjacent side of previous row.
Following assembly diagram below, repeat Round 7 as for First Hexagon. Work Round 8 of One-Side Join as for Second Hexagon to join to corresponding side of first Hexagon of previous row. -
NEXT 6 HEXAGONS OF ROW:
Fit Hexagon along three adjacent sides of previous Hexagon and previous row. Following assembly diagram below, repeat Round 7 as for First Hexagon. Work Round 8 of Three-Side Join as for Second Row to join to corresponding Hexagons of previous row. -
LAST HEXAGON OF ROW:
Following assembly diagram below, repeat Round 7 as for First Hexagon. Work Round 8 of Two-Side Join as for first Hexagon of Second Hexagon to corresponding sides of previous Hexagon of row and corresponding Hexagon of previous row.
Instructions for FINISHING:
-
BORDER:
Round 1: With right side facing and larger hook, join A with a slip st in top left hand corner ch-4 space (marked on assembly diagram), ch 1, *[work (2 sc, ch 2, 2 sc) in ch- 4 space, sc in next ch-2 space, Small Shell in next ch-2 space, sc in next 2 ch-2 space, Small Shell in next ch-2 space, sc in next ch-2 space] twice, [sc2tog over joined corner ch-4 sp of working Hexagon and ch-4 sp of next Hexagon, sc in next ch-2 space, Small Shell in next ch-2 space, sc in next 2 ch-2 space, Small Shell in next ch-2 space, sc in next ch-2 space, (2 sc, ch 2, 2 sc) in ch- 4 space, sc in next ch-2 space, Small Shell in next ch-2 space, sc in next 2 ch-2 space, Small Shell in next ch-2 space, sc in next ch-2 space] 7 times, ([work (2 sc, ch 2, 2 sc) in ch- 4 space, sc in next ch-2 space, Small Shell in next ch-2 space, sc in next 2 ch-2 space, Small Shell in next ch-2 space, sc in next ch-2 space] twice, [sc2tog over joined corner ch-4 sp of working Hexagon and ch-4 sp of next Hexagon, sc in next ch-2 space, Small Shell in next ch-2 space, sc in next 2 ch-2 space, Small Shell in next ch-2 space, sc in next ch-2 space] twice) three times; repeat from * once more, slip st in first sc.
Round 2: Change to smaller hook, sc in each sc, skipping sc2tog, and work (sc, ch 2, sc) in each ch-2 space and center dc of each Small Shell around, slip st in first sc.
Fasten off.
Weave in ends.
Abbreviations
- (SPECIAL) Beg Cluster
- Ch 3, [yarn over, insert hook in same stitch, yarn over and pull up loop, yarn over, draw through 2 loops] 2 times, yarn over, draw through all loops on hook.
- (SPECIAL) Cluster
- [Yarn over, insert hook in same stitch, yarn over and pull up loop, yarn over, draw through 2 loops] 3 times, yarn over, draw through all loops on hook.
- (SPECIAL) sc2tog
- [Draw up a loop in next st] twice, yarn over and draw through all 3 loops on hook.
- (SPECIAL) Shell
- Work 5 dc in same stitch.
- (SPECIAL) Small Shell
- Work 3 dc in same stitch.
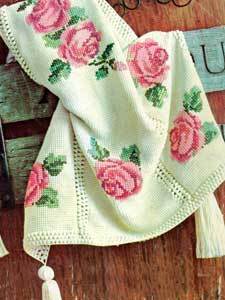
Read NextRose Afghan
Your Recently Viewed Projects
Thanks for your comment. Don't forget to share!
Zeemer
Apr 24, 2018
I love throws of this type of design even if I know it's very tedious to do. I love the colors used in this Blooming Flowers Crochet Throw. The green/purple/light yellow contrast is just fantastic. I can't wait to start this project. Gorgeous!
Hippie Chick
May 15, 2017
My son and daughter-in-law just bought a house and I would love to make this for them as a house warming gift. These colors are great and they would actually go with their chosen color scheme for their family room. I hope it doesnt take too long to make. Instructions look fairly easy.
Report Inappropriate Comment
Are you sure you would like to report this comment? It will be flagged for our moderators to take action.
Thank you for taking the time to improve the content on our site.