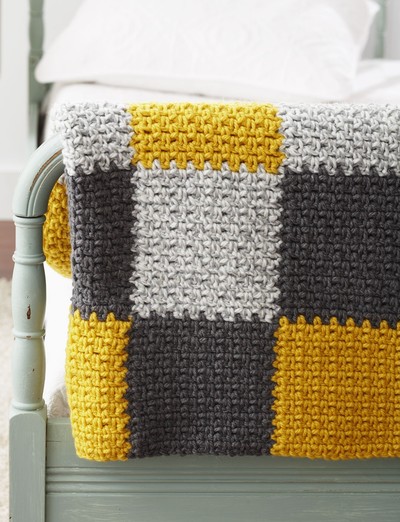
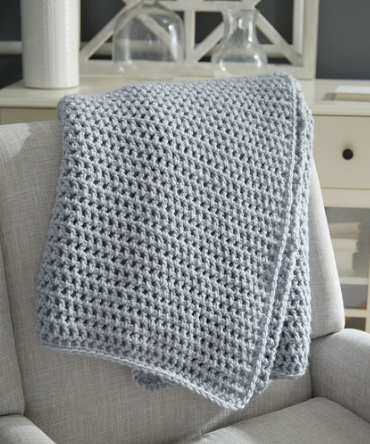
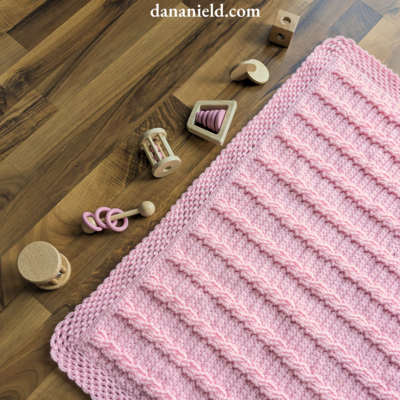
Butter Mints Tunisian Crochet Blanket
 Tunisian crochet is growing in popularity, so jump on board and try the Butter Mints Tunisian Crochet Blanket. Sweet as can be, this intermediate crochet pattern is a perfect way to get started in the world of tunisian crochet. The crochet blanket pattern will show you how to crochet different blocks with a unique crocheted border to create this finished look.
Materials
- RED HEART® "Super Saver®": 3 skeins 316 Soft White A, 1 skein each 320 Cornmeal B, 382 Country Blue C, 579 Pale Plum D, 661 Frosty Green E, and 774 Light Raspberry F.
- Afghan Crochet Hook: 6.5mm [US K-10.5].
- Crochet Hook: 6mm [US J-10].
- Yarn needle.
Size:
Throw measures 43” x 60.5”.
Gauge/Tension:
GAUGE: 16 sts = 4”; 12 rows = 4” in afghan pattern stitch. CHECK YOUR GAUGE. Use any size hook to obtain the gauge.
Note: All rows and rounds are worked from the right side.
THROW
Blocks (Make 7 each of B, C, D, E and F)
With afghan crochet hook, ch 16.
Row 1: Keeping all loops on hook, draw up a loop in 2nd ch from hook and in each ch across – 16 loops on hook; do NOT turn; work loops off as follows: yo and draw
through 1 loop, [yo and draw through 2 loops] 15 times –1loop remains on hook.
Row 2: [With yarn at back of work, draw up a loop in next vertical bar, with yarn at front of work, draw up a loop in next vertical bar] 7 times, with yarn at back of work, draw up a loop in last vertical bar – 16 loops on hook; do NOT turn; yo and draw through 1 loop, [yo and draw through 2 loops] 15 times.
Row 3: [With yarn at front of work, draw up a loop in next vertical bar, with yarn at back of work, draw up a loop in next vertical bar] 7 times, with yarn at front of work, draw up a loop in last vertical bar – 16 loops on hook; do NOT turn; yo and draw through 1 loop, [yo and draw through 2 loops] 15 times.
Rows 4-13: Repeat Rows 2 and 3 for afghan pattern stitch 5 more times.
Row 14: [With yarn at back of work, draw up a loop in next vertical bar and through the loop on the hook, with yarn at front of work, draw up a loop in next vertical bar and through the loop on the hook] 7 times, with yarn at back of work, draw up a loop in last vertical bar and through the loop on the hook. Fasten off.
Block Border
Round 1: With right side facing and crochet hook, join A in top right-hand corner st; ch 3, * [skip next st, (dc, ch 1, dc) all in next st] 6 times, skip next st, dc in last st, ch 2, pivot to work down side, dc in first row end, (dc, ch 1, dc) all in next row end, [skip next row end, (dc, ch 1, dc) all in next row end] 5 times, skip next row end, dc in next row end, ch 2 *, pivot to work across lower edge, dc in first st; repeat from * to * once more; join with a slip st in top of ch-3. Fasten off.
Round 2: With same color as center of Block, join yarn in same st as joining; ch 1, sc in same st, * [ch 1, sc in next ch-1 space] 6 times, ch 1, skip next dc, sc in next dc, (sc, ch 2, sc) all in corner ch-2 space, sc in next dc, [ch 1, sc in next ch-1 space] 6 times, ch 1, skip next dc, sc in next dc, (sc, ch 2, sc) all in corner ch-2 space *, sc in next dc; repeat from * to * once more; join in first sc. Fasten off.
Round 3: Join A in top right-hand corner ch-2 space; (ch 3, dc, ch 2, 2 dc) all in same space, * skip next sc, dc in next sc, [2 dc in next ch-1 space] 7 times, skip next sc, dc in next sc, (2 dc, ch 2, 2 dc) all in corner ch-2 space; repeat from * around; join in top of ch-3. Fasten off.
Assembly
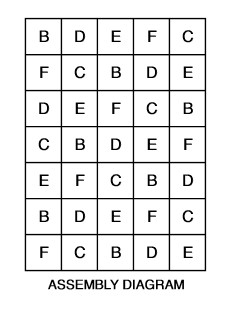 Arrange Blocks following diagram. With A, slip st Blocks together in back loops, matching sts.
Afghan Border
With right side facing and crochet hook, join A in upper right-hand corner dc.
Round 1: Ch 3, dc in each dc and each ch-space on each side of each joining seam around and work (2 dc, ch 2, 2 dc) in each corner ch-2 space; join. Fasten off.
Round 2: Join B in top right-hand corner ch-2 space; ch 1, ** (sc, ch 3, sc) in corner ch-2 space, * ch 1, skip next dc, sc in next dc; repeat from * to corner ch-2 space; repeat from ** around; join. Fasten off.
Round 3: Join E in corner ch-2 space; ch 3, (dc; ch 3, slip st in last dc - picot made; [2 dc, picot] twice) all in corner ch-2 space, * skip next sc, 2 dc in next ch-1 space, picot; repeat from * to 2 sc before corner; dc in next sc, skip next sc **, [2 dc, picot] 3 times all in corner ch-2 space; repeat from * around, end at **; join. Fasten off.
Round 4: Join D in loop of first picot; ch 1, sc in same picot, * ch 3, sc in next picot; repeat from * around; join. Fasten off.
Round 5: Join F in first ch-3 space; ch 3, dc in same space, picot, * (2 dc, picot) all in next ch-3 space; repeat from * around; join. Fasten off.
Read NextUnbelievably Easy Crochet Blanket
Your Recently Viewed Projects

Thanks for your comment. Don't forget to share!
rkayg99 1031535
Oct 07, 2021
Yarn at back sounds like TSS (Tunisian simple stitch) yarn in front of vertical bar sounds like a TPS (Tunisian purl stitch) I'm not sure if this is what the instructions mean. It would be nice if this could be run by someone who's an expert Tunisian crocheter
tfrusso77 2936526
Mar 22, 2019
Has anyone made this blanket for a baby? Just wondering how many squares to make.
Zeemer
Aug 28, 2017
Just reading the comments of my fellow crocheters make this Butter Mints Tunisian Crochet Blanket tedious to make but...if you really want to do this because it is challenging for a veteran crocheter, then by all means, go ahead and to this project. If there's one thing that will convince me to do this blanket is the design and color combo used here. I love the vibrant colors, it gives me energy.
Cheryl Y
Mar 23, 2017
This is a lovely looking Butter Mints Tunisian Crochet Blanket. After reading the pattern, I'm not sure I want to even try it. It is very confusing and I'm not sure it will work out. I also like the comments below, what does yarn in back, yarn in front mean? I wish there was a video showing this so it would make more sense. Has anyone finished a square? Has it worked? I love doing the Tunisian stitch but have never heard of this one. I'm looking for some one to change my mind, so please help. Thanks for sharing this free crochet pattern.
jmttm
Aug 05, 2015
Is this an error??? 7 times? The row is 16 stitches long so how can it be 7 times?????? Row 14 With yarn at back of work, draw up a loop in next vertical bar and through the loop on the hook, with yarn at front of work, draw up a loop in next vertical bar and through the loop on the hook 7 times, with yarn at back of work, draw up a loop in last vertical bar and through the loop on the hook. Fasten off Read more at http//www.allfreecrochetafghanpatterns.com
cginn99 2516849
Sep 27, 2013
I am starting to make this beautiful blanket; but I am confused on Row 2 (With yarn at back of work, draw up a loop in next vertical bar, with yarn at front of work, draw up a loop in next vertical bar] 7 times, with yarn at back of work, draw up a loop in last vertical bar. What does that mean? With yarn at the back of work and yarn at the front of work? Can someone please help !!??
prodgers15 0627209
Mar 17, 2014
I am about 50% finished making my squares. I am new to Tunisian crochet, so instead of doing the "yarn at front..., yarn at back...", I made all the colored squares using the Tunisian simple stitch, where you don't have to move the yarn at all. You just do your stitches with the yarn at the back all the time. It looks fine - not quite as fancy as the stitch called for, but plenty good for my nine-yr-old g-daughter! She won't know the difference and I'm not telling (except here!) This whole blanket is very nice, but not as easy/quick as I imagined it would be. I'm excited to see it finished. Hope this helps!
rosebooboo
Aug 16, 2013
Love, love, love this! It's so pretty with the pastels and easy to make. Thanks for sharing this pattern with us.
Report Inappropriate Comment
Are you sure you would like to report this comment? It will be flagged for our moderators to take action.
Thank you for taking the time to improve the content on our site.