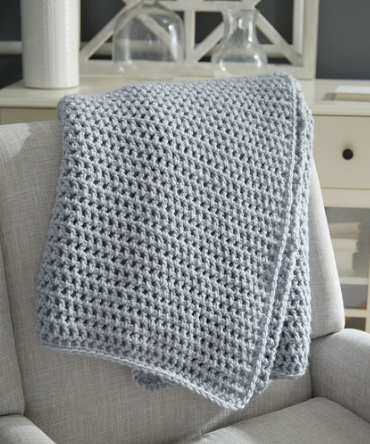
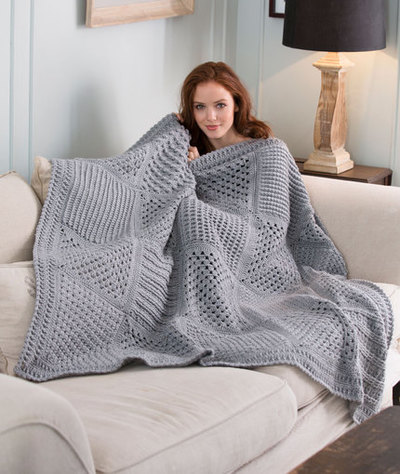
50 Shades of Gray Crochet Throw
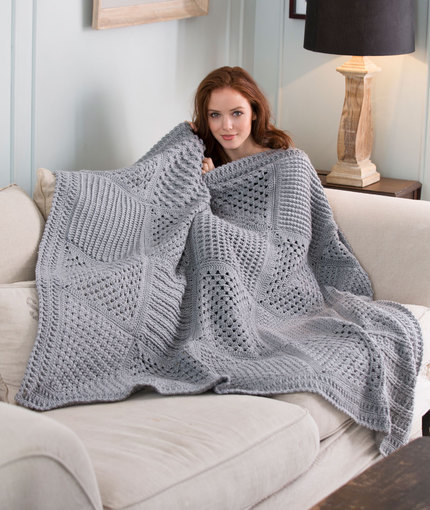
The 50 Shades of Gray Crochet Throw is a great crochet blanket pattern for those who like to try new crochet stitch patterns. The texture of each of the crochet squares is fun to work up each time; a granny square is placed between each of the textured squares in a checkerboard arrangement. For your own unique crochet design work up each square in a different color. Snuggle up on the couch with your newly crocheted throw and just enjoy the elegance that it is.

Crochet HookG/6 or 4 mm hook
Yarn Weight(4) Medium Weight/Worsted Weight and Aran (16-20 stitches to 4 inches)
Materials:
- RED HEART® Soft®:13 balls 9440 Light Grey Heather
- Susan Bates® Crochet Hooks: 4mm [US G-6] (for Granny Squares) and 3.75mm [US F-5] (for all other Squares)
- Stitch markers (optional)
- Yarn needle
- Chart
GAUGE: Each Square measures 10 x 10” (25.5 x 25.5 cm); 15 sts = 4” (10 cm), row gauge for individual Squares is given at beginning of instructions for each Square.
Throw measures 47” x 57” (119.5 x 145 cm)
Special Stitches
Bpdc (back post double crochet) = Yarn over, insert hook from back side of work to front and to back again around the post of indicated stitch; yarn over and pull up a loop (3 loops on hook), [yarn over and draw through 2 loops on hook] twice.
Note: Take care not to work into the top of the same stitch around which the Bpdc was worked; thiswould result in a stitch increase.
Fpdc (Front post double crochet) = Yarn over, insert hook from front side of work to back and to front again around post of indicated stitch; yarn over and pull up a loop (3 loops on hook), [yarn over and draw through 2 loops on hook] twice.
Notes: Take care not to work into the top of the same stitch around which the Fpdc was worked; this would result in a stitch increase. If the Fpdc is worked around a stitch several rows below, skip the stitch in the row currently being worked into “behind” the Fpdc.
Fptr (Front post treble crochet) = [Yarn over] twice, insert hook from front side of work to back and to front again around post of the indicated stitch on a previous row; yarn over and pull up a loop (4 loops on hook), [yarn over and draw through 2 loops] 3 times.
Note: Skip the stitch in the row currently being worked into “behind” the Fptr. popcorn = Work 4 dc in indicated stitch, drop loop from hook, insert hook in first of the 4 dc just made, return dropped loop to hook and draw it through, ch 1 to close popcorn. shell = (2 dc, ch 2, 2 dc) in indicated stitch or space.
Pattern Notes
1. Throw is made from twenty Squares: Ten Granny Squares and one each of ten different Textured Squares. For photos of all individual squares, see end of pattern.
2. Each Grann y Square is worked in joined and turned rounds. Each Textured Square is worked back and forth in rows, beginning at the lower edge.
3. All Squares are sewn together according to assembly dia gram, and a border worked around the outer edge.
4. When instructed to work around a stitch “2 rows/rounds below” work around the stitch in the row/round numbered 2 less than the row/round you are currently working. For example, if you are working Row 4, a stitch “2 rows below” is in Row 2.
GRANNY SQUARE
(make 10)
Gauge:
Rounds 1–3 measure about 3¾” (9.5cm across).
With larger hook, ch 4; join with slip st in first ch to form a ring.
Round 1 (right side): Ch 3 (counts as first dc here and throughout), 2 dc in ring, [ch 2, 3 dc in ring] 3 times, ch 2; join with slip st in top of beginning ch, turn—12 dc (four 3-dc groups) and 4 corner ch-2 spaces.
Round 2 (wrong side): Ch 3, (2 dc, ch 2, 3 dc) in first corner ch-2 space, [ch 1, (3 dc, ch 2, 3 dc) in next corner ch-2 space] 3 times, ch 1; join with slip st in top of beginning ch, turn— 24 dc (eight 3-dc groups), 4 ch-1 spaces, and 4 corner ch-2 spaces.
Round 3: Ch 3, 2 dc in first ch-1 space, ch 1, (3 dc, ch 2, 3 dc) in next corner ch-2 space, *ch 1, 3 dc in next ch-1 space, ch 1, (3 dc, ch 2, 3 dc) in next corner ch-2 space; repeat from * 2 more times, ch 1; join with slip st in top of beginning ch, turn—36 dc (twelve 3-dc groups), 8 ch-1 spaces, and 4 corner ch-2 spaces.
Round 4: Ch 3, 2 dc in first ch-1 space, ch 1, (3 dc, ch 2, 3 dc) in next corner ch-2 space, *[ch 1, 3 dc in next ch-1 space] twice, ch 1, (3 dc, ch 2, 3 dc) in next corner ch-2 space; repeat from * 2 more times, ch 1, 3 dc in last ch-1 space, ch 1; join with slip st in top of beginning ch, turn—48 dc (sixteen 3-dc groups), 12 ch-1 spaces, and 4 corner ch-2 spaces.
Round 5: Ch 3, 2 dc in first ch-1 space, ch 1, 3 dc in next ch-1 space, ch 1, (3 dc, ch 2, 3 dc) in next corner ch-2 space, *[ch 1, 3 dc in next ch-1 space] 3 times, ch 1, (3 dc, ch 2, 3 dc) in next corner ch-2 space; repeat from * 2 more times, ch 1, 3 dc in last ch-1 space, ch 1; join with slip st in top of beginning ch, turn—60 dc (twenty 3-dc groups), 16 ch-1 spaces, and 4 corner ch-2 spaces.
Round 6: Ch 3, 2 dc in first ch-1 space, ch 1, 3 dc in next ch-1 space, ch 1, (3 dc, ch 2, 3 dc) in next corner ch-2 space, *[ch 1, 3 dc in next ch-1 space] 4 times, ch 1, (3 dc, ch 2, 3 dc) in next corner ch-2 space; repeat from * 2 more times, [ch 1, 3 dc in next ch-1 space] twice, ch 1; join with slip st in top of beginning ch, turn—72 dc (twenty-four 3-dc groups), 20 ch-1 spaces, and 4 corner ch-2 spaces.
Round 7: Ch 3, 2 dc in first ch-1 space, [ch 1, 3 dc in next ch-1 space] twice, ch 1, (3 dc, ch 2, 3 dc) in next corner ch-2 space, *[ch 1, 3 dc in next ch-1 space] 5 times, ch 1, (3 dc, ch 2, 3 dc) in next corner ch-2 space; repeat from * 2 more times, [ch 1, 3 dc in next ch-1 space] twice, ch 1; join with slip st in top of beginning ch, turn—84 dc (twenty-eight 3-dc groups), 24 ch-1 spaces, and 4 corner ch-2 spaces.
Round 8: Ch 3, 2 dc in first ch-1 space, [ch 1, 3 dc in next ch-1 space] twice, ch 1, (3 dc, ch 2, 3 dc) in next corner ch-2 space, *[ch 1, 3 dc in next ch-1 space] 6 times, ch 1, (3 dc, ch 2, 3 dc) in next corner ch-2 space; repeat from * 2 more times, [ch 1, 3 dc in next ch-1 space] 3 times, ch 1; join with slip st in top of beginning ch, turn—96 dc (thirty-two 3-dc groups), 28 ch-1 spaces, and 4 corner ch-2 spaces.
Round 9 (right side): Ch 3, dc in each ch-1 space and dc around, working (dc, ch 2, dc) in each corner ch-2 space; join with slip st in top of beginning ch, do NOT turn—132 dc (33 dc across each edge) and 4 corner ch-2 spaces.
Round 10 (right side): Ch 1, sc in each dc around working (sc, ch 3, sc) in each corner ch-2 space; join with slip st in first sc—140 sc (35 sc across each side edge) and 4 corner ch-3 spaces. Fasten off.
TEXTURED SQUARE #1
CROSS-STITCHED
Gauge: Rows 1-7 = 3” (7.5 cm) With smaller hook, ch 36 loosely.
Row 1 (wrong side): Working in back loop of each ch only, sc in 2nd ch from hook and in each remaining ch across, turn—35 sc.
Row 2: Ch 3 (counts as first dc here and throughout), *skip next st, dc in next 2 sts, working in front of 2 dc just made, dc in skipped st (crossed-dc made); repeat from * to last st, dc in last st, turn—11 crossed-dc, and 1 dc at each end of row.
Row 3: Ch 1, sc in each st across, turn.
Rows 4–27: Repeat last 2 rows 12 more times.
Do not fasten off.
Border Round (right side): Ch 1, (sc, ch 3, sc) in first sc (first corner made), sc in each remaining sc to last st, (sc, ch 3, sc) in last sc (2nd corner made); working in ends of rows, work 33 sc evenly spaced across side edge; working across opposite side of foundation ch and working into both free loops of each ch, (sc, ch 3, sc) in first ch (3rd corner made), sc in each remaining ch across to last ch, (sc, ch 3, sc) in last ch (4th corner made); work across remaining side edge in same manner as first side edge; join with slip st in first sc—140 sc (35 sc across each side edge) and 4 corner ch-3 spaces. Fasten off.
Note:
To work 33 sc evenly spaced across each side edge, the designer recommends working as follows: Place a marker in each end of Rows 5, 9, 13, 17, 21, and 25 (remove markers as you come to them while working Border Round), skip the marked sc rows, sc in top of and around post of each dc row, and sc in end of each unmarked sc.
TEXTURED SQUARE #2
BACK LOOPS
Gauge: Rows 1–8 = 3” (7.5 cm) With smaller hook, ch 36 loosely.
Row 1 (wrong side): Working in back loop of each ch only, sc in 2nd ch from hook and in each remaining ch across, turn—35 sc.
Row 2: Ch 3 (counts as first dc here and throughout), working in back loops only, dc in each st across, turn.
Row 3: Ch 1, working in back loops only, sc in each st across, turn.
Rows 4–27: Repeat last 2 rows 12 more times.
Do not fasten off.
Border Round (right side): Ch 1, (sc, ch 3, sc) in first sc (first corner made), sc in each remaining sc to last st, (sc, ch 3, sc) in last sc (2nd corner made); working in ends of rows, work 33 sc evenly spaced across side edge; working across opposite side of foundation ch and working into both free loops of each ch, (sc, ch 3, sc) in first ch (3rd corner made), sc in each remaining ch across to last ch, (sc, ch 3, sc) in last ch (4th corner made); work across remaining side edge in same manner as first side edge; join with slip st in first sc—140 sc (35 sc across each side edge) and 4 corner ch-3 spaces. Fasten off.
Note: To work 33 sc evenly spaced across each side edge, the designer recommends working as follows: Place a marker in each end of Rows 5, 9, 13, 17, 21, and 25 (remove markers as you come to them while working Border Round), skip the marked sc rows, sc in top of and around post of each dc row, and sc in end of each unmarked sc.
TEXTURED SQUARE #3
FRONT POST TREBLE CROCHET (FPTR)
Gauge:
Rows 1–8 = 3¼” (8.5 cm) With smaller hook, ch 36 loosely.
Row 1 (wrong side): Working in back loop of each ch only, sc in 2nd ch from hook and in each remaining ch across, turn—35 sc.
Row 2: Ch 3 (counts as first dc here and throughout), dc in each st across, turn.
Row 3: Ch 1, sc in each st across, turn.
Row 4: Ch 3, dc in next sc, [Fptr around each of next 2 sts 2 rows below, dc in next 2 dc] 3 times, Fptr around each of next 2 sts 2 rows below, dc in next dc, Fptr around next st 2 rows below, dc in next dc, [Fptr around each of next 2 sts 2 rows below, dc in next 2 dc] 4 times, turn—17 Fptr and 18 dc.
Row 5: Ch 1, sc in each st across, turn.
Row 6: Ch 3, dc in next sc, [Fptr around each of next 2 Fptr 2 rows below, dc in next 2 dc] 3 times, Fptr around each of next 2 Fptr 2 rows below, dc in next dc, Fptr around next Fptr 2 rows below, dc in next dc, [Fptr around each of next 2 Fptr 2 rows below, dc in next 2 dc] 4 times, turn.
Rows 7–26: Repeat last 2 rows 10 times.
Row 27: Repeat Row 5.
Do not fasten off.
Border Round (right side): Ch 1, (sc, ch 3, sc) in first sc (first corner made), sc in each remaining sc to last st, (sc, ch 3, sc) in last sc (2nd corner made); working in ends of rows, work 33 sc evenly spaced across side edge; working across opposite side of foundation ch and working into both free loops of each ch, (sc, ch 3, sc) in first ch (3rd corner made), sc in each remaining ch across to last ch, (sc, ch 3, sc) in last ch (4th corner made); work across remaining side edge in same manner as first side edge; join with slip st in first sc—140 sc (35 sc across each side edge) and 4 corner ch-3 spaces. Fasten off.
Note: To work 33 sc evenly spaced across each side edge, the designer recommends working as follows: Place a marker in each end of Rows 5, 9, 13, 17, 21, and 25 (remove markers as you come to them while working Border Round), skip the marked sc rows, sc in top of and around post of each dc row, and sc in end of each unmarked sc.
TEXTURED SQUARE #4
POPCORN
Gauge: Rows 1–7 = 3” (7.5 cm) With smaller hook, ch 36 loosely.
Row 1 (wrong side): Working in back loop of each ch only, sc in 2nd ch from hook and in each remaining ch across, turn—35 sc.
Row 2: Ch 3 (counts as first dc here and throughout), dc in next 2 sts, *popcorn in next st, dc in next 3 sts; repeat from * across, turn—8 popcorns.
Row 3: Ch 1, sc in each dc and ch-1 space (at top of each popcorn) across, turn—35 sc.
Row 4: Ch 3, popcorn in next st, *dc in next 3 sts, popcorn in next st; repeat from * to last st, dc in last st, turn—8 popcorns.
Row 5: Repeat Row 3.
Rows 6–25: Repeat Rows 2–5 five more times.
Do not fasten off.
Border Round (right side): Ch 1, (sc, ch 3, sc) in first sc (first corner made), sc in each remaining sc to last st, (sc, ch 3, sc) in last sc (2nd corner made); working in ends of rows, work 33 sc evenly spaced across side edge; working across opposite side of foundation ch and working into both free loops of each ch, (sc, ch 3, sc) in first ch (3rd corner made), sc in each remaining ch across to last ch, (sc, ch 3, sc) in last ch (4th corner made); work across remaining side edge in same manner as first side edge; join with slip st in first sc—140 sc (35 sc across each side edge) and 4 corner ch-3 spaces. Fasten off.
Note: To work 33 sc evenly spaced across each side edge, the designer recommends working as follows: Place a marker in each end of Rows 5, 13, and 19 (remove markers as you come to them while working Border Round), skip the marked sc rows, sc in top of and around post of each dc row, and sc in end of each unmarked sc row.
TEXTURED SQUARE #5
RAISED TREBLE CROCHET
Gauge: Rows 1–10 = 3” (7.5 cm) With smaller hook, ch 36 loosely.
Row 1 (right side): Working in back loop of each ch only, sc in 2nd ch from hook and in each remaining ch across, turn—35 sc.
Row 2: Ch 1, sc in first st, *tr in next st, sc in next st; repeat from * across, turn—18 sc and 17 tr.
Row 3: Ch 1, sc in each st across, turn.
Row 4: Ch 1, sc in first 2 sts, *tr in next st, sc in next st; repeat from * last st, sc in last st, turn—19 sc and 16 tr.
Row 5: Repeat Row 3.
Rows 6–33: Repeat Rows 2–5 seven times.
Rows 34 and 35: Repeat Rows 2 and 3; do NOT turn at end of Row 35.
Do not fasten off.
Border Round (right side): Ch 1, working in ends of rows down side edge, work 33 sc evenly spaced across side edge; working across opposite side of foundation ch and working into both free loops of each ch, (sc, ch 3, sc) in first ch (first corner made), sc in each remaining ch across to last ch, (sc, ch 3, sc) in last ch (2nd corner made); work across next side edge in same manner as first side edge; working across sts of Row 35, (sc, ch 3, sc) in first st (3rd corner made), sc in each st across to last st, (sc, ch 3, sc) in last st (4th corner made); join with slip st in first sc—140 sc (35 sc across each side edge) and 4 corner ch-3 spaces. Fasten off.
Note: To work 33 sc evenly spaced across each side edge, the designer recommends working as follows: Place a marker in each end of Row 18 (remove marker as you come to it while working Border Round), skip the first row (Row 35) and marked row (Row 18), sc in end of each remaining row.
TEXTURED SQUARE #6
FRONT POST DOUBLE CROCHET (FPDC)
Gauge: Rows 1–8 = 3¼” (8.5 cm) With smaller hook, ch 36 loosely.
Row 1 (right side): Working in back loop of each ch only, sc in 2nd ch from hook and in each remaining ch across, turn—35 sc.
Row 2: Ch 3 (counts as first dc here and throughout), dc in each st across, turn.
Row 3: Ch 3, *Fpdc around next st, dc in next st; repeat from * across, turn—18 dc and 17 Fpdc.
Row 4: Ch 3, *dc in next FPdc, Fpdc around next dc; repeat from * to last 2 sts, dc in last 2 sts, turn—19 dc and 16 Fpdc.
Rows 5–26: Repeat last 2 rows 11 more times.
Row 27: Ch 1, sc in each st across, do NOT turn. Do not fasten off.
Border Round (right side): Ch 1, working in ends of rows down side edge, work 33 sc evenly spaced across side edge; working across opposite side of foundation ch and working into both free loops of each ch, (sc, ch 3, sc) in first ch (first corner made), sc in each remaining ch across to last ch, (sc, ch 3, sc) in last ch (2nd corner made); work across next side edge in same manner as first side edge; working across sts of Row 27, (sc, ch 3, sc) in first st (3rd corner made), sc in each st across to last st, (sc, ch 3, sc) in last st (4th corner made); join with slip st in first sc—140 sc (35 sc across each side edge) and 4 corner ch-3 spaces. Fasten off.
Note: To work 33 sc evenly spaced across each side edge, the designer recommends working as follows: Place a marker in each end of Rows 2, 4, 8, 12, 16, 20, and 24 (remove markers as you come to them while working Border Round), sc in top of and around post of each marked dc row, sc around post of each unmarked dc row, and sc in end of each unmarked sc row.
TEXTURED SQUARE #7
BACK LOOP AND FRONT LOOP
Gauge: Rows 1–11 = 3” (7.5 cm) With smaller hook, ch 36 loosely.
Row 1 (right side): Working in back loop of each ch only, sc in 2nd ch from hook and in each remaining ch across, turn—35 sc.
Row 2: Ch 1, sc in back loop of first st, *sc in front loop of next st, sc in back loop of next st; repeat from * across, turn.
Row 3: Ch 1, sc in front loop of first st, *sc in back loop of next st, sc in front loop of next st; repeat from * across, turn.
Rows 4–39: Repeat last 2 rows 18 more times.
Row 40: Repeat Row 2.
Row 41: Ch 1, working in both loops, sc in each st across, do NOT turn.
Do not fasten off.
Border Round (right side): Ch 1, working in ends of rows down side edge, work 33 sc evenly spaced across side edge; working across opposite side of foundation ch and working into both free loops of each ch, (sc, ch 3, sc) in first ch (first corner made), sc in each remaining ch across to last ch, (sc, ch 3, sc) in last ch (2nd corner made); work across next side edge in same manner as first side edge; working across sts of Row 41, (sc, ch 3, sc) in first st (3rd corner made), sc in each st across to last st, (sc, ch 3, sc) in last st (4th corner made); join with slip st in first sc—140 sc (35 sc across each side edge) and 4 corner ch-3 spaces. Fasten off.
Note: To work 33 sc evenly spaced across each side edge, the designer recommends working as follows: Place a marker in each end of Rows 1, 6, 12, 18, 24, 30, and 36 (remove markers as you come to them while working Border Round), sc in end of each unmarked row and skip each marked row.
TEXTURED SQUARE #8
FRONT POST DOUBLE CROCHET (FPDC)
AROUND SINGLE CROCHET
Gauge: Rows 1–12 = 3” (7.5 cm) With smaller hook, ch 36 loosely.
Row 1 (wrong side): Working in back loop of each ch only, sc in 2nd ch from hook and in each remaining ch across, turn—35 sc.
Row 2: Ch 1, sc in first st, *Fpdc around next st, sc in next st; repeat from * across, turn— 18 sc and 17 Fpdc.
Row 3: Ch 1, sc in each st across, turn.
Row 4: Ch 1, sc in first st, *Fpdc around next Fpdc 2 rows below, sc in next st; repeat from * across, turn.
Rows 5–44: Repeat last 2 rows 20 more times.
Row 45: Ch 1, sc in each st across, turn.
Do not fasten off.
Border Round (right side): Ch 1, (sc, ch 3, sc) in first sc (first corner made), sc in each remaining sc to last st, (sc, ch 3, sc) in last sc (2nd corner made); working in ends of rows, work 33 sc evenly spaced across side edge; working across opposite side of foundation ch and working into both free loops of each ch, (sc, ch 3, sc) in first ch (3rd corner made), sc in each remaining ch across to last ch, (sc, ch 3, sc) in last ch (4th corner made); work across remaining side edge in same manner as first side edge; join with slip st in first sc—140 sc (35 sc across each side edge) and 4 corner ch-3 spaces. Fasten off.
Note: To work 33 sc evenly spaced across each side edge, the designer recommends working as follows: Place a marker in each end of Rows 2, 6, 10, 14, 18, 22, 26, 30, 34, 38 and 42 (remove markers as you come to them while working Border Round), sc in end of each unmarked row and skip each marked row.
TEXTURED SQUARE #9
SQUARE SHELLS WITH FRONT AND BACK
POST STITCHES
Gauge: Rows 1–6 = 3” (7.5 cm) at shell points
With smaller hook, ch 36 loosely.
Row 1 (right side): Working in back loop of each ch only, sc in 2nd ch from hook and in each remaining ch across, turn—35 sc.
Row 2: Ch 3 (counts as first dc here and throughout), dc in next 2 sts, *skip next 2 sts, shell in next st, skip next 2 sts, dc in next 3 sts; repeat from * across, turn—4 shells and 15 dc.
Row 3: Ch 3, Fpdc around each of next 2 sts, shell in ch-2 space of next shell, skip remaining sts of the shell, *Fpdc around each of next 3 sts, shell in ch-2 space of next shell, skip remaining sts of the shell; repeat from * to last 3 sts, Fpdc around each of next 2 sts, dc in last st, turn—4 shells, 13 Fpdc, and 2 dc.
Row 4: Ch 3, Bpdc around each of next 2 post sts, shell in ch-2 space of next shell, skip remaining sts of the shell, *Bpdc around each of next 3 post sts, shell in ch-2 space of next shell, skip remaining sts of the shell; repeat from * to last 3 sts, Bpdc around each of next 2 post sts, dc in last st, turn—4 shells, 13 Bpdc, and 2 dc.
Row 5: Ch 3, Fpdc around each of next 2 post sts, shell in ch-2 space of next shell, skip remaining sts of the shell, *Fpdc around each of next 3 post sts, shell in ch-2 space of next shell, skip remaining sts of the shell; repeat from * to last 3 sts, Fpdc around each of next 2 post sts, dc in last st, turn—4 shells, 13 Fpdc, and 2 dc.
Rows 6–23: Repeat last 2 rows 9 more times.
Row 24: Ch 3, Bpdc around each of next 2 post sts, dc in next st, hdc in next st, sc in next ch-2 space, hdc in next st, dc in next st, *Bpdc around each of next 3 post sts, dc in next st, hdc in next st, sc in next ch-2 space, hdc in next st, dc in next st; repeat from * to last 3 sts, Bpdc around each of next 2 post sts, dc in last st, turn—35 sts.
Do not fasten off.
Border Round (right side): Ch 1, (sc, ch 3, sc) in first sc (first corner made), sc in each remaining sc to last st, (sc, ch 3, sc) in last sc (2nd corner made); working in ends of rows, work 33 sc evenly spaced across side edge; working across opposite side of foundation ch and working into both free loops of each ch, (sc, ch 3, sc) in first ch (3rd corner made), sc in each remaining ch across to last ch, (sc, ch 3, sc) in last ch (4th corner made); work across remaining side edge in same manner as first side edge; join with slip st in first sc—140 sc (35 sc across each side edge) and 4 corner ch-3 spaces. Fasten off.
Note: To work 33 sc evenly spaced across each side edge, the designer recommends working as follows: skip Row 24, *sc in top of and around post of dc at end of next row, sc around post of dc at end of next row; repeat from * to last row, skip last row.
TEXTURED SQUARE #10
DOUBLE CROCHET AND SLIP STITCH
Gauge: Rows 1–9 = 3¼” (8.5 cm) With smaller hook, ch 36 loosely.
Row 1 (right side): Working in back loop of each ch only, sc in 2nd ch from hook and in each remaining ch across, turn—35 sc.
Row 2: Ch 1, slip st in first st, *dc in next st, slip st in next st; repeat from * across, turn— 18 slip sts and 17 dc.
Row 3: Ch 3 (counts as first dc here and throughout), dc in each dc and slip st across, turn—35 dc.
Row 4: Ch 1, slip st in first st, *dc in next st, slip st in next st; repeat from * across, turn.
Rows 5–30: Repeat last 2 rows 13 more times.
Do not fasten off.
Border Round (right side): Ch 1, (sc, ch 3, sc) in first sc (first corner made), sc in each remaining sc to last st, (sc, ch 3, sc) in last sc (2nd corner made); working in ends of rows, work 33 sc evenly spaced across side edge; working across opposite side of foundation ch and working into both free loops of each ch, (sc, ch 3, sc) in first ch (3rd corner made), sc in each remaining ch across to last ch, (sc, ch 3, sc) in last ch (4th corner made); work across remaining side edge in same manner as first side edge; join with slip st in first sc—140 sc (35 sc across each side edge) and 4 corner ch-3 spaces. Fasten off.
Note: To work 33 sc evenly spaced across each side edge, the designer recommends working as follows: Place a marker in each end of Rows 5, 11, 17, and 23 (remove markers as you come to them while working Border Round), skip the unmarked slip st rows, sc in end of each marked slip st row, and sc in top of and around post of each dc row.
FINISHING
Arrange Squares as in assembly diagram. With 1 strand of yarn, whipstitch Squares together sewing through front loops of single crochet stitches around edges.
Border
Round 1 (right side): With right side facing, join yarn with sc in 2nd sc following any outer corner ch-3 space, *sc in each sc, in each ch- space on both sides of each seam between Squares, and in each seam across to next corner ch-3 space, (sc, ch 3, sc) in corner ch-3 space; repeat from * 3 more times, sc in last sc; join with slip st in first sc—680 sc (151 sc across each short edge and 189 sc across each long edge) and 4 corner ch-3 spaces.
Round 2 (right side): Ch 3 (counts as first dc), dc in each sc around, working (dc, ch 3, dc) in each corner ch-3 space; join with slip st in top of beginning ch—688 dc (153 dc across each short edge and 191 dc across each long edge) and 4 corner ch-3 spaces.
Round 3 (right side): Ch 1, sc in same st as joining, [*ch 1, skip next dc, sc in next dc; repeat from * across to 1 dc before next corner ch-3 space, ch 1, skip next dc, (sc, ch 3, sc) in corner ch-3 space] 4 times, **ch 1, skip next dc, sc in next dc; repeat from ** to last dc, ch 1, skip last dc; join with slip st in first sc.
Round 4 (right side): Ch 1, sc in same st as joining, [*working over next ch-1 space work Fpdc around next dc 2 rounds below, sc in next sc; repeat from * to next corner ch-3 space, (sc, ch 3, sc) in corner ch-3 space, sc in next sc] 4 times, working over next ch-1 space work Fpdc around next dc 2 rounds below, **sc in next sc, working over next ch-1 space, work Fpdc around next dc 2 rounds below; repeat from ** to end of round; join with slip st in first sc—704 sts (157 sts across each short edge and 195 sts across each long edge) and 4 corner ch-3 spaces.
Round 5 (right side): Ch 1, sc in same st as joining, [*ch 1, skip next Fpdc, sc in next sc; repeat from * to 1 sc before next corner ch-3 space, ch 1, skip next sc, (sc, ch 3, sc) in corner ch-3 space, ch 1, skip next sc, sc in next sc] 4 times, **ch 1, skip next Fpdc, sc in next sc; repeat from ** to last Fpdc, ch 1, skip last Fpdc; join with slip st in first sc.
Round 6 (wrong side): Ch 1, TURN, sc in first ch-1 space, sc in each sc and ch-1 space around, working (sc, ch 3, sc) in each corner ch-3 space; join with slip st in first sc—720 sc (161 sc across each short edge and 199 sc across each long edge) and 4 corner ch-3 spaces.
Round 7 (right side): Ch 3 (counts as dc), TURN, dc in each sc around, working (dc, ch 3, dc) in each corner ch-3 space; join with slip st in top of beginning ch—728 dc (163 dc across each short edge and 201 dc across each long edge) and 4 corner ch-3 spaces.
Rounds 8 and 9: Repeat Rounds 3 and 4—744 sts (167 sts across each short edge and 205 sts across each long edge) and 4 corner ch-3 spaces at the end of Round 9.
Round 10: Ch 1, (sc, ch 2, sc) same st as joining, [*skip next Fpdc, (sc, ch 2, sc) in next sc; repeat from * to 1 sc before next corner ch-3 space, skip next sc, (sc, ch 2, sc, ch 3, sc, ch 2, sc) in corner ch-3 space, skip next sc, (sc, ch 2, sc) in next sc] 4 times, **skip next Fpdc, (sc, ch 2, sc) in next sc; repeat from ** to last Fpdc, skip last Fpdc; join with slip st in first sc. Fasten off.
Weave in any remaining ends.
From wrong side, block border rounds only.
Read NextHygge Happy Crochet Throw Pattern
Your Recently Viewed Projects
Thanks for your comment. Don't forget to share!
SusanBLuvsCrafts
May 18, 2021
This is the Red Heart Checkerboard Textures Throw. You can download the 8 page pdf pattern, complete with assembly diagram and photos of all the squares at https//www.yarnspirations.com/red-heart-checkerboa == rd-textures-throw/RHC0502-019529M.html The download link is in the column on the right, just above where it says "customize your pattern kit".
SusanBLuvsCrafts
May 18, 2021
Correct address is https//www.yarnspirations.com/red-heart-checkerboa == rd-textures-throw/RHC0502-019529M.html Don't know how the " == " got inserted.
SusanBLuvsCrafts
May 18, 2021
Arrrrggggg!! This website is inserting the " == " in the middle of the http address when I submit my comments. Please remove that and paste everything together so it says "red-heart-checkerboard-textures-throw" with no space or == in the middle of checkerboard.
Penny
Jul 07, 2020
"For photos of all individual squares, see end of pattern." Where's the photos?
lmlidz
Oct 17, 2018
No diagram for layout of squares as indicated in pattern.
AFCAP Editor
Nov 12, 2018
Hi there! The above directions comprise everything Red Heart gave us to describe the pattern. But you could always contact their customer service if you'd like more direction. That said, I think you could probably take some poetic license with this design and lay out the squares according to your own style preference. Hope this helps! Thanks!
Zeemer
Sep 21, 2018
OMG! This is the ultimate. Eleven differently stitched squares to make then connect them to make a huge, elegant, and classy blanket. Incredible. Thanks for having the pattern within reach. This design is really amazing! Can't wait to start it.
Morehouse17
Feb 28, 2018
The designer of this 50 shades of grey crochet throw really left the finished design up to the you. I really love this idea. I am not much on the color grey and I do understand the inspiration, but I would elect to use a different hue. Depending on who the item will be made for, you can adjust the color.
Delphine Bryant
Feb 10, 2018
Very interesting. This is a unique concept. My only issue would be would all of my squares meet up. I have a tendency for my blocks not to end up being the same size. For this, I guess I will have to keep the gauge out. I like this.
Trinasue
Jul 20, 2016
There were no photos at the end of the pattern. Where can I find them?
AFC Editor Julia
Jul 20, 2016
Hi Trinasue, Thanks for pointing out our error - I've gone ahead and added the photos of the individual squares you'll be making. Thanks so much! Julia, editor for AllFreeCrochetAfghanPatterns
nlangeder 8709023
Jul 12, 2016
Thanks for sharing this one - I really enjoyed making it. The only problem I had was that my textured squares came out at really inconsistent sizes so I had to block them quite firmly. The squares once attached aren't laying quite as flat as I would have liked but its still a nice throw
Report Inappropriate Comment
Are you sure you would like to report this comment? It will be flagged for our moderators to take action.
Thank you for taking the time to improve the content on our site.