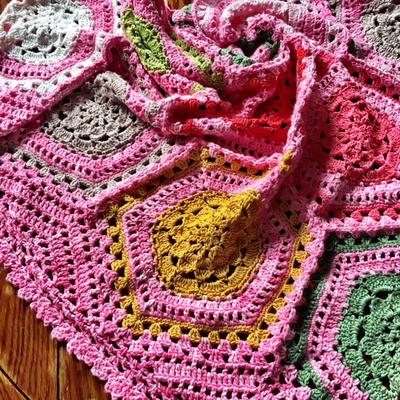
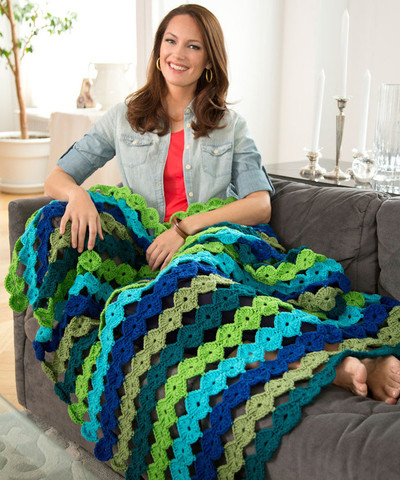
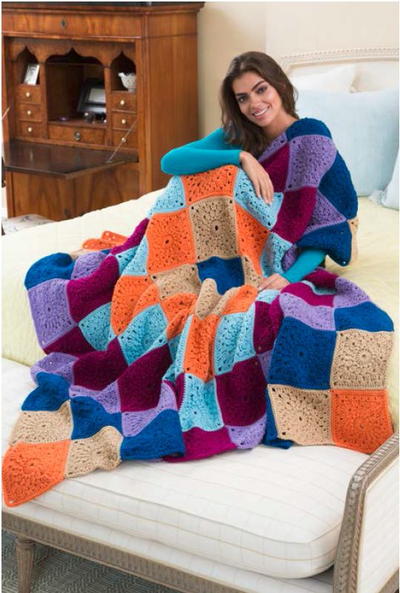
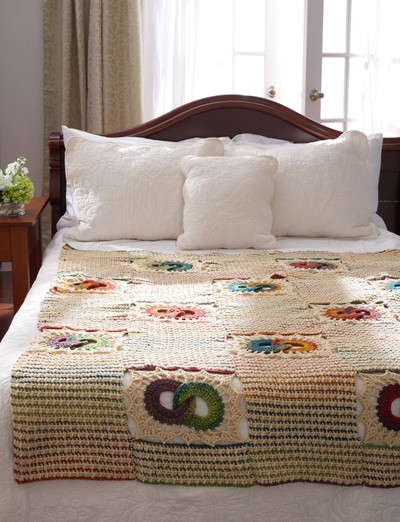
Modern Wedding Ring Throw

Create a throw that will last a lifetime. You'll never want to get rid of the Modern Wedding Ring Throw. With an interesting color scheme and an array of different crochet stitches, this is one of the most unique crochet afghan patterns we've seen.
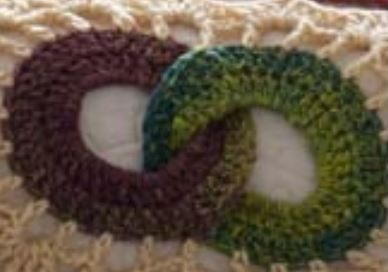
Interlocking ring motifs in variegated yarn really give this blanket a modern, eclectic look, but the contrast color makes it neutral enough for any room. You'll love making these cool crochet motifs. Make this crochet throw pattern for newlyweds or for anniversaries.
PLUS! Check out the video right below to learn or refresh yourself on the half double crochet stitch.

Crochet HookH/8 or 5 mm hook
Yarn Weight(4) Medium Weight/Worsted Weight and Aran (16-20 stitches to 4 inches)
Crochet Gauge13 sc and 14 rows = 4" [10 cm]
Finished SizeApprox 50" x 56" (127 x 142 cm)
Materials List
- Bernat® Mosaic™ (100 g/3.5 oz; 191 m/209 yds): Main Color (MC) Optimistic (44609) - 5 balls; Contrast AOatmeal (53010) - 4 balls
- Hook: Size 5 mm (U.S. H/8) or size needed to obtain gauge
- 5 stitch markers
Instructions for MOTIF A:
(make 13)
With MC, ch 32.
-
1st row: (RS). 1 sc in 2nd ch from hook and each ch to end of chain. Join A. Turn. 31 sc.
2nd row: With A, ch 2 (does not count as hdc). 1 hdc in first sc. *Bobble in next sc. 1 hdc in next sc. Rep from * to end of row. Join MC. Turn.
3rd row: With MC, ch 1. 1 sc in each st to end of row. Join A. Turn. Rep last 2 rows for Stripe Pat until work from beg measures 14" [35.5 cm], ending with 3rd row.
Fasten off.
Place markers on 1st, 9th, 16th, 23rd and last sc of last row and foundation ch.
Instructions for MOTIF B:
(make 4)
-
Work as given for Motif A until work from beg measures 3-1/2" [9 cm], ending with 3rd row. Place markers on 1st, 9th, 16th, 23rd and last sc of last row and foundation ch.
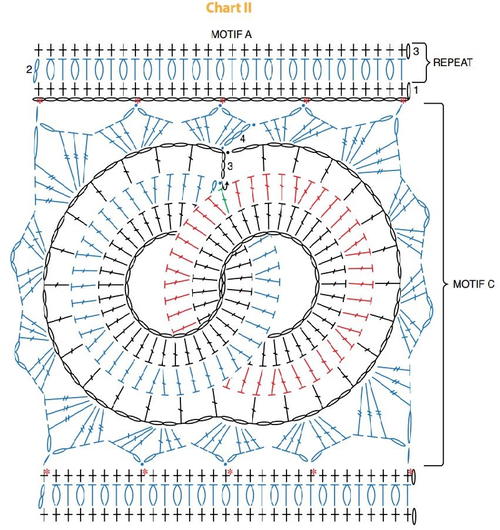
Instructions for MOTIF C:
(make 12)
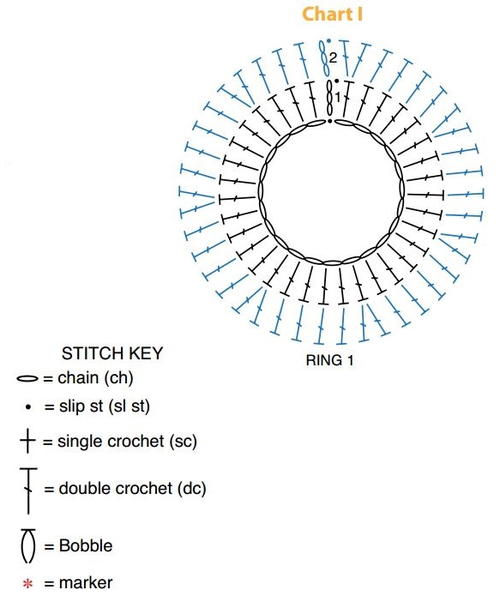
(See charts below)
-
Ring 1: With MC, ch 23. Join with sl st to first ch to form ring, taking care not to twist ch.
1st rnd: Ch 3 (counts as dc). 34 dc in ring. Join with sl st to top of ch 3.35 dc.
2nd rnd: Ch 3 (counts as dc). 1 dc in each of next 3 dc. 2 dc in next dc.*1 dc in each of next 4 dc. 2 dc in next dc. Rep from * around. Join with sl st to top of ch 3. 42 dc. Fasten off. Mark first and 29th sts of 2nd rnd.
Ring 2: With MC, ch 23. Insert beg of chain from back to front through center of Ring 1, taking care not to twist chain. Join with sl st to form a ring.
1st rnd: Ch 3 (counts as dc).Rotating ring to make room for each st, work 34 dc in ring. Join with sl st to top of ch 3. 35 dc.
2nd rnd: Ch 3 (counts as dc). 1 dc in each of next 3 dc. 2 dc in next dc. *1 dc in each of next 4 dc. 2 dc in next dc. Rep from * around. 42 dc. Drop loop from hook. Insert hook into marked 29th st of Ring 1, through dropped st and through top of ch 3. Draw A through all loops on hook. Break MC.
3rd rnd: With A, ch 6 (counts as dc and ch 3). Miss next dc. 1 dc in next dc. (Ch 3. Miss next dc. 1 dc in next dc) 12 times. Ch 3. Miss next dc. 1 dc through next dc and first st of Ring 1. Ch 3. Cont on Ring 1, miss next dc.1 dc in next dc. (Ch 3. Miss next dc. 1 dc in next dc) 12 times. Ch 3. Join with sl st to 3rd ch of ch 6. Note: Work join as sl st in marked st of last row or foundation ch of Motif A or B.
4th rnd: (Joining rnd). Sl st in next ch-3 sp. Ch 3 (counts as dc). (2 dc. Ch 1.Sl st in 16th marked st of foundation ch of Motif A – first join made. Ch 1.3 dc) in same sp as last sl st. Miss next ch-3 sp. (3 dc. Ch 1. Join. Ch 1.3 dc) in next ch-3 sp. Miss next ch-3 sp. *(3 tr. Ch 2. Join. Ch 2. 3 tr) in next ch-3 sp. Miss next ch-3 sp. [(3 dc. Ch 3. 3 dc) in next ch-3 sp. Miss next ch-3 sp] twice. (3 tr. Ch 2. Join. Ch 2. 3 tr) in next ch-3 sp. Miss next ch-3 sp.** [(3 dc. Ch 1. Join. Ch 1. 3 dc) in next ch-3 sp. Miss next ch-3 sp] 3 times. Rep from * once more. [(3 dc. Ch 1. Join. Ch 1. 3 dc) in next ch-3 sp. Miss next ch-3 sp] twice. Join with sl st to top of ch 3.
Fasten off.
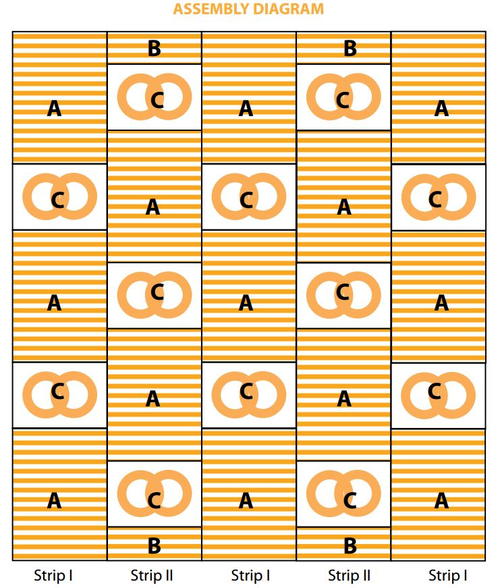
Instructions for ASSEMBLY:
-
Following Diagram below, join Motifs A, B, and C into Strips I and II. Sew Strips tog as shown in Assembly Diagram.
Read NextLady Windsor Lace Crochet Blanket
Your Recently Viewed Projects
Thanks for your comment. Don't forget to share!
sweetrose46 250009 8
Oct 31, 2016
There is a young couple in my church that will be getting married, no date set yet, I would love to give them this wonderful Wedding Ring afghan for their gift.
Zeemer
Aug 23, 2016
I was thinking of something else but when I saw this picture ahh okay...it's actually a throw with wedding ring design. This can be a good wedding present something that will remind the couple of this important day in their lives. Thanks for this free pattern which is found on the same page. It is very clearly presented complete with photos and diagrams. Thanks again.
mswinstead
Jul 22, 2014
Making this now! Is the bobble a hdc bobble, and if so, how do you do that? Can't find instructions anywhere! Love the pattern but need help!!! Thanks.
Report Inappropriate Comment
Are you sure you would like to report this comment? It will be flagged for our moderators to take action.
Thank you for taking the time to improve the content on our site.