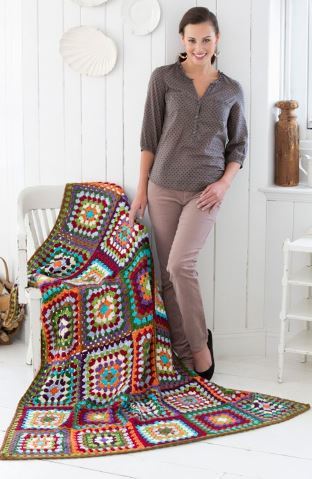
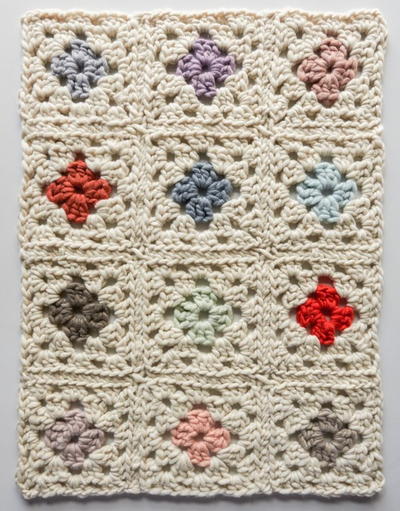
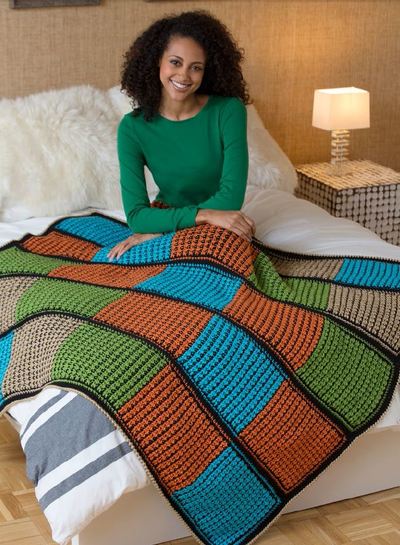
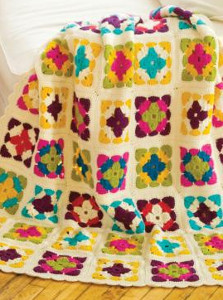
Crocheted Granny Afghan

Warm up with a Crocheted Granny Afghan. This classic granny square blanket pattern gets a modern twist with cool blocks and fun colors. Follow this easy crochet pattern and create a keepsake that goes with any type of decor. Geometric crochet patterns like this are fun and funky - make one for any season by changing up the colors. There's nothing like cuddling up with a colorful crochet square blanket after a long day.

Crochet HookJ/10 or 6 mm hook
Yarn Weight(4) Medium Weight/Worsted Weight and Aran (16-20 stitches to 4 inches)
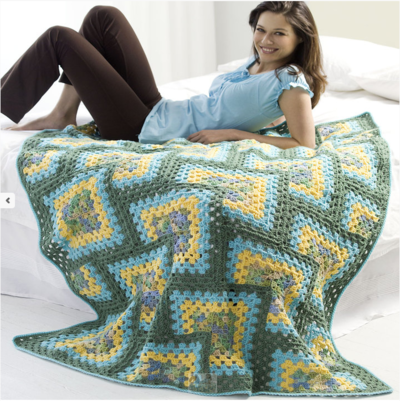
Afghan measures 52½" x 64½".
RED HEART® "Super Saver®":
- 2 Skeins 931 Seagrass A,
- 1 skein 320 Cornmeal B,
- 2 skeins 505 Aruba Sea C,
- 3 skeins 631 Light Sage D.
Materials:
- Crochet Hook: 6mm [US J-10].
-
Yarn needle.
Diagram
GAUGE: Rnds 1-2 = 3" square; each block = 7" square. CHECK YOUR GAUGE. Use any size hook to obtain the gauge.
To Change Color in Dc: Work last dc until 2 loops remain on hook, with new color, yarn over and draw through last 2 loops.
BLOCK (Make 63): With A, ch 5; join with a slip st in first ch to form a ring.
Rnd 1: Ch 3, 2 dc in ring, [ch 2, 3 dc in ring] 3 times; hdc in top of ch-3 to join and form last ch-2 space.
Rnd 2: Ch 3, (2 dc, ch 2, 3 dc) all over hdc, [ch 1; (3 dc, ch 2, 3 dc) all in next ch-2 space – corner made] 3 times, ch 1; join with a slip st in top of ch-3. Fasten off A.
From this point forward block is worked in rows.
Row 1: With right side facing join B in 2nd ch of any ch-2; ch 3, 2 dc in same place, ch 1, 3 dc in next ch-1 space, ch 1, corner in next ch-2 space, ch 1, 3 dc in next ch-1 space, ch 1, 3 dc in first ch of next ch-2; turn and leave remaining sts unworked.
Row 2: Ch 3, [ch 1, 3 dc in next ch-1 space] twice, ch 1, corner in next ch-2 space, [ch 1, 3 dc in next ch-1 space] twice, ch 1, dc in top of ch-3 changing to C; turn. Fasten off B.
Row 3: Ch 3, 2 dc in first ch-1 space, [ch 1, 3 dc in next ch-1 space] twice, ch 1, corner in next ch-2 space, [ch 1, 3 dc in next ch-1 space] twice, ch 1, 2 dc in next ch-1 space, dc in top of ch-3; turn.
Row 4: Ch 3, [ch 1, 3 dc in next ch-1 space] 3 times, ch 1, corner in next ch-2 space, [ch 1, 3 dc in next ch-1 space] 3 times, ch 1, dc in top of ch-3 changing to D; turn. Fasten off C.
Row 5: Ch 3, 2 dc in first ch-1 space, [ch 1, 3 dc in next ch-1 space] 3 times, ch 1, corner in next ch-2 space, [ch 1, 3 dc in next ch-1 space] 3 times, ch 1, 2 dc in next ch-1 space, dc in top of ch-3; turn.
Row 6: Ch 3, [ch 1, 3 dc in next ch-1 space] 4 times, ch 1, corner in next ch-2 space, [ch 1, 3 dc in next ch-1 space] 4 times, ch 1, dc in top of ch-3. Fasten off.
FINISHING: Following diagram, sew blocks together.
EDGING-NOTE: For Rnd 1, "space" refers to ch-3 OR solitary dc at end of a row OR remaining half of ch-2 corner space OR ch-1 space between 3-dc groups on edges of blocks.
Rnd 1: With right side facing join A at upper right corner; ch 3, (2 dc, ch 2, 3 dc) all in same place, *** [ch 1, 3 dc in next space] 4 times, * ch 1, [2 dc in next space] twice, [ch 1, 3 dc in next space] 4 times **; repeat from * to ** 6 more times for top edge; ch 1, corner in next ch-2 space, [ch 1, 3 dc in next space] 4 times; repeat from * to ** 8 times for first long side †, corner in next ch-2 space; repeat from *** for bottom edge and 2nd side, end at †; join.
Rnd 2: Slip st in next 2 dc, slip st in ch-2 space, ch 3, (2 dc, ch 2, 3 dc) all in same space, * ch 1, 3 dc in next ch-1 space; repeat from * to corner; (3 dc, ch 2, 3 dc) all in ch-2 corner space; repeat from * around; join. Fasten off.
Rnd 3: With right side facing, join C in back loop of any st; ch 1, working in back loops sc in each dc and ch around; join. Fasten off.
Your Recently Viewed Projects
Thanks for your comment. Don't forget to share!
Zeemer
Jul 30, 2018
This is gonna be a long and tedious project to make but it's worth it. The intricate design will be an interesting conversation piece among the host and her guests. Those who love to crochet and those who don't know the craft but admire its beauty will have a grand time looking and talking about this lovely afghan.
hvnlydrms1
Jul 28, 2017
Could you post a photo of the finished afghan, please? Thanks.
KathrynAllison
Jul 28, 2017
Hello hvnlydrms1, there was a glitch in our system. The photo for this pattern has been restored. We apologize for the inconvenience. -Editors of AllFreeCrochetAfghanPatterns
barbjoubert 214808 0
Jan 28, 2014
never dreamed there were so many ways to do a granny blanket. I'm in love
woofie02 5851262
Jul 24, 2015
Hi Barb, I am a beginner crocheter. I can do the stitches, but following the directions I get lost. Would this pattern be fairly easy to follow?
sandrafoni 8546520
Aug 11, 2015
I thought the same thing and then looked at the diagram for attaching and realized each corner is actually 3 squares joined to make the illusion. You will do fine. Try a square and see.
Report Inappropriate Comment
Are you sure you would like to report this comment? It will be flagged for our moderators to take action.
Thank you for taking the time to improve the content on our site.