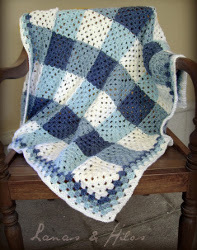
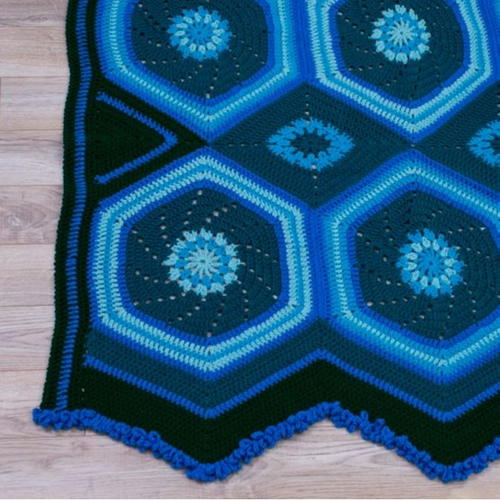
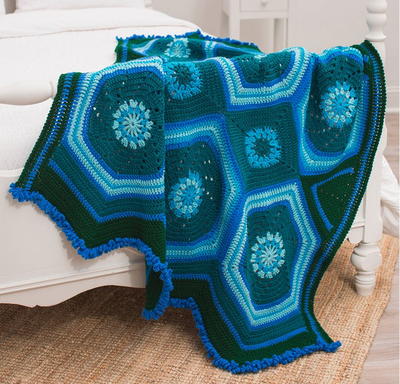
Moody Blues and Greens Throw

The only mood you will be in once you make this Moody Blues and Greens Throw is elated. This stunning crochet afghan pattern has a unique geometric pattern in various shades of blue and green. You will crochet the hexagons, triangles, and squares, and then work them together.
The end result is an outstanding afghan that will become an instant favorite in your household. This crochet blanket idea would also make a thoughtful gift idea for parents or grandparents. They will certainly appreciate it when they are snuggled up on the couch on a chilly night.

Crochet HookK/10.5 or 6.5 mm hook
Yarn Weight(4) Medium Weight/Worsted Weight and Aran (16-20 stitches to 4 inches)
Crochet Gauge12 sts and 6 rows dc = 4” (10 cm). CHECK YOUR GAUGE. Use any size hook to obtain the gauge.
Finished Size55" x 67" (139.5 x 170 cm)
Materials List
- RED HEART® Super Saver®: 4 skeins of 656 Real Teal A, 2 skeins each of 886 Blue B, and 389 Hunter Green C
- RED HEART® With Love®: 2 skeins of 1803 Blue Hawaii D, 1 skein of 1502 Iced Aqua E
- Crochet Hook: 6.5mm [K-10-1/2]
- Yarn needle
Instructions:
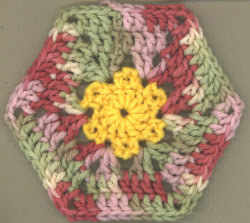
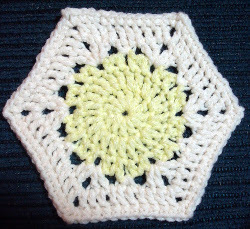
Instructions for HEXAGON A:
Make 5.
With E, ch 5; join with a slip st in first ch to form ring.
-
Round 1: Ch 5 (counts as tr, ch 1), [tr, ch 1] 11 times in ring; join with slip st in 4th ch of beginning ch-5—12 tr; 12 ch-1 spaces. Fasten off.
Round 2: With right side facing, join D with a slip st in any ch-1 space, ch 3 (counts as dc here and throughout), dc in same space, ch 1, (2 dc, ch 1) in each ch-1 space around; join with a slip st to top of beginning ch-3—24 dc; 12 ch-1 spaces. Fasten off.
Round 3: With right side facing, join E with a slip st in any ch-1 space, ch 3, dc in same space, *dc in next dc, ch 1**, skip next dc, 2 dc in next ch-1 space; repeat from * around, ending last repeat at **; join with a slip st to top of beginning ch- 3—36 dc (3 dc across each side); 12 ch-1 spaces. Fasten off.
Round 4: With right side facing, join A with a slip st in any ch-1 space, ch 3, dc in same space, *dc in each of next 2 dc**, ch 1, skip next dc, 2 dc in next ch-1 space; repeat from * around, ending last repeat at **; sc to top of beginning ch-3 instead of last ch-1 space—4 dc across each side; 12 ch-1 spaces.
Round 5: Ch 3, dc in same ch-1 space, *dc in each of next 3 dc **, ch 1, skip next dc, 2 dc in next ch-1 space; repeat from * around, ending last repeat at **; sc to top of beginning ch-3 instead of last ch-1 space—5 dc across each side; 12 ch-1 spaces.
Round 6: Ch 3, dc in same ch-1 space, *dc in each of next 4 dc **, ch 1, skip next dc, 2 dc in next ch-1 space; repeat from * around, ending last repeat at **; sc to top of beginning ch-3 instead of last ch-1 space—6 dc across each side; 12 ch-1 spaces.
Round 7: Ch 3, dc in same ch-1 space, *dc in each of next 5 dc **, ch 1, skip next dc, 2 dc in next ch-1 space; repeat from * around, ending last repeat at **; sc to top of beginning ch-3 instead of last ch-1 space—7 dc across each side; 12 ch-1 spaces.
Round 8: Ch 3, dc in same ch-1 space, *dc in each of next 6 dc **, ch 1, skip next dc, 2 dc in next ch-1 space; repeat from * around, ending last repeat at **; sc to top of beginning ch-3 instead of last ch-1 space—8 dc across each side; 12 ch-1 spaces. Fasten off.
Round 9: With right side facing, join B with a slip st in any ch-1 space, ch 3, *dc in each of next 8 dc, skip next ch-1 space, dc in each of next 8 dc**, (dc, ch 1, dc) in next ch-1 space; repeat from * around, ending last repeat at **, dc in last ch-1 space, ch 1, join with a slip st of beginning ch-3 instead of last ch-1 space—18 dc across each side; 6 ch-1 spaces. Fasten off.
Round 10: With right side facing, join E with a slip st in any ch-1 space, ch 3, *dc in each of next 8 dc, dc2tog over next 2 dc, dc in each of next 8 dc**, (dc, ch 1, dc) in next ch-1 space; repeat from * around, ending last repeat at **, dc in last ch-1 space, ch 1, join with a slip st of beginning ch-3 instead of last ch-1 space—19 sts across each of 6 sides; 6 ch-1 spaces. Fasten off.
Round 11: With right side facing, join D with a slip st in any ch-1 space, ch 3, *dc in each of next 19 dc**, (dc, ch 1, dc) in next ch-1 space; repeat from * around, ending last repeat at **, dc in last ch-1 space, ch 1, join with a slip st of beginning ch-3 instead of last ch-1 space—21 dc across each side; 6 ch-1 spaces. Fasten off.
Round 12: With right side facing, join E with a slip st in any ch-1 space, ch 3, *dc in each of next 21 dc**, (dc, ch 1, dc) in next ch-1 space; repeat from * around, ending last repeat at **, dc in last ch-1 space, ch 1, join with a slip st of beginning ch-3 instead of last ch-1 space—23 dc across each side; 6 ch-1 spaces. Fasten off.
Round 13: With right side facing, join B with a slip st in any ch-1 space, ch 3, *dc in each of next 23 dc**, (dc, ch 1, dc) in next ch-1 space; repeat from * around, ending last repeat at **, dc in last ch-1 space, ch 1, join with a slip st of beginning ch-3 instead of last ch-1 space—25 dc across each side; 6 ch-1 spaces. Fasten off, leaving a long sewing length.
Instructions for HEXAGON B:
Make 4.
-
Work same as Hexagon A, working in the following color sequence:
1 row D; 1 row E; 1 row D; 5 rows A; 1 row B; 1 row D; 1 row E; 1 row D; 1 row B. Fasten off, leaving a long sewing length.
Instructions for SIDE TRIANGLE:
Make 4.
With A, ch 5; join with a slip st in first ch to form ring.
-
Row 1: Ch 3 (here and thoughout), 3 dc in ring, ch 2, 4 dc in ring; turn—4 dc across each side; 1 ch-2 space.
Row 2: Ch 3, dc in each of first 4 dc, (2 dc, ch 2, 2 dc) in next ch-2 space, dc in each of 3 dc, 2 dc between last 2 dc; turn—7 dc across each side. Row 3: Ch 3, dc in each of first 7 dc, (2 dc, ch 2, 2 dc) in next ch-2 space, dc in each of 6 dc, 2 dc between last 2 dc; turn—10 dc across each side. Row 4: Ch 3, dc in each of first 10 dc, (2 dc, ch 2, 2 dc) in next ch-2 space, dc in each of 9 dc, 2 dc between last 2 dc; turn—13 dc across each side. Row 5: Ch 3, dc in each of first 13 dc, (2 dc, ch 2, 2 dc) in next ch-2 space, dc in each of 12 dc, 2 dc between last 2 dc; turn—16 dc across each side. Drop loop to be picked up later. Do not fasten off. Do not turn.
Row 6: With same side facing (open loop and yarn tail is on the left), join B with a slip st in space between first 2 sts at beg of row, ch 3, dc in same space, dc in each of next 15 dc, (2 dc, ch 2, 2 dc) in next ch-2 space, dc in each of 15 dc, 2 dc in space as before—19 dc across each side. After working final dc, pick up dropped loop of A and pull through final loop of B, turn. Fasten off B.
Row 7: With A, ch 3, dc in same space, dc in each of next 18 dc, (2 dc, ch 2, 2 dc) in next ch-2 space, dc in each of next 18 dc, 2 dc between last 2 dc; turn—22 dc across each side.
Row 8: Ch 2, hdc in each of 22 dc, (2 hdc, ch 1, 2 hdc) in next ch-2 space, hdc in each of next 22 dc, 2 hdc between last 2 dc; turn—25 dc across each side. Fasten off, leaving a long sewing length.
Instructions for SQUARE:
Make 4.
Work same as Hexagon Motif A through Round 3, working in the following color sequence: 1 round A; 2 rounds B.
-
Round 4: With right side facing, join A with a slip st in any ch-1 space, ch 3, *dc in each of next 11 sts and spaces**, (dc, ch 2, dc) in next ch-1 space; repeat from * around, ending last repeat at **, dc in last ch-1 space, ch 1, sc in top of beginning ch-3 instead of last ch-2 space—13 dc across each side; 4 ch-2 corner spaces.
Rounds 5-7: Ch 3, dc in same corner space, *dc in each dc across to next corner**, (2 dc, ch 2, 2 dc) in next ch-2 space; repeat from * around, ending last repeat at **, 2 dc in last ch-1 space, ch 1, sc in top of beginning ch-3 instead of last ch-2 space—25 dc across each side at end of last round; 4 ch-2 corner spaces. Fasten off, leaving a long sewing length.
Assembly: Sew motifs together following Assembly Diagram for placement. Weave in ends.
Instructions for END BORDER:
-
Row 1: With right side facing, and short edge of throw on top, join A with a slip st in corner ch-1 space (at asterisk on Assembly Diagram), ch 3, *dc in each dc across to next ch-1 space, (dc, ch 1, dc) in next ch-1 space, dc in each dc across to last 2 dc before junction between motifs, dc2tog over next 2 dc**, dc2tog over next 2 joined ch-1 space, dc2tog over next 2 dc; repeat from* across, ending last repeat at **, dc in corner ch-1 space, turn.
Row 2: Ch 3, skip first dc, dc2tog over next 2 dc, * dc in each dc across to next ch-1 space, (dc, ch 1, dc) in next ch-1 space**, dc in each dc across to center 3 dc at valley, dc2tog over next 3 sts, skipping center st; repeat from * across, ending last repeat at **, dc in each dc across to last 3 sts, dc2tog over next 2 sts, dc in last dc, turn.
Rows 3-9: Repeat Row 2 in the following color sequence: 1 row A; 1 row B; 5 rows C. Fasten off.
Repeat End Border across opposite short edge.
Instructions for SIDE BORDER:
-
Row 1: With right side facing and long edge of throw on top, join C with a slip st in top right-hand corner, ch 2 (counts as hdc), hdc evenly across side edge, working 2 hdc around in each row-end st across Border and Half Triangles and 1 hdc in each st across each Hexagon, turn. Fasten off C. Row 2: With wrong side facing, join B with slip st in first dc, ch 3 (counts as dc here and throughout), dc in each st across, turn. Fasten off B.
Rows 3-4: With C, repeat Row 2.
Row 5: Ch 2, working from left to right, reverse sc in each st across. Fasten off C.
Ruffled Edging:
Row 1: With right side facing and short edge on top, join B with a slip st in top right-hand corner, ch 8, sc in same place, [ch 8, sc] twice in each row-end st across Side Border, *[ch 8, sc in next dc] twice, [ch 8, sc] twice in next dc; repeat from * across to Side Border, [ch 8, sc] twice in each row-end st across Side Border, ch 8, corner sc. Fasten off.
Repeat Ruffle Edging a cross opposite edge. Weave in ends.

Abbreviations
- (SPECIAL) Double crochet 2 together (dc2tog)
- [Yarn over, insert hook in next st, yarn over and draw up a loop, yarn over, draw through 2 loops on hook] twice as indicated, yarn over, draw yarn through 3 loops on hook.
- (SPECIAL) Reverse single crochet (reverse sc)
- Working from left to right, insert hook in next st to the right, yarn over, draw up a loop, yarn over, draw yarn through 2 loops on hook.
Up Next:
Your Recently Viewed Projects
Thanks for your comment. Don't forget to share!
Report Inappropriate Comment
Are you sure you would like to report this comment? It will be flagged for our moderators to take action.
Thank you for taking the time to improve the content on our site.