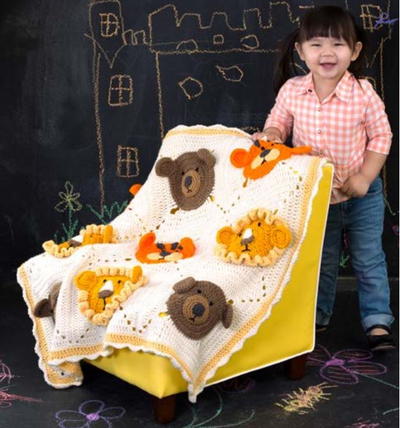
Lions and Tigers and Bears Baby Blanket

Lions and tigers and bears, OH MY! Not only will your new bundle of joy fall in love with this free baby afghan pattern but adults will get a kick out of it, too. Make this Lions and Tigers and Bears Baby Blanket by crocheting up the beautiful baby blanket and then attaching the lions, tigers, and bears.
These normally ferocious animals are anything but since they are made of yarn and snuggly soft. The three animals also give this quirky baby afghan pattern some dimension which separates it from the pack.
NotesNOTES:
- Special Technique: Join with sc = Place a slip knot on hook, insert hook in indicated stitch, yarn over and draw up a loop, yarn over and draw through both loops on hook.
- Blanket is made from 9 squares worked in
joined rounds and then sewn together.
- Rounds 1–5 of each square are the base
of each animal’s face and head; work 3
squares with same color for each animal.
- Facial and head pieces are made
separately and sewn to base. On all
pieces, fasten off leaving a long end for
sewing.

Crochet HookH/8 or 5 mm hook
Yarn Weight(4) Medium Weight/Worsted Weight and Aran (16-20 stitches to 4 inches)
Crochet Gauge1 square = 11” (28 cm); 9 sts = 3” (7.5 cm); 3 rows = 4” (10 cm). CHECK YOUR GAUGE. Use any size hook to obtain the gauge.
Finished Size36" x 36" (91.5 x 91.5 cm)
Materials List
- RED HEART® Super Saver®: 3 skeins 313 Aran D, 1 skein each 320 Cornmeal A, 321 Gold B, 360 Café Latte C, 254 Pumpkin E, 3950 Charcoal F, 336 Warm Brown G, and 312 Black H
- Crochet Hook: 5mm [US H-8]
- Yarn needle
- Stitch marker
Instructions for BLANKET:
Square (make 9 – 3 each with E & D, B & D, and C & D) With first color, ch 4; join with slip st in first ch to form a ring.
-
Round 1 (right side): Ch 3 (counts as first dc here and throughout), 11 dc in ring; join with slip st in top of beginning ch—12 dc.
Round 2: Ch 3, dc in same st as join, 2 dc in each st around; join with slip st in top of beginning ch—24 dc.
Round 3: Ch 3, 2 dc in next st, *dc in next st, 2 dc in next st; repeat from * around; join with slip st in top of beginning ch—36 dc.
Round 4: Ch 3, dc in next st, 2 dc in next st, *dc in next 2 sts, 2 dc in next st; repeat from * around; join with slip st in top of beginning ch—48 dc.
Round 5: Ch 3, dc in next 2 sts, 2 dc in next st, *dc in next 3 sts, 2 dc in next st; repeat from * around; join with slip st in top of beginning ch—60 dc. Fasten off.
Round 6: With right side facing and working in back loops only, join D with slip st in any st, ch 4 (counts as first tr), dc in next st, hdc in next st, sc in next 9 sts, hdc in next st, dc in next st, tr in next st, *ch 3, tr in next st, dc in next st, hdc in next st, sc in next 9 sts, hdc in next st, dc in next st, tr in next st; repeat from * twice, ch 3; join with slip st in top of beginning ch—8 tr, 8 dc, 8 hdc, 36 sc, and 4 ch-3 spaces.
Round 7: Ch 1, sc in same st as join, sc in next 14 sts, 5 sc in next ch-3 space, *sc in next 15 sts, 5 sc in next ch-3 space; repeat from * twice; join with slip st in first sc—80 sc.
Round 8: Ch 3, dc in next 16 sts, (2 dc, ch 3, 2 dc) in next st, *dc in next 19 sts, (2 dc, ch 3, 2 dc) in next st; repeat from * twice, dc in last 2 sts; join with slip st in top of beginning ch—92 dc and 4 ch-3 spaces.
Round 9: Ch 3, dc in next 18 sts, (2 dc, ch 3, 2 dc) in next ch-3 space, *dc in next 23 sts, (2 dc, ch 3, 2 dc) in next ch-3 space; repeat from * twice, dc in last 4 sts; join with slip st in top of beginning ch—108 dc and 4 ch-3 spaces.
Round 10: Ch 3, dc in next 20 sts, (2 dc, ch 3, 2 dc) in next ch-3 space, *dc in next 27 sts, (2 dc, ch 3, 2 dc) in next ch-3 space; repeat from * twice, dc in last 6 sts; join with slip st in top of beginning ch—124 dc and 4 ch-3 spaces. Fasten off.
Instructions for LION:
Make 3.
-
Mane
Round 1: With right side of square facing, join A with slip st in any unworked front loop of Round 6, ch 3, 2 dc in same st as join, 3 dc in each front loop around; join with slip st in top of beginning ch. Fasten off, leaving a long end for sewing on this and all facial pieces.
Ear (make 2)
With B, ch 2.
Round 1: Work 6 sc in 2nd ch from hook— 6 sc. Do not join. Place marker for beginning of round and move marker up as each round is completed.
Round 2: Work 2 sc in each sc around— 12 sc.
Round 3: *Sc in next sc, 2 sc in next sc; repeat from * around—18 sc.
Round 4: *Sc in next 2 sc, 2 sc in next sc; repeat from * around—24 sc.
Round 5: Working in front loops only, slip st in each sc around; join with slip st in first slip st. Fasten off.
Top of Nose
With D, ch 6.
Round 1: Dc in 3rd ch from hook, hdc in next ch, sc in next ch, 3 sc in last ch, working on opposite side of foundation ch, skip first ch, sc in next ch, hdc in next ch, dc in next ch, ch 2; join with slip st in last ch. Fasten off.
Bottom of Nose
With C, ch 6.
Row 1: Sc in 2nd ch from hook and in each ch across, turn—5 sc.
Row 2: Ch 1, sc in first 2 sc, 2 sc in next sc, sc in last 2 sc. Fasten off.
Instructions for TIGER:
Make 3.
-
Ears (make 2)
With E, work same as lion’s ear. Stripes (make 3) With F, ch 5.
Row 1: Slip st in 2nd ch from hook, sc in next 2 chs, hdc in last ch. Fasten off.
Cheek (make 2)
With A, work same as Rounds 1–3 of lion’s ear—18 sc. Fasten off.
Nose
With F, ch 2.
Round 1: Work 6 sc in 2nd ch from hook— 6 sc. Do not join.
Round 2: *Sc in next sc, 2 sc in next sc; repeat from * around—9 sc. Fasten off.
Instructions for BEAR:
Make 3.
-
Ears (make 2)
With C, work same as lion’s ear.
Nose
Work same as tiger’s nose.
Snout
With G, ch 2.
Rounds 1–4: Work same as Rounds 1–4 of lion’s ear—24 sc.
Round 5: Sc in each st around; join with slip st in first sc. Fasten off.
Instructions for ASSEMBLY:
Use photograph below as a guide for placement of all pieces.
-
Lion: Sew ears in place as shown slightly overlapping edge of head. Sew top and bottom of nose together, center on base of face and sew in place. With H, embroider satin stitches for eyes and straight stitches for mouth (see first image below for satin stitch visual).
Tiger: Sew ears same as lion. Position stripes at top of base, equally spaced apart, and sew in place. Embroider eyes and mouth same as lion.
Bear: Sew ears same as lion. Sew nose to snout. On snout, embroider mouth same as lion then sew piece in place. Embroider eyes same as lion.
Arrange squares as shown in photograph or as desired. With wrong sides held together and working through both thicknesses, with D, sew through matching stitches and chain spaces in Round 10.
Instructions for FINISHING:
-
Border
Round 1 (right side): With right side facing, join D with sc in any st, sc in each st and ch-3 space between squares and working 5 sc in each ch-3 space at outer corners (corner made); join with slip st in first sc¬— 408 sc. Fasten off.
Round 2: With right side facing, join A with slip st in center sc of any 5-sc corner, ch 3, 4 dc in same st (corner made), *dc in each st to center st of next 5-sc corner, 5 dc in center st (corner made); repeat from * twice, dc in each remaining st; join with slip st in top of beginning ch—424 sc.
Round 3: Ch 2 (counts as first hdc), hdc next st, 3 hdc in next st, *hdc in each st to center st of next 5-dc corner, 3 hdc in center st; repeat from * twice, hdc in each remaining st; join with slip st in top of beginning ch—432 hdc. Fasten off.
Round 4: Join D with sc in any st, hdc in next st, 2 dc in next st, hdc in next st, sc in next st, slip st in next st, *sc in next st, hdc in next st, 2 dc in next st, hdc in next st, sc in next st, slip st in next st; repeat from * around; join with slip st in first sc. Fasten off.
Abbreviations
- (SPECIAL) sc2tog
- [Insert hook in next stitch, yarn over and pull up a loop] twice, yarn over and draw through all 3 loops on hook.
- A, B, C
- Color A, Color B, Color C, etc
- ch
- chain
- dc
- double crochet
- hdc
- half double crochet
- sc
- single crochet
- st(s)
- stitch(es)
- tr
- treble (triple) crochet
- ( )
- work directions in parentheses into same st
- *
- repeat whatever follows the * as indicated
Read NextEasy One Ball Baby Blanket
Your Recently Viewed Projects
Thanks for your comment. Don't forget to share!
Tricia108
Oct 08, 2017
I love this blanket! The instructions are not difficult. It is just a bit of work with the detail but the end result is worth it. My son's friends are now at the stage that the babies are coming. This is a project that can't be rushed so I may just begin it and see what happens. Thank you.
Stephanie Hantz
Jun 11, 2017
This blanket is adorable! If I had a grandkid on the way I might undertake this project! Alas, no grandkids on the way, I keep hoping! I really like the 3D accents of the blanket. I know my kids would talk to their stuffed animals when they were little. This ways they always have their animals with them!
Report Inappropriate Comment
Are you sure you would like to report this comment? It will be flagged for our moderators to take action.
Thank you for taking the time to improve the content on our site.