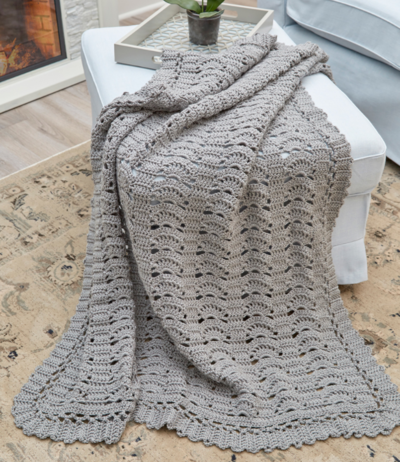
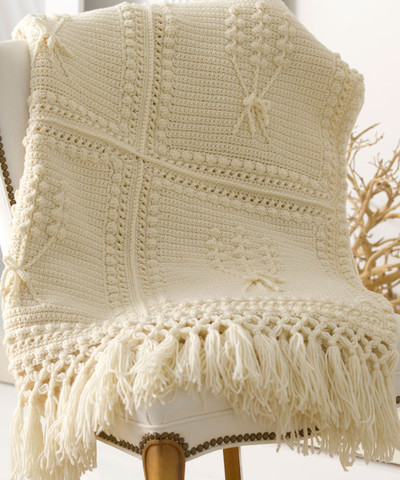
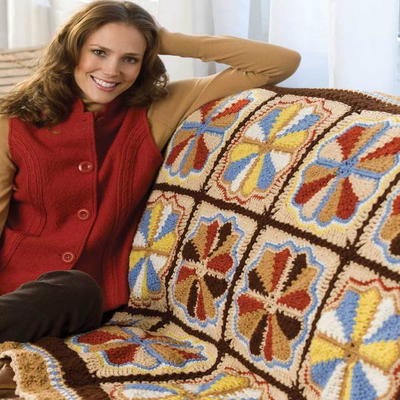
Vintage Bruges Lace Throw

If you're a fan of all things vintage, then you'll adore this Vintage Bruges Lace Throw. This crochet afghan pattern is perfect for adding a touch of antique chic to any home decor set up. You'll just love how dainty and delicate the pattern looks, but how durable it actually is. This lacy pattern was traditionally used for things like doilies, table cloths, and garment embellishments, but a blanket will be just as cozy. You'll definitely feel like Queen Victoria with this crochet lace pattern.

Crochet HookI/9 or 5.5 mm hook
Crochet Gauge1 pattern repeat = 4" (10 cm) in Row 3 (pattern repeat consists of one single crochet, one shell, next single crochet, and 5 double crochet); 6 rows = 4" (10 cm)
Finished SizeThrow measures 44" wide x 52" long (112 x 132 cm).
Materials List
- RED HEART® Super Saver®: 6 skeins 340 Dusty Grey
- Susan Bates® Crochet Hook: 5.5mm [US I-9]
- Yarn needle
Instructions
Notes
1. Center of throw is worked back and forth in rows.
2. Bruges edging is worked in turned rows joined to chain-5 spaces of edging base.
3. Chain-5 loop at end of each oddnumbered row of Bruges edging does not count as a stitch. Do not work into this loop.
Special Stitch
Shell = 7 dc in indicated space.
Special Technique
Join with sc = Place a slip knot on hook, insert hook in indicated stitch, yarn over and pull up a loop, yarn over and draw through both loops on hook
ABBREVIATIONS
ch = chain(s); dc = double crochet; sc = single crochet; st(s) = stitch(es); ( ) = work directions in parentheses into same st; [ ] = work directions in brackets the number of times specified; * = repeat whatever follows the * as indicated.
Center
Ch 135.
-
Row 1 (right side): Dc in 4th ch from hook (beginning skipped ch count as first dc) and in each ch across, turn—133 dc.
-
Row 2: Ch 3, dc in next 4 dc, *[ch 3, skip next 3 dc, sc in next dc] twice, ch 3, skip next 3 dc, dc in next 5 dc; repeat from * across, working last dc in top of beginning ch, turn—45 dc and 24 ch-3 spaces.
-
Row 3: Ch 3, dc in next 4 dc, *ch 3, sc in next ch-3 space, shell in next ch-3 space, sc in next ch-3 space, ch 3, dc in next 5 dc; repeat from * across, working last dc in top of beginning ch, turn—45 dc, 8 shells, and 16 ch-3 spaces.
-
Row 4: Ch 3, dc in next 4 dc, *ch 1, sc in next ch-3 space, (dc in next dc, [ch 1, dc in next dc] 6 times) in next shell, sc in next ch-3 space, ch 1, dc in next 5 dc; repeat from * across, working last dc in top of beginning ch, turn—101 dc and 64 ch-1 spaces
-
Row 5: Ch 3, dc in next 4 dc, *skip next ch-1 space, dc in next dc, [dc in next ch-1 space, dc in next dc] 6 times, skip next ch-1 space, dc in next 5 dc; repeat from * across, working last dc in top of beginning ch, turn—149 dc.
-
Row 6: Ch 3, dc in next 4 dc, *ch 3, skip next 4 dc, sc in next dc, ch 3, skip next 3 dc, sc in next dc, ch 3, skip next 4 dc, dc in next 5 dc; repeat from * across, working last dc in top of beginning ch, turn—45 dc and 24 ch-3 spaces
-
Rows 7–90: Repeat last 4 rows 21 times.
-
Rows 91 and 92: Repeat Rows 3 and 4. Fasten off.
Edging Base
Row 1 (right side): With right side of Row 1 facing and working in opposite side of foundation ch, join yarn with sc in first ch, [ch 5, skip next 3 ch, sc in next ch] across; working in ends of rows of first side, *ch 5, skip first row, dc in top of next row, [ch 5, skip next row, dc in top of next row] across*; working across last row, ch 5, skip first 4 dc, sc in next dc, [skip next dc and next ch-1 space, sc in next dc, ch 5, skip next 2 dc, sc in next dc, ch 5, sc in next sc, ch 5, skip next 4 dc, sc in next dc] across; working in ends of rows of other side, repeat from * to *; join with slip st in first sc—33 ch-5 spaces across each short side and 46 ch-5 spaces across each long side. Fasten off.
Bruges Edging
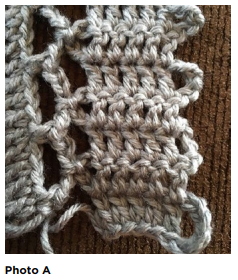
-
Row 1 (right side): Ch 10, dc in the 6th ch from the hook (beginning skipped ch do not count as a st) and in each remaining ch, ch 2; with right side of either short side of edging base facing, join with slip st in first ch-5 space, turn— 5 dc. (See Photo A)
-
Row 2: Ch 2, dc in each dc across, turn
-
Row 3: Ch 5, dc in each dc across, ch 2; join with slip st in next ch-5 space, turn.
-
Rows 4–65: Repeat last 2 rows 31 times.
-
Row 66: Repeat Row 2
-
Row 67: Ch 5, dc in each dc across, ch 2; join with slip st in same ch-5 space as previous join, turn
-
Row 68: Repeat Row 2
-
Row 69: Working in first ch-5 space of next side, repeat Row 3
-
Row 70: Repeat Row 2.
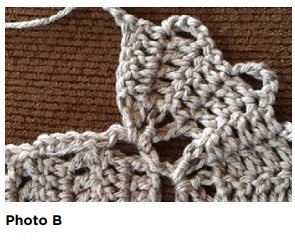
-
Row 71: Repeat Row 67. (See photo B)
-
Rows 72–161: Repeat Rows 2 and 3 forty-five times.
-
Rows 162–167: Repeat Rows 66–71.
-
Rows 168–231: Repeat Rows 2 and 3 thirty-two times
-
Rows 232–237: Repeat Rows 66–71.
-
Rows 238–327: Repeat Rows 2 and 3 forty-five times
-
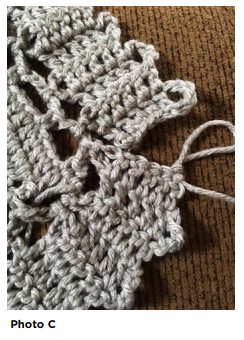
Rows 328–332: Repeat Rows 66–70. Fasten off, leaving an 8" (20.5 cm) tail. (See Photo C)
Finishing
Holding Row 1 and Row 332 together, whipstitch dc together. Weave in ends
Read NextHighland Home Afghan