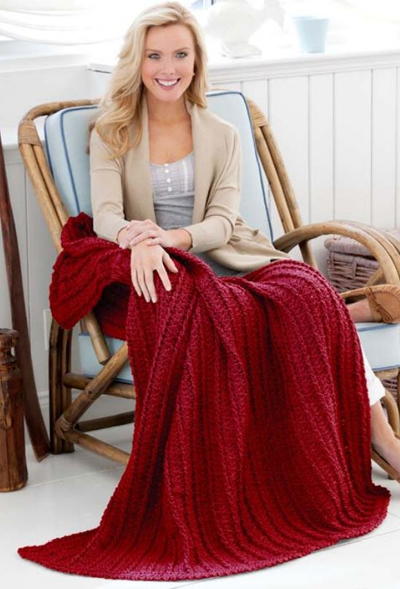
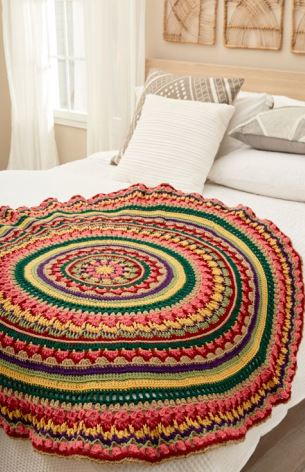
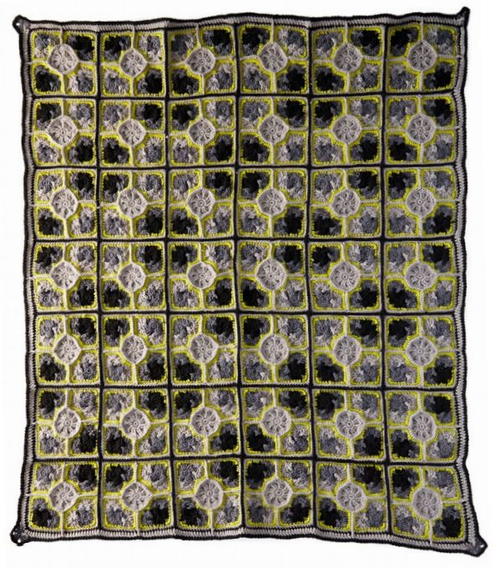
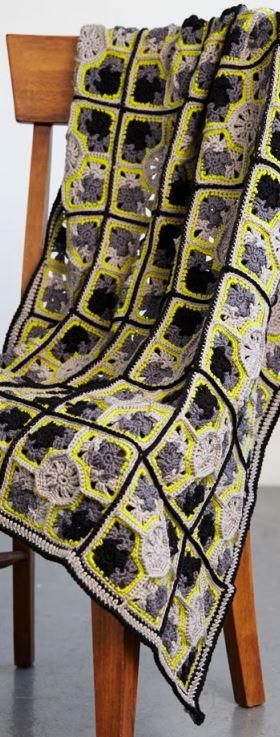
Nouveau Chic Crochet Granny Throw

Bold and vivid as can be, this Nouveau Chic Crochet Granny Throw is one design you won't want to skip! The intermediate crochet throw pattern is a creative way to incorporate an intricate motif and will result in a blanket that is both warm and chic. This stylish take on the classic crochet granny square is a must-make project for anyone whose personal style is modern and understated. The pattern includes an assortment of crochet stitches and techniques, making it the perfect project for crocheters looking for a way to step outside the traditional afghan blanket designs. You won't be disappointed when you pick up your crochet hook and start working on this throw! Diagrams of the pattern are also available following the instructions.

Crochet HookI/9 or 5.5 mm hook
Yarn Weight(4) Medium Weight/Worsted Weight and Aran (16-20 stitches to 4 inches)
Crochet GaugeCompleted Motif = 7" (18 cm) by 7” (18 cm). CHECK YOUR GAUGE. Use any size hook to obtain the gauge.
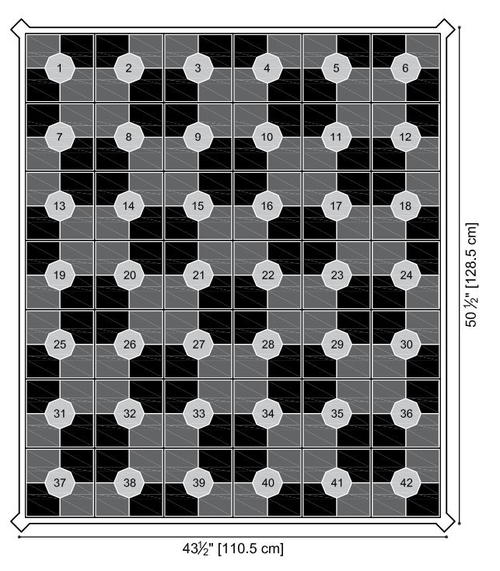
Finished SizeProject measures 43.5” [110.5 cm] in width, 50.5” [128.5 cm] in length
Materials List
- RED HEART® Chic Sheep™: 6 balls 5641 Sterling A, 3 balls each of 5640 Platinum B, 5312 Stiletto C, 5620 Green Tea D
- Susan Bates® Crochet Hook: 5.5mm [US I-9]
- Yarn needle
- Stitch markers
Instructions
Pattern Notes
-
Beginning chain-3 counts as first double crochet.
Join with a slip stitch unless otherwise stated.
Do not join or turn rounds unless otherwise stated.
Mark first stitch of each round.
Right Side will always be facing.
Do not turn.
When making a ring of sc, count the joining slip stitch as a stitch.
Assembly of components is difficult and will require some flexibility. The key reference points are the middle stitch of every corner. Continually get back to matching those points up with the corresponding stitches on the other components when joining. Use stitch markers to help with seaming. -
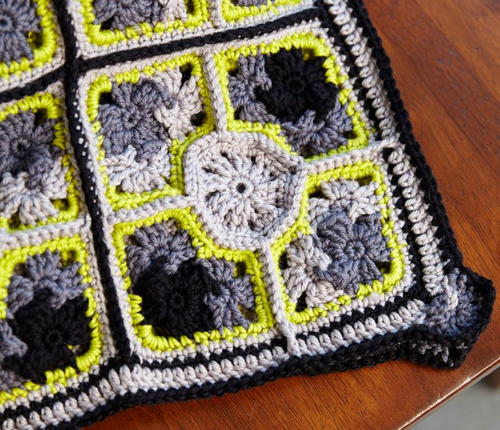
Each Square Motif is comprised of 4 corner units and 1 octagon center. Each corner unit is comprised of 1 hexagon and 2 petals. Half of the corner units will be Stiletto (C) hexagons with Platinum (B) petals and the other half of the corner units will be Platinum (B) hexagons with Sterling (A) petals.
Special Stitches
-
Single Crochet 2 Together (sc2tog): Insert hook into st indicated and pull up a loop, insert hook into next st indicated and pull up a loop, yarn over and draw through all 3 loops on hook.
-
Long Double Crochet (long dc): Yarn over, insert hook around stitch indicated and pull up a long loop, [yarn over and draw through 2 loops on hook] twice.
Motifs
-
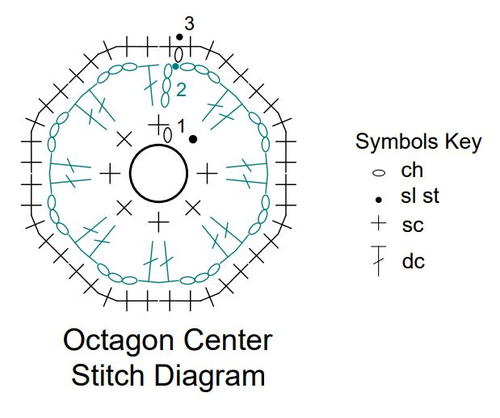
Octagon Center
Make 42 with A.
Round 1: Using a slip ring, ch 1, 7 sc in ring, join with slip st to first sc (slip st counts as a st), pull ring closed. Do not turn throughout. – 8 sts.
Round 2: Ch 3 (counts as dc), dc in same sc as join, [ch 2, 2 dc in next st] 7 times, ch 2, slip st in top of beginning ch-3. - 16 dc and 8 ch-2 spaces.
Round 3: Ch 1, sc in same st as join, sc in next dc, [3 sc in ch-2 space, sc in next 2 dc] 7 times, 3 sc in next ch-2 space, slip st to first sc (does not count as a st).
Fasten off – 40 sc. -
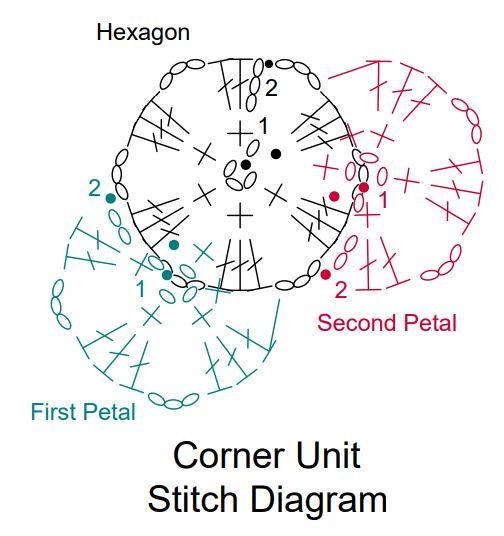
Corner Unit
Note: Corner Unit is made from a corner hexagon and 2 petals joined together.
Corner hexagon
Make 84 in C, Make 84 in B.
Ch 3, slip st in first ch to form a ring.
Round 1: Ch 1, 5 sc in ring, join with slip st to first sc (counts as a st). – 6 sts.
Round 2: Ch 3 (counts as dc), 2 dc in same st as join, [ch 3, 3 dc in next st] 5 times, ch 3, slip st in top of beginning ch-3.
Fasten off.- 18 dc and 6 ch-3 spaces.
First petal
Note: Use B for Stiletto (C) hexagons and A for Platinum (B) hexagons.
Round 1: Ch 3, place tail of chains from front to back in any ch-3 corner on hexagon, slip st in first ch to form a ring (and joins petal to hexagon). Ch 1, 5 sc in ring, join with slip st to first sc (counts as a st). – 6 sts.
Row 2: Ch 2, slip st in the next ch-3 corner to the right on hexagon (counts as dc), 2 dc in same st as join on petal, ch 3, 3 dc in next sc, ch 3, 2 dc in next sc, yo, insert hook into previous sc and pull up a loop, yo and draw through 2 loops on hook, insert hook in ch-3 corner to the left on hexagon and pull up a loop, yo and draw through all 3 loops on hook (counts as dc). Fasten off.- 9 dc and 2 ch-3 spaces.
Second petal
Note: Use B for Stiletto (C) hexagons and A for Platinum (B) hexagons.
Round 1: Ch 3, place tail of chains from front to back in ch-3 corner that is the first unused corner to the left on hexagon, slip st in first ch to form a ring. Ch 1, 5 sc in ring, join with slip st in first sc (counts as a st) – 6 sts.
Row 2: Ch 2, slip st in the next ch-3 corner to the right on hexagon (counts as dc, first petal is also anchored in this ch-3 corner), 2 dc in same st as join on petal, ch 3, 3 dc in next sc, ch 3, 2 dc in next sc, yo, insert hook into previous sc and pull up a loop, yo and draw through 2 loops on hook, insert hook in ch-3 corner to the left on hexagon and pull up a loop, yo and draw through all 3 loops on hook (counts as dc). Fasten off.- 9 dc and 2 ch-3 spaces.
Border around corner unit
With D, join with sc in corner ch-3 space on hexagon, 4 sc in same ch-3 space, sc in next 3 dc on hexagon, [sc in next 3 dc on petal, 5 sc in next ch-3 space on petal] twice, sc in next 2 dc on petal, sc2tog over next 2 dc on next 2 petals, sc in next 2 dc on next petal, [5 sc in next ch-3 space, sc in next 3 dc] twice, sc in next 3 dc on hexagon, join with slip st to first sc. Fasten off- 48 sc. -
Assembly of Motif components
Arrange the corner units so that they alternate colors around the octagon center. Stiletto (C) and Platinum (B) hexagons should be opposite of each other. Place marker in (or pin together) middle sc (of 3 sc group) on corner of octagon and sc2tog of corner unit. With A and WS facing each other, holding the octagon in front, sc through both the inner loops (back loop of octagon and front loop of corner unit) of each stitch on both pieces at the same time. (Note: Some easing may be necessary. Keep lining up the middle stitches of the octagon and corner unit’s corners.)
Seam the corner units together in similar method. Hold the working yarn on the back of the piece, insert hook through the center stitch on the octagon and pull up a loop, begin working sc through the inner loops of corresponding stitches on the two corners units outward.
Fasten off and repeat for all 4 short seams.
Motif Border
-
Round 1: Join A with sc in any middle sc of 5-sc corner, 2 sc in same st, *sc in each sc across to middle sc of corner**, 3 sc in corner; repeat from * around ending at **, join with slip st in first sc.
-
Fasten off. - 104 sc.
Motif Assembly
-
Arrange the motifs in 6 rows of 7 motifs, see layout for placement.
-
Join motifs together with C and WS facing each other, sc through inner loops of each corresponding stitch across.
Blanket Edging
-
Round 1: With C and RS facing, join with sc through both loops of any middle sc of sc-3 corner, 2 sc in same st, *sc in each sc to next seam, sc through the side of the seam; repeat from * across, 3 sc in middle sc of corner, repeat from * around blanket, join with slip st in first sc. Fasten off.
-
Round 2: Join A with slip st in 3rd sc of sc-3 corner, ch 3 (counts as first dc), *dc in each sc to corner unit seam, work long dc in the side of the Sterling (A) seam joining the corner units together; repeat from * across to corner, dc in first sc of the sc-3 corner, ch 3, skip next sc, dc in next sc of corner; repeat from * around to last corner, dc in first sc of corner, ch 3, join with slip st in top of beginning ch-3. Fasten off.
-
Round 3: Join C with sc in same st where the corner petal attaches, *sc in each dc across to corner petal, sc in same st where the petal attaches, [sc in each of 3 dc of corner petal, 3 sc in ch-3 space of corner petal] twice, sc in next 3 dc of petal, sc in same st where the petal attaches; repeat from * around, join with slip st in first sc. Fasten off.
-
Corner petals
Place 1 corner petal in each of four corners.
Round 1: With B, ch 4, place tail of chains from front to back in any ch-3 corner, slip st in first ch to form a ring. Ch 1, 5 sc in ring, join with slip st in first sc (counts as st). – 6 sts.
Row 2: Ch 2, slip st in the 3rd dc to the right on Round 2 of blanket edging (counts as dc), 2 dc in same st as join on corner petal, ch 3, 3 dc in next sc of petal, ch 3, 2 dc in next sc of petal, yo, insert hook into previous sc and pull up a loop, yo and draw through 2 loops on hook, insert hook in 3rd dc to the left on Round 2 of blanket edging and pull up a loop, yo and draw through all 3 loops on hook (counts as dc). Fasten off. - 9 dc and 2 ch-3 spaces.
Diagrams
-
Click here for an enlarged version of the diagram below.
-
Cilck here for an enlarged version of the diagram below.
-
Click here for an enlarged version of the corner unit stitch diagram below.
-
Click here for an enlarged version of the octagon center stitch diagram below.
Abbreviations
- ch
- chain
- st(s)
- stitch(es)
- sc
- single crochet
- dc
- double crochet
- RS
- right side
- WS
- wrong side
- ( )
- work directions in parentheses in same st
- [ ]
- work directions in brackets the number of times specified
- *
- repeat whatever follows the * as indicated
Read NextStellar Patchwork Crochet Blanket
Your Recently Viewed Projects
Thanks for your comment. Don't forget to share!
Morehouse17
Feb 28, 2018
This nouveau chic crochet granny throw is really pretty. I love granny square projects and I would consider this one a time consuming one. So the intermediate tag just means to me that the time involved is higher than other granny square projects.
Delphine Bryant
Feb 27, 2018
Wow! This is a piece of art. I can hardly believe that this is made from granny squares. The colors to me are a little off but I guess it goes along with the nouveau chic idea. This is what I would call a conversation starter.
Report Inappropriate Comment
Are you sure you would like to report this comment? It will be flagged for our moderators to take action.
Thank you for taking the time to improve the content on our site.