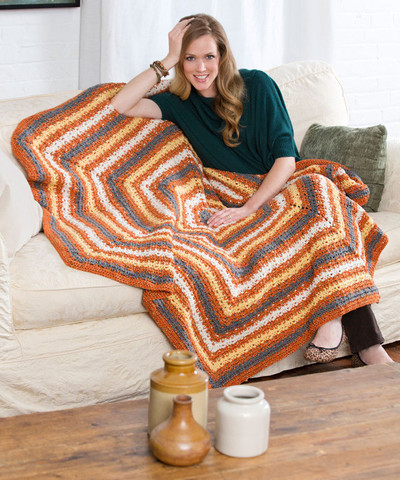
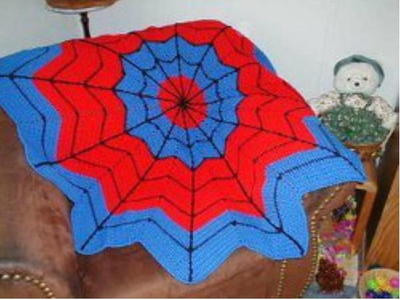
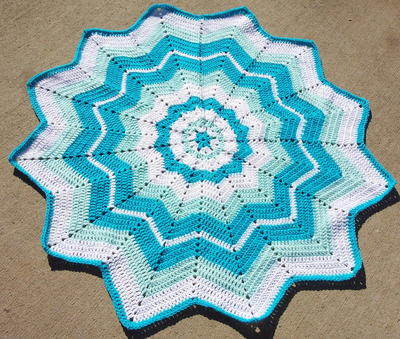
Captain America Inspired Crochet Blanket

Crochet your own round baby blanket that looks just like Captain America's shield with the easy Captain America Inspired Crochet Blanket. This easy crochet blanket pattern uses red, white, and blue chunky yarn to work up a round, striped pattern with a white star motif in the center. Your little one's face will light up when you present him or her with this super cozy blanket - they can use this to cover themselves and stay warm or to play on, since the super thick yarn makes for a durable surface.
NotesNOTES:
1. Body of Blanket is worked with RS facing throughout.
2. Star is worked separately and sewed to Blanket.
3. To change color, work last st of old color to last yarn over. Yarn over with new color and
draw through all loops to complete the st. Fasten off old color.

Crochet HookN/15 or 10 mm hook
Yarn Weight(6) Super Bulky/Super Chunky (4-11 stitches for 4 inches)
Crochet Gauge8 dc + 5 rnds = about 5 in. (12.5 cm)
Finished SizeDiameter = 39inch
Materials List
- 135-109 Lion Brand Hometown USA Yarn: Fort Worth Blue 2 Balls (A)
- 135-113 Lion Brand Hometown USA Yarn: Cincinnati Red 3 Balls (B)
- 135-100 Lion Brand Hometown USA Yarn: New York White 3 Balls (C)
- Lion Brand Crochet Hook - Size N-13 (9 mm)
- Lion Brand Large-Eye Blunt Needles (Set of 6)
Pattern
Blanket
-
With A, ch 4; join with sl st in first ch to make a ring.
-
Rnd 1: Ch 3 (always counts as first dc), work 9 dc in ring; join with sl st in top of beg ch - 10 sts.
-
Rnd 2: Ch 3, dc in same sp as join, 2 dc in each st around; join with sl st in top of beg ch - 20 sts at the end of this rnd.
-
Rnd 3: Ch 3, 2 dc in next dc, *dc in next dc, 2 dc in next dc; rep from * around; join with sl st in top of beg ch - 30 sts.
-
Rnd 4: Ch 3, dc in next dc, 2 dc in next dc, *dc in next 2 dc, 2 dc in next dc; rep from * around; join with sl st in top of beg ch - 40 sts
-
Rnd 5: Ch 3, dc in next 2 dc, 2 dc in next dc, *dc in next 3 dc, 2 dc in next dc; rep from * around, join with sl st in top of beg ch - 50 sts.
-
Rnd 6: Ch 3, dc in next 3 dc, 2 dc in next dc, *dc in next 4 dc, 2 dc in next dc; rep from * around, join with sl st in top of beg ch - 60 sts.
-
Rnd 7: Ch 3, dc in next 4 dc, 2 dc in next dc, *dc in next 5 dc, 2 dc in next dc; rep from * around, join with sl st in top of beg ch - 70 sts.
-
Rnd 8: Ch 3, dc in next 5 dc, 2 dc in next dc, *dc in next 6 dc, 2 dc in next dc; rep from * around, join with sl st in top of beg ch - 80 sts.
-
Rnd 9: Ch 3, dc in next 6 dc, 2 dc in next dc, *dc in next 7 dc, 2 dc in next dc; rep from * around, join with sl st in top of beg ch - 90 sts.
-
Change to B.
Rnd 10: With B, ch 3, dc in next 7 dc, 2 dc in next dc, *dc in next 8 dc, 2 dc in next dc; rep from * around, join with sl st in top of beg ch - 100 sts. -
Rnd 11: Ch 3, dc in next 8 dc, 2 dc in next dc, *dc in next 9 dc, 2 dc in next dc; rep from * around, join with sl st in top of beg ch - 110 sts.
-
Rnd 12: Ch 3, dc in next 9 dc, 2 dc in next dc, *dc in next 10 dc, 2 dc in next dc; rep from * around, join with sl st in top of beg ch - 120 sts.
-
Change to C.
Rnd 13: With C, ch 3, dc in next 10 dc, 2 dc in next dc, *dc in next 11 dc, 2 dc in next dc; rep from * around, join with sl st in top of beg ch - 130 sts. -
Rnd 14: Ch 3, dc in next 11 dc, 2 dc in next dc, *dc in next 12 dc, 2 dc in next dc; rep from * around, join with sl st in top of beg ch - 140 sts.
-
Rnd 15: Ch 3, dc in next 12 dc, 2 dc in next dc, *dc in next 13 dc, 2 dc in next dc; rep from * around, join with sl st in top of beg ch - 150 sts.
-
Change to B.
Rnd 16: With B, ch 3, dc in next 13 dc, 2 dc in next dc, *dc in next 14 dc, 2 dc in next dc; rep from * around, join with sl st in top of beg ch - 160 sts. -
Rnd 17: Ch 3, dc in next 14 dc, 2 dc in next dc, *dc in next 15 dc, 2 dc in next dc; rep from * around, join with sl st in top of beg ch - 170 sts.
-
Rnd 18: Ch 3, dc in next 15 dc, 2 dc in next dc, *dc in next 16 dc, 2 dc in next dc; rep from * around, join with sl st in top of beg ch - 180 sts.
Do not fasten off. -
Edging: Continue with B, ch 1, sc in each st around; join with sl st in first sc. Fasten off.
Star
-
With C, ch 4; join with sl st in first ch to make a ring.
-
Rnd 1: Ch 3 (counts as first dc in this and in all following rnds), work 9 dc in ring; join with sl st in top of beg ch - 10 sts.
-
Rnd 2: Ch 3, dc in same sp as join, 2 dc in each st around; join with sl st in top of beg ch - 20 sts.
-
Rnd 3: Ch 3, 2 dc in next st, *dc in next st, 2 dc in next st; rep from * around; join with sl st in top of beg ch - 30 sts.
Shape First Arm
-
To shape the arms you will be working back and forth in rows across one portion of the sts at a time.
-
Row 1: Ch 3 (counts as first dc in this row and in all following rows), dc in each of next 5 sts, leave rem sts unworked - 6 sts.
-
Row 2: Ch 3, turn, dc in each of next 5 sts.
-
Row 3: Ch 3, turn, dc2tog twice, dc in last st - 4 sts.
-
Row 4: Ch 3, turn, dc2tog, dc in last st - 3 sts.
-
Row 5: Ch 2, yarn over, insert hook into st and draw up a loop, yarn over and draw through 2 loops.
(Yarn over, insert hook into next st and draw up a loop.
Yarn over, draw through 2 loops) twice, yarn over and draw through all loops on hook.
Fasten off.
Shape Second-Fifth Arms
-
Join yarn with sl st in next dc at end of Row 1 of last arm made.
-
Rep Rows 1-5 of first arm.
-
At the end of fifth arm, do not fasten off. Work sc evenly spaced around outside edge of Star, working 3 sc in same space at tip of each arm. Fasten off.
Finishing
With C, whipstitch Star to the center of Blanket. Weave in ends.
Read NextBeginner's Round Ripple