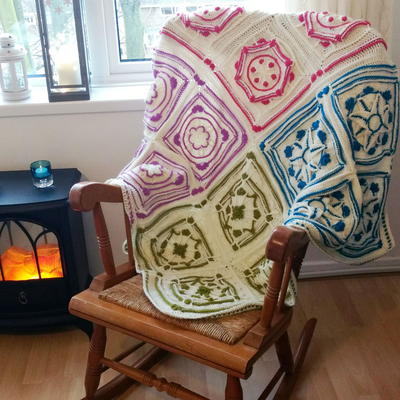
Garden Patch Granny Afghan

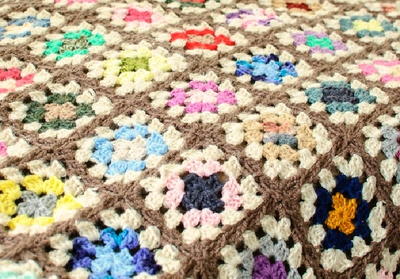
The Garden Patch Granny Afghan is an excellent pattern that uses different-sized crochet granny squares to create a splendid afghan. Boasting lively natural tones that play to the harvest in fall or the flowers of spring, this blanket transforms your bed into a garden. Follow the pattern to learn how to crochet granny squares in multiple sizes that are reminiscent of the variety blooming in your backyard. Combine your love of the outdoors, of digging in the dirt to create beauty and bounty, with your love of the hook, of working up afghans to stay warm and cozy.

Crochet HookJ/10 or 6 mm hook
Yarn Weight(4) Medium Weight/Worsted Weight and Aran (16-20 stitches to 4 inches)
Materials:
- Lion Brand Vanna's Choice Yarn
- 3 Balls 860-173 Dusty Green (A)
- 2 Balls 860-101 Pink (B)
- 2 Balls 860-105 Silver Blue (C)
- 2 Balls 860-108 Dusty Blue (D)
- 2 Balls 860-123 Beige (E)
- 2 Balls 860-130 Honey (F)
- 2 Balls 860-142 Rose (G)
- 2 Balls 860-143 Antique Rose (H)
- 2 Balls 860-158 Mustard (I)
- 2 Balls 860-170 Pea Green (J)
- 2 Balls 860-174 Olive (K)
- 1 Ball 860-099 Linen (L)
- 1 Ball 860-125 Taupe (M)
- Size J-10 crochet hook
- Large-Eye blunt needles (set of 6)
- Diagram
Size: 56" x 58"
Gauge: Small square = about 2 1/4 x 2 1/4"
Special Stitches:
beg-Cl = Ch 2, yarn over, insert hook in indicated sp and draw up a loop, yarn over and draw through 2 loops on hook (2 loops rem on hook); yarn over, insert hook in same st and draw up a loop, yarn over and draw through 2 loops on hook, yarn over and draw through all 3 loops on hook.
Cl (cluster) = Yarn over, insert hook in indicated sp and draw up a loop, yarn over and draw through 2 loops on hook (2 loops rem on hook), *yarn over, insert hook in same st and draw up a loop, yarn over and draw through 2 loops on hook; rep from * once more, yarn over and draw through all 4 loops on hook.
Notes:
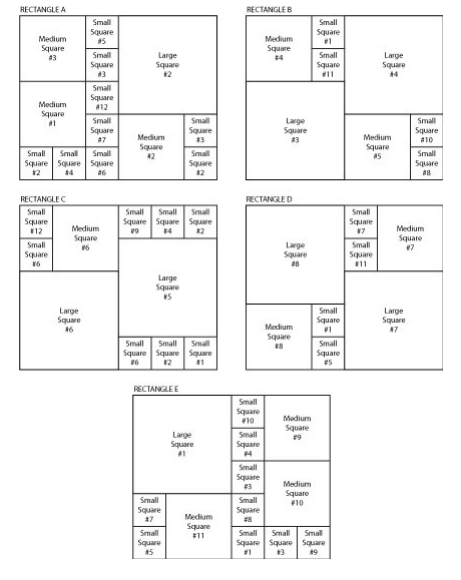
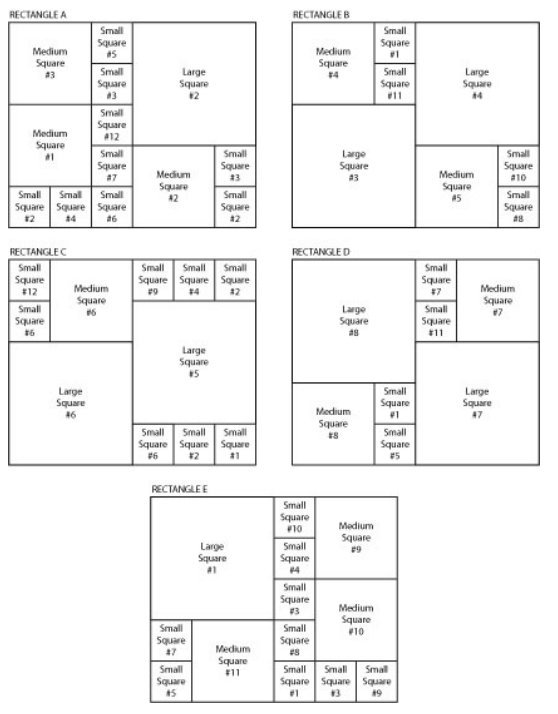
1. Small, medium and large squares are crocheted. Finished squares are seamed. Follow Rectangle Assembly Diagram to make 4 each of 5 rectangles.
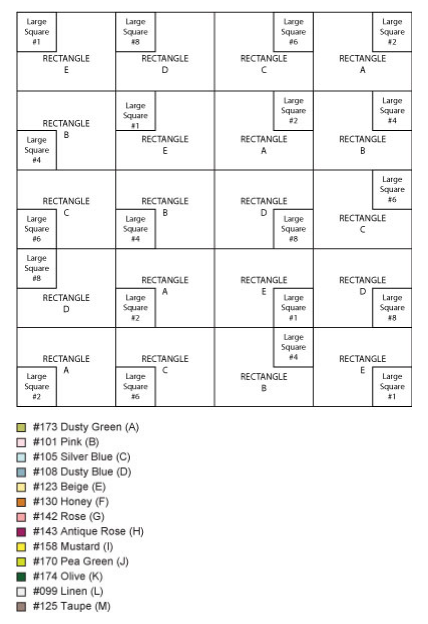
2. Sew tog rectangles to make afghan according to Afghan Assembly Diagram.
Small Square #1 (16)
With D, ch 8. Join with sl st in first ch to form a ring.
Rnd 1 (RS): (Beg-Cl, ch 5, Cluster) in ring, ch 2, *(Cluster, ch 5, Cluster) in ring, ch 2; rep from * 2 more times; join with sl st in top of Beg-Cl - 8 Clusters, 4 ch-5 sps and 4 ch-2 sps. Fasten off, leaving a long tail for sewing.
Small Square #2 (16)
With E, make same as Small Square #1.
Small Square #3 (16)
With M, make same as Small Square #1.
Small Square #4 (12)
With H, make same as Small Square #1.
Small Square #5 (12)
With J, make same as Small Square #1.
Small Square #6 (12)
With K, make same as Small Square #1.
Small Square #7 (12)
With L, make same as Small Square #1.
Small Square #8 (8)
With B, make same as Small Square #1.
Small Square #9 (8)
With C, make same as Small Square #1.
Small Square #10 (8)
With F, make same as Small Square #1.
Small Square #11 (8)
With I, make same as Small Square #1.
Small Square #12 (8)
With G, make same as Small Square #1.
Medium Square #1 (4)
With F, ch 8. Join with sl st in first ch to form a ring.
Rnd 1 (RS): (Beg-Cl, ch 5, Cluster) in ring, ch 2, *(Cluster, ch 5, Cluster) in ring, ch 2; rep from * 2 more times; join with sl st in top of Beg-Cl - 8 Clusters, 4 ch-5 sps and 4 ch-2 sps. Fasten off F.
Rnd 2: With RS facing, join B with sl st in any ch-5 sp, (Beg-Cl, ch 3, Cl) in same ch-5 sp (corner made), ch 2, 3 dc in next ch-2 sp, ch 2, *(Cl, ch 3, Cl) in next ch-5 sp, ch 2, 3 dc in next ch-2 sp, ch 2; rep from * 2 more times; join with sl st in top of Beg-Cl - 8 clusters, 12 dc, and 4 corner ch-3 sps.
Rnd 3: Sl st to first ch-3 sp, (Beg-Cl, ch 3, Cl) in same ch-3 sp, ch 2, 2 dc in next ch-2 sp, dc in each dc across to next ch-2 sp, 2 dc in next ch-2 sp, ch 2, *(Cl, ch 3, Cl) in next ch-3 sp, ch 2, 2 dc in next ch-2 sp, dc in each dc across to next ch-2 sp, 2 dc in next ch-2 sp, ch 2; rep from * 2 more times; join with sl st in top of Beg-Cl - 8 clusters, 28 dc, and 4 corner ch-3 sps.
Fasten off B, leaving a long tail for sewing.
Medium Square #2 (4)
Make same as Medium Square #1, working Rnd 1 with F, Rnds 2 and 3 with I.
Medium Square #3 (4)
Make same as Medium Square #1, working Rnd 1 with K, Rnds 2 and 3 with A.
Medium Square #4 (4)
Make same as Medium Square #1, working Rnd 1 with L, Rnds 2 and 3 with F.
Medium Square #5 (4)
Make same as Medium Square #1, working Rnd 1 with D, Rnds 2 and 3 with C.
Medium Square #6 (4)
Make same as Medium Square #1, working Rnd 1 with M, Rnds 2 and 3 with B.
Medium Square #7 (4)
Make same as Medium Square #1, working Rnd 1 with E, Rnds 2 and 3 with M.
Medium Square #8 (4)
Make same as Medium Square #1, working Rnd 1 with K, Rnds 2 and 3 with H.
Medium Square #9 (4)
Make same as Medium Square #1, working Rnd 1 with J, Rnds 2 and 3 with K.
Medium Square #10 (4)
Make same as Medium Square #1, working Rnd 1 with E, Rnds 2 and 3 with A.
Medium Square #11 (4)
Make same as Medium Square #1, working Rnd 1 with L, Rnds 2 and 3 with G.
Large Square #1 (4)
With I, ch 8. Join with sl st in first ch to form a ring.
Rnd 1 (RS): (Beg-Cl, ch 5, Cluster) in ring, ch 2, *(Cluster, ch 5, Cluster) in ring, ch 2; rep from * 2 more times; join with sl st in top of Beg-Cl - 8 Clusters, 4 ch-5 sps and 4 ch-2 sps. Fasten off I.
Rnd 2: With RS facing, join D with sl st in any ch-5 sp, (Beg-Cl, ch 3, Cl) in same ch-5 sp (corner made), ch 2, 3 dc in next ch-2 sp, ch 2, *(Cl, ch 3, Cl) in next ch-5 sp, ch 2, 3 dc in next ch-2 sp, ch 2; rep from * 2 more times; join with sl st in top of Beg-Cl - 8 clusters, 12 dc, and 4 corner ch-3 sps.
Rnd 3: Sl st to first ch-3 sp, (Beg-Cl, ch 3, Cl) in same ch-3 sp, ch 2, 2 dc in next ch-2 sp, dc in each dc across to next ch-2 sp, 2 dc in next ch-2 sp, ch 2, *(Cl, ch 3, Cl) in next ch-3 sp, ch 2, 2 dc in next ch-2 sp, dc in each dc across to next ch-2 sp, 2 dc in next ch-2 sp, ch 2; rep from * 2 more times; join with sl st in top of Beg-Cl - 8 clusters, 28 dc, and 4 corner ch-3 sps. Fasten off D.
Rnd 4: With RS facing, join C with sl st in any ch-3 sp, (Beg-Cl, ch 3, Cl) in same ch-3 sp, ch 2, 2 dc in next ch-2 sp, dc in each dc across to next ch-2 sp, 2 dc in next ch-2 sp, ch 2, *(Cl, ch 3, Cl) in next ch-3 sp, ch 2, 2 dc in next ch-2 sp, dc in each dc across to next ch-2 sp, 2 dc in next ch-2 sp, ch 2; rep from * 2 more times; join with sl st in top of Beg-Cl - 8 clusters, 44 dc, and 4 corner ch-3 sps.
Rnd 5: Rep Rnd 3.
Fasten off C, leaving a long tail for sewing.
Large Square #2 (4)
Make same as Large Square #1, working Rnd 1 with L, Rnds 2 and 3 with C, Rnds 4 and 5 with D.
Large Square #3 (4)
Make same as Large Square #1, working Rnd 1 with M, Rnds 2 and 3 with J, Rnds 4 and 5 with A.
Large Square #4 (4)
Make same as Large Square #1, working Rnd 1 with G, Rnds 2 and 3 with E, Rnds 4 and 5 with H.
Large Square #5 (4)
Make same as Large Square #1, working Rnd 1 with F, Rnds 2 and 3 with L, Rnds 4 and 5 with I.
Large Square #6 (4)
Make same as Large Square #1, working Rnd 1 with H, Rnds 2 and 3 with A, Rnds 4 and 5 with J.
Large Square #7 (4)
Make same as Large Square #1, working Rnd 1 with A, Rnds 2 and 3 with G, Rnds 4 and 5 with B.
Large Square #8 (4)
Make same as Large Square #1, working Rnd 1 with J, Rnds 2 and 3 with F, Rnds 4 and 5 with E.
Finishing
Following Rectangle Assembly Diagram, sew squares tog to make rectangles. Arrange rectangles as shown in Afghan Assembly Diagram and sew tog.
Edging
Rnd 1: With RS facing, join A with sl st anywhere along outside edge of Afghan. Work sc evenly spaced around; join with sl st in first sc.
Rnd 2: Ch 1, sc in each sc around; join with sl st in first sc. Fasten off. Weave in ends.
Garden Patch Afghan Assembly Diagrams
-
Assembly Diagram 1
-
Assembly Diagram 2
Read NextWinter Jewels Lapghan
Your Recently Viewed Projects
Thanks for your comment. Don't forget to share!
reneewagener 36328 18
Sep 11, 2018
Found the rectangle assembly diagram but not the afghan assembly diagram for the Garden Patchwork crocheted blanket. Can anyone help me?? I would not want to make all the squares and not be able to assemble.
AFCAP Editor
Sep 13, 2018
Hi there. I've updated this page to include the assembly diagram. Thanks for your question! I'm sure it will help a lot of other people, too! I hope you enjoy making this pretty afghan. )
reneewagener 36328 18
Sep 11, 2018
Would really like to make this however when I bring up the diagram for square placement it doesn't make sense. Any suggestions?
Zeemer
Apr 05, 2016
This patchwork afghan is so lovely, I will be proud to make and show this off to my friends and relatives. It is so beautiful. We're lucky to have the pattern just right on the same page. In case you need the crochet abbreviations, here they are http//www.allfreecrochetafghanpatterns.com/Baby-Bl == anket-Afghans/Patchwork-Plaid-Baby-Blanket
Report Inappropriate Comment
Are you sure you would like to report this comment? It will be flagged for our moderators to take action.
Thank you for taking the time to improve the content on our site.


