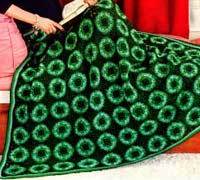
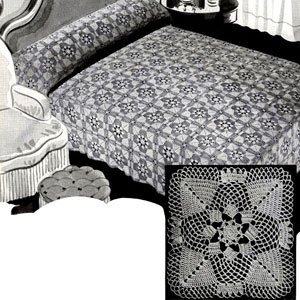
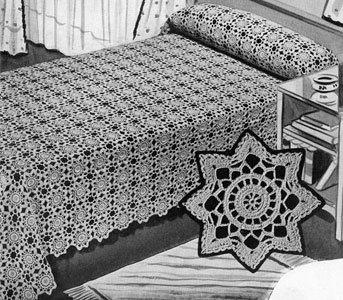
Pinwheel Crochet Bedspread Pattern
Simple, chic, and elegant are all words that come to mind when looking at this Pinwheel Crochet Bedspread Pattern. With its delicate swirling wheels motif, this free tutorial teaches you how to crochet a blanket that's unique and effortlessly chic. The white compliments any and all color schemes, so don't worry about it matching your decor. The blanket color beneath the afghan peeks through the wheels to create the best bedding combination ever.

Crochet Hook6 or 1.8 mm hook (steel)
Yarn Weight(1) Super Fine (27-32 stitches to 4 inches)
Materials:
- Bernat® Handicrafter® Crochet Thread™ Solids: (3 oz/85 g; 371 yds/339 m or 14 oz/400 g; 1746 yds/1596 m) Soft White (31005) 85 g ball - 28 balls or Soft White (32005) 400 g ball - 6 balls
- Crochet Hook: Size U.S. 6 (1.75 mm) steel crochet hook or size needed to obtain gauge.
- Stitch marker
Size: Approx 90" x 95" [228.5 x 241.5 cm].
Gauge: 30 sc and 32 rows = 4" [10 cm]. Motif = Approx 7½" [19 cm] between sides.
Abbreviations: Approx = Approximately, Beg = Beginning, Ch = Chain(s), Cont = Continue, Rnd(s) = Round(s), Sc = Single crochet, Sl st = Slip stitch, Sp(s) = Space(s), Tog = Together, Tr = Treble crochet
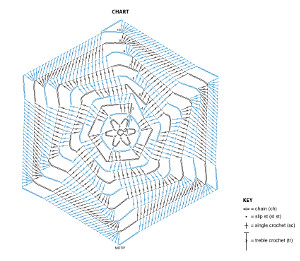
MOTIF (Make 149):
Ch 4. Join with sl st into first ch to form a ring.
1st round: Ch 1. (1 sc. Ch 5) 6 times in ring. Join with sl st to first sc.
2nd round: Ch 1. 1 sc in first ch-5 sp. (Ch 4. Miss next sc. 1 sc in next ch-5 sp) 5 times. Ch 4. Join with sl st to first sc.
3rd round: Ch 4 (counts as tr). 1 tr in same sp as last sl st. 2 tr in first ch-4 sp. (Ch 4. 2 tr in next sc. 2 tr in next ch-4 sp) 5 times. Do not join in rnd. Place a marker on last st to mark end of rnd. Cont moving this marker at end of each subsequent rnd.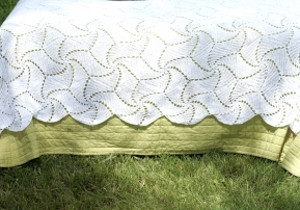
4th round: (Ch 4. Miss next tr. 1 tr in each of next 2 tr. 2 tr in next tr. 2 tr in next ch-3 sp) 6 times.
5th round: (Ch 4. Miss next tr. 1 tr in each of next 4 tr. 2 tr in next tr. 2 tr in next ch-4 sp) 6 times.
6th round: (Ch 4. Miss next tr. 1 tr in each of next 6 tr. 2 tr in next tr. 3 tr in next ch-4 sp) 6 times.
7th round: (Ch 4. Miss next tr. 1 tr in each of next 9 tr. 2 tr in next tr. 3 tr in next ch-4 sp) 6 times.
8th round: (Ch 4. Miss next tr. 1 tr in each of next 12 tr. 2 tr in next tr. 4 tr in next ch-4 sp) 6 times.
9th round: (Ch 4. Miss next tr. 1 tr in each of next 16 tr. 2 tr in next tr. 4 tr in next ch-4 sp) 6 times.
10th round: (Ch 4. Miss next tr. 1 tr in each of next 20 tr. 2 tr in next tr. 4 tr in next ch-4 sp) 6 times. Ch 4. Join with sl st in first tr. Fasten off.
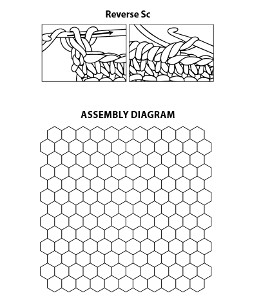
FINISHING: Pin Motifs to measurements. Cover with damp cloth, leaving to dry. Sew Motifs tog as shown in diagram.
EDGING:
1st round: Join thread with sl st to any tr. Ch 1. 1 sc in same sp as sl st. Work 1 sc in each tr, 3 sc in each ch-4 sp at bottom of V and 6 sc at outer points around. Join with sl st to first sc.
2nd round: Ch 1. Working from left to right, instead of right to left as usual, work 1 reverse sc in each sc around. Join with sl st to first sc. Fasten off.
Read NextPinwheel Crochet Bedspread Pattern
Your Recently Viewed Projects
Thanks for your comment. Don't forget to share!
lcarr
Jun 28, 2017
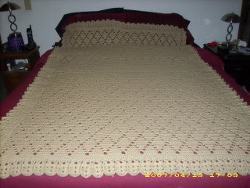
Very pretty and unique. I love the way the pinwheels interlock, making it so there really is no center starting point when looking at them. It is nice and large too, big enough to cover a full or queen sized bed properly. Matching shams, or accent pillows in a contrasting colour would look lovely with this.
auntyshanny 880184 7
Jan 23, 2017
Hi, I was lucky enough to find this exact item at a second hand store that I frequent. Lucky, because as much as I love crocheting this would take too long for me. If a project takes too long I start to lose interest. It is very lovely, I use it as a tablecloth!
Zeemer
May 02, 2016
This blanket is indeed fit for a queen. Very beautiful. Thanks for the pattern which is just in front of the page.
dandysandy
Apr 04, 2016
Also you can tell if a pattern is UK or US as the UK patterns don't use the term sc, for single crochet. Their term for single crochet is dc. If you see sc anywhere in the pattern you can safely assume its a US pattern.
dandysandy
Apr 04, 2016
If you have Windows 10 use the open book pattern on the top menu bar. It won't print the diagram but will print the pattern notes. Just draw the diagram for assembly using a few of the motifs. Its 11 on the first row, 12 on the second - alternating the rows for a total of 13 rows. To print press ctrlp or use the printer icon at the bottom of the page. I don't know if Windows 8 has these icons but you can print the pattern using ctrl p but it will print pictures/colors etc. As for joining attach each motif one by one in rows then attach row by row. Make sure you alternate 11 motif rows with 12 motif rows. Also be careful what side you attach. Its easy to get lost when doing the attaching. Hope this helps.
fulghum3537 659084 4
Apr 11, 2015
Does anyone know how to join as you go? Please tel me how. Thank you in advance.
Abuela Mairim
Nov 03, 2014
Beautiful pattern agree with the comment of Char55 the best way is to join as you go all the motifs.
Char55
Aug 17, 2014
While the motifs themselves are easy and work up quickly. The bedspread itself isn't exactly what I would call effortless...joining 149 motifs and weaving in the ends takes a LOT of time. Although I haven't made this particular pattern, I have made similar ones.
Report Inappropriate Comment
Are you sure you would like to report this comment? It will be flagged for our moderators to take action.
Thank you for taking the time to improve the content on our site.