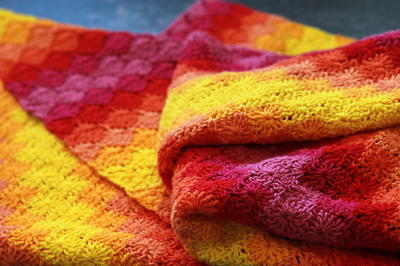
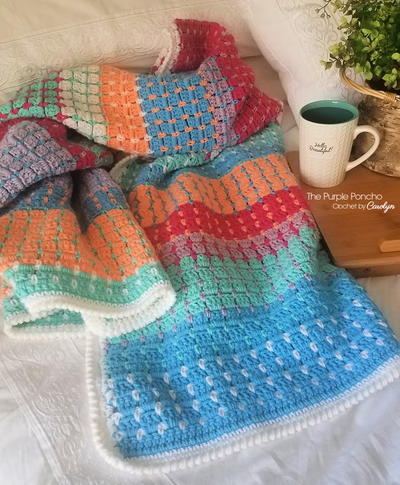
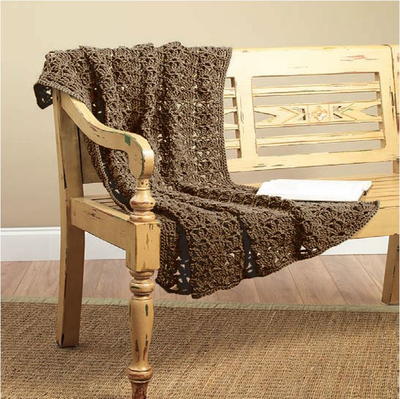
Rustic Shells and Stripes Throw

Because this Rustic Shells and Stripes Throw uses chunky weight yarn, you'll find that this crochet throw pattern works up quickly. You can use these rich colors to make a charming and old-fashioned blanket or choose several colors of your choice to make it your own. Because of the thin and thick striped pattern, many color combinations would look amazing. You will use the shell stitch for this crochet idea, which gives this throw a slightly delicate style that everyone who sees it will love immediately.

Crochet HookM/13 or 9 mm hook
Yarn Weight(5) Bulky/Chunky (12-15 stitches for 4 inches)
Crochet GaugeOne pattern repeat = about 2¼” [5.5 cm]; Rows 1–9 = about 5” [12.5 cm]. Note: One pattern repeat consists of a shell and the following sc. CHECK YOUR GAUGE. Use any size hook to obtain the gauge.
Finished Size45" x 56" [114.5 x 142 cm]
Materials List
- RED HEART® Comfort Chunky®: 1 ball each of 4455 Claret A, 4453 Fudge B, 4456 Blue Jeans C, 4452 Cream D
- Susan Bates® Crochet Hook: 9 mm [US M-13]
- Yarn needle
Instructions for THROW:
With A, ch 104.
-
Row 1 (right side): Sc in 2nd ch from hook, *skip next 2 ch, shell in next ch, skip next 2 ch, sc in next ch; repeat from * across—17 shells and 18 sc.
Row 2: Ch 5 (counts as dc, ch 2), turn, sc in ch-2 space of first shell, ch 2, dc in next sc, *ch 2, sc in ch-2 space of next shell, ch 2, dc in next sc; repeat from * across—34 ch-2 spaces, 17 sc and 18 dc.
Row 3: Ch 1, turn, sc in first dc, *shell in next sc, sc in next dc; repeat from * across working the last sc in 3rd ch of beginning ch-5—17 shells and 18 sc.
Rows 4 and 5: Repeat Rows 2 and 3.
Row 6: Repeat Row 2. Fasten off. With right side facing, draw up a loop of C in first dc.
Row 7 (right side): Ch 1, sc in first dc, *ch 2, sc in next sc, ch 2, sc in next dc; repeat from * across working the last sc in 3rd ch of beginning ch-5—34 ch-2 spaces and 35 sc.
Rows 8 and 9: Ch 1, turn, sc in first sc, *ch 2, sc in next sc; repeat from * across. Fasten off. With right side facing, draw up a loop of B in first sc.
Row 10 (right side): Ch 1, sc in first sc, *shell in next sc, sc in next sc; repeat from * across—17 shells and 18 sc.
Rows 11–15: Repeat Rows 2–6. Fasten off. With right side facing, draw up a loop of D in first dc.
Rows 16–18: With D, repeat Rows 7–9. Fasten off. With right side facing, draw up a loop of A in first sc.
Row 19 (right side): With A, repeat Row 10.
Rows 20–36: Repeat Rows 2–18.
Rows 37–72: Repeat Rows 19–36 twice more.
Fasten off. With right side facing, draw up a loop of B in first dc.
Row 73: Repeat Row 10.
Rows 74–87: Repeat Rows 2–15. Fasten off.
Instructions for BORDER:
With right side facing and Row 87 at top, draw up a loop of D in first sc (following corner).
-
Round 1 (right side): Ch 1, sc in same sc, *ch 2, sc in next dc, ch 2, sc in next sc; repeat from * to beginning ch-5, ch 2, (sc, ch 2, sc) in 3rd ch of beginning ch-5 for corner; working in ends of rows across side edge, ch 2, skip remainder of beginning ch-5, sc in end of next sc row, [ch 2, skip next row, sc in end of next sc row] twice, **ch 2, skip end of next 2 sc rows, sc in end of next sc row, [ch 2, skip next row, sc in end of next sc row] 3 times; repeat from ** across side edge; working across opposite side of foundation ch, (sc, ch 2, sc) in first ch, ***ch 2, skip next 2 ch, sc in next ch; repeat from *** across working (sc, ch 2, sc) in last ch; working in ends of rows across next side edge, sc in end of first sc row, ****[ch 2, skip next dc row, sc in end of next sc row] 3 times, ch 2, skip end of next 2 sc rows, sc in end of next sc row; repeat from **** to last 5 rows, [ch 2, skip next dc row, sc in end of next sc row] twice, ch 2, skip last dc row, (sc, ch 2, sc) in first dc of Row 87, ch 2; join with slip st in first sc.
Round 2: Ch 1, sc in each sc and ch around working (sc, ch 2, sc) in each corner ch-2 space; join with slip st in first sc. Note: In following rounds, skip more or fewer stitches at corners, as needed.
Round 3 (wrong side): Ch 1, turn, sc in next sc, *ch 1, skip next sc, sc in next sc; repeat from * around working (sc, ch 2, sc) in each corner ch-2 space; join with slip st in first sc.
Round 4 (right side): Ch 1, turn, beginning in next ch-1 space, work sc in each sc and ch-1 space around working (sc, ch 2, sc) in each corner ch-2 space; join with slip st in first sc. Fasten off.
Round 5 (right side): With right side facing, draw up a loop of C in 3rd sc following any corner ch-2 space, ch 1, sc in same sc, *skip next 2 sc, shell in next sc, skip next 2 sc, sc in next sc; repeat from * around working corner-shell in each corner ch-2 space; join with slip st in first sc.
Round 6: Ch 3 (counts as dc), (dc, ch 2, 2 dc) in same sc as joining, *sc in ch-2 space of next shell, shell in next sc; repeat from * around working at each corner: skip first 2 dc of corner-shell, sc in next dc, shell in ch-2 space of corner-shell, sc in next dc, skip last 2 dc of corner-shell; join with slip st in top of beginning ch.
Round 7: Slip st in each st to ch-2 space of first shell, (slip st, ch 1, sc, ch 2, sc) in first ch-2 space, ch 2, sc in next sc, *ch 2, (sc, ch 2, sc) in ch-2 space of next shell, ch 2, sc in next sc; repeat from * around working at each corner: ch 2, skip next dc, (sc, ch 2, sc) in next dc, (sc, ch 3, sc) in corner ch-2 space, (sc, ch 2, sc) in next dc, ch 2, skip next dc; join with slip st in first sc. Fasten off.
Instructions for FINISHING:
-
Weave in ends.
Abbreviations
- A, B, C
- Color A, Color B, Color C etc
- ch
- chain
- dc
- double crochet
- sc
- single crochet
- st(s)
- stitch(es)
- ()
- work directions in parentheses into same st
- [ ]
- work directions in brackets the number of times specified
- *, **, *** or ***
- repeat whatever follows the *, **, ***, or **** as indicated
Read NextUnbelievably Easy Crochet Blanket
Your Recently Viewed Projects
Thanks for your comment. Don't forget to share!
hmoranatty 8398059
Sep 29, 2018
There are so many variations for a shell stitch...I don't see where the description of the shell stitch for this pattern is given.
Zeemer
Sep 16, 2017
I was expecting a lighter color combination for this Rustic Shells and Stripes Throw as I am used to the light color of shells in the seashore in my hometown. I am not very much delighted of the dark color scheme but who cares, some people like this project s o much. So go ahead, fellow crocheter who like this project can enjoy doing it now.
Report Inappropriate Comment
Are you sure you would like to report this comment? It will be flagged for our moderators to take action.
Thank you for taking the time to improve the content on our site.