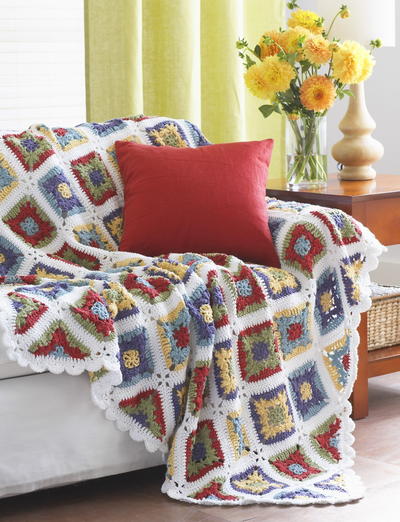
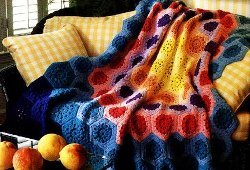
Pennsylvania Dutch Throw
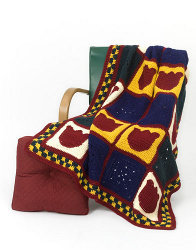
This Pennsylvania Dutch Throw is full of country splendor. Grab your your yarn needle and hook for this floral afghan pattern that features a tulip motif. With its rich color scheme and old-fashioned flavor, this crochet throw just might become your favorite wrap. If this pattern seems a bit complicated, don't fret. It comes with a detailed chart to help you visualize the finished blanket. This throw is a sweet and soft addition to your home decor.

Crochet HookI/9 or 5.5 mm hook
Yarn Weight(4) Medium Weight/Worsted Weight and Aran (16-20 stitches to 4 inches)
Materials:
- One Pound (454 g / 16. oz ; 742 m / 812 yds)
- 1 skein Cream (0589) – Contrast A
- 1 skein Claret (0562) – Contrast B
- 1 skein Sunflower (00549) – Contrast C
- 1 skein Midnight Blue (0546) – Contrast D
- 1 skein Forest Green (0534) – Contrast E
- Aluminum crochet hook 6" size I9 / 5.5mm
- Yarn needle
- Chart
Size: 43" / 109 cm wide x 52" / 132 cm long
Gauge:
Rounds 1 and 2 of motif = 3 x 3" / 7.5 x 7.5 cm
1 motif = 9 x 9" / 23 x 23 cm
In single crochet, 9 sc and 10 rows = 3 x 3" / 7.5 x 7.5 cm
Instructions:
Notes
1. Weave in ends as work progresses.
2. To change color, work old color to last yarn over; yarn over with new color and draw through all loops on hook. Continue work with new color. Do not carry unused yarn colors along; join a new ball for each section of color.
3. On chart, each square represents one single crochet. Read odd-numbered rows from right to left, even-numbered rows from left to right.
Tulip Motif (10 Total, 6 in first color combination, 4 in second color combination)
First color combination: background color A, tulip color B.
Second color combination: background color C, tulip color B.
With background color, chain 24.
Row 1 (RS): Sc in second ch from hook and in each remaining ch across, turn—23 sc.
Rows 2–23: Ch 1, sc in each sc across; changing color as shown in tulip chart, turn. Do not fasten off at end of Row 23. Begin working in rounds.
Round 24: With background color, ch 1, work 21 sc evenly spaced along each edge, working 3 sc in each corner; join with slip st in first sc—96 sc. Fasten off background color.
Round 25: Join tulip color with sc in center sc of any 3-sc corner, 2 sc in same sc (corner made), sc in each sc around, working 3 sc in center sc of each 3-sc corner; join with slip st in first sc—104 sc. Fasten off tulip color.
Surface Slip Stitch Tulip Outline
With RS of motif facing, hold hook on RS of piece and tulip color on WS of piece. Insert hook from RS to WS near edge of tulip, yarn over and draw loop through to RS of piece; *move hook slightly forward and insert again from RS to WS, yarn over and draw loop through to RS and through loop on hook (surface slip st completed); repeat from * working around entire edge of tulip to outline. Fasten off tulip color.
Solid Motif (10 Total – 6 with D, 4 with E)
Chain 5; join with slip st in first ch to form a ring.
Round 1: Ch 3 (counts as first dc here and throughout), 2 dc in ring, ch 2, [3 dc in ring, ch 2] 3 times; join with slip st in top of beginning ch—12 dc and 4 ch-3 sps.
Round 2: Ch 3, dc in next 2 dc, [5 dc in next ch-2 sp, dc in next 3 dc] 3 times, 5 dc in last ch-2 sp; join with slip st in top of beginning ch—32 dc.
Round 3: Ch 4 (counts as dc, ch 1), [sk next dc, dc in next 3 dc, (2 dc, ch 2, 2 dc) in next dc (corner made), dc in next 3 dc, ch 1] 3 times, sk next dc, dc in next 3 dc, (2 dc, ch 2, 2 dc) in next dc (corner made), dc in last 2 dc; join with slip st in 3rd ch of beginning ch—4 ch-2 corner sps, 4 ch-1 sides sps, and 10 dc along each side.
Round 4: Ch 3, dc in first ch-1 space, dc in next 5 dc, [5 dc in next ch-2 sp, dc in next 5 dc, dc in next ch-1 sp, dc in next 5 dc] 3 times, 5 dc in last ch-2 sp, dc in last 4 dc; join with slip st in top of of beginning ch—64 dc.
Round 5: Ch 3, dc in next 8 dc, [(2 dc, ch 2, 2 dc) in next dc, dc in next 15 dc] 3 times, (2 dc, ch 2, 2 dc) in next dc, dc in last 6 dc; join with slip st in top of beginning ch—4 ch-2 corner sps and 19 dc along each side.
Round 6: Ch 1, sc in each dc around, working 3 sc in each corner ch-2 sp; join with slip st in first sc—88 sc.
Round 7: Ch 1, sc in each sc around, working 3 sc in center sc of each 3-sc corner; join with slip st in first sc—96 sc. Fasten off.
Round 8: Join B with sc in center sc of any 3-sc corner, 2 sc in same sc, sc in each remaining sc around, working 3 sc in center sc of each 3-sc corner; join with slip st in first sc—104 sc. Fasten off B.
Finishing: Arrange squares according to assembly diagram. Hold neighboring squares with RS together. Whip stitch neighboring sides of squares together, sewing through front loops of each sc only.
Edging
With RS facing, join B with slip st in center sc of any 3-sc corner.
Round 1: Ch 3, 2 dc in same sc as join; work 133 dc evenly spaced along each long edge, and 109 dc evenly spaced along each short edge, working 3 dc in center sc of each 3-sc corner; join with slip st in top of beginning ch—496 dc. Fasten off B.
Round 2: With RS facing, join E with slip st in 3rd dc of any 3-dc corner; ch 3 (counts as first dc here and throughout), dc in next 2 dc, *ch 3, sk next 3 dc, dc in next 3 dc; repeat from * to center dc of next 3-dc corner, ch 3, sk next dc (center dc of 3-dc corner)**, dc in next 3 dc; repeat from * around, ending last repeat at **; join with slip st in top of beginning ch—252 dc and 84 ch-3 sps. Fasten off E.
Round 3: With RS facing, join C with slip st in skipped center dc of any 3-dc corner of Round 1, ch 3, working over ch-3 corner sp, 4 dc in same dc as join, *ch 3, sk next 3 dc, working over ch-3 sp, dc in next 3 skipped dc of Round 1; repeat from * to last 3-dc before corner, ch 3, sk next 3 dc**, working over ch-3 corner sp, 5 dc in skipped center dc of 3-dc corner of Round 1; repeat from * around, ending last repeat at **; join with slip st in top of beginning ch. Fasten off C.
Round 4: Join E with slip st in center dc of any 5-dc corner, ch 1, 3 sc in same dc as join, sc in next 2 dc, working over ch-3 sp, sc in next 3 skipped dc of Round 2, *sc in next 3 dc, working over ch-3 sp, sc in next 3 skipped dc of Round 2; repeat from * to next 5-dc corner, sc in next 2 dc**, 3 sc in next dc (center dc of corner), sc in next 2 dc; repeat from * around, ending last repeat at **; join with slip st in first sc.
Round 5: Slip st in next 2 sc, ch 3, dc in next 2 sc, *ch 3, sk next 3 sc, dc in next 3 sts; repeat from * to center sc of next 3-sc corner, ch 3, sk next sc (center sc of corner)**, dc in next 3 sc; repeat from * around, ending last repeat at **; join with slip st in top of beginning ch. Fasten off E.
Round 6: Join C with slip st in skipped center sc of any 3-sc corner of Round 4, ch 3, working over ch-3 corner sp, 4 dc in same sc as join, *ch 3, sk next 3 dc, working over ch-3 sp, dc in next 3 skipped sc of Round 4; repeat from * to last 3-dc before corner, ch 3, sk next 3 dc**, working over ch-3 corner sp, 5 dc in skipped corner sc of Round 4; repeat from * around, ending last repeat at **; join with slip st in top of beginning ch. Fasten off C.
Round 7: Join B with sc in center dc of any 5-dc corner, 2 sc in same dc as join, sc in next 2 dc, working over ch-3 sp, sc in next 3 skipped dc of Round 5, *sc in next 3 dc, working over ch-3 sp, sc in next 3 skipped dc of Round 5; repeat from * to next 5-dc corner, sc in next 2 dc**, 3 sc in next dc (center dc of corner), sc in next 2 dc, working over ch-3 sp, sc in next 3 skipped dc of Round 5; repeat from * around, ending last repeat at **; join with slip st in first sc.
Round 8: Ch 3, dc in each sc around, working 5 dc in center sc of each 3-sc corner; join with slip st in top of beginning ch. Fasten off B.
Using yarn needle, weave in all ends.
Read NextSucculent Spring Hexagon Afghan
Your Recently Viewed Projects
Thanks for your comment. Don't forget to share!
mulberrygalprinces s
Jun 13, 2016
My parents were Penn Dutch. My aunt still lives in Lancaster the heArt of Dutch country. I have seen designs such as these all over that area. They still make quilts by hand and all kinds of things to go with them. I want to make this to keep some of my heritage alive. Maybe my grand daughter will take an interest since pattern is easy. Thank you.
Zeemer
May 03, 2016
This afghan is so gorgeous. The blue/red/yellow combination is so attractive and inviting. This will make a room abright and full of life. Thanks for the easy access to the pattern for those who would like to make this project. Here's the link to the chart http//www.allfreecrochetafghanpatterns.com/masteri == mages/files/pennsylvania-dutch-graph.JPG
Report Inappropriate Comment
Are you sure you would like to report this comment? It will be flagged for our moderators to take action.
Thank you for taking the time to improve the content on our site.