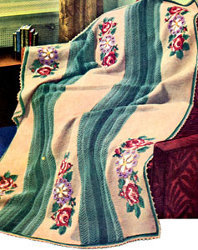
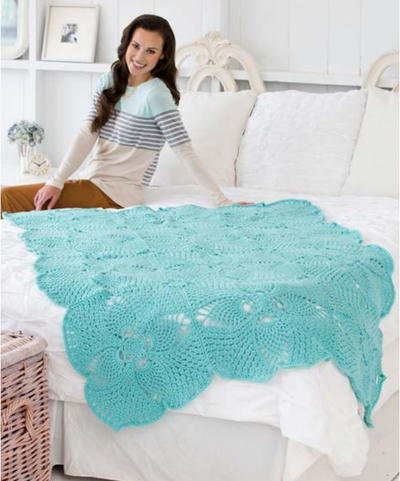
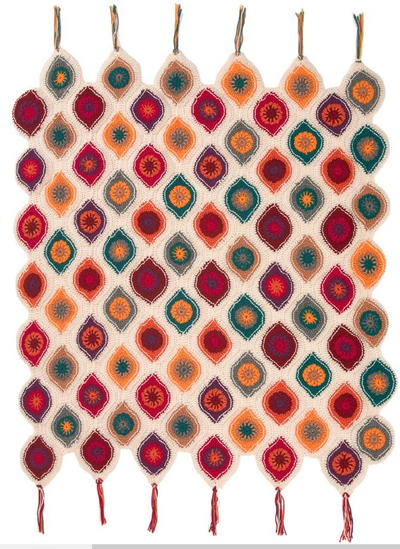
Fall Romance Throw

If you're in love with autumn as much as we are, you'll be head over heels for the Fall Romance Throw. This motif afghan would be so comfortable to snuggle up under with your spouse or significant other. When the weather gets chilly in the fall, all we want is the summer warmth, but this blanket will allow you to be closer to your love one to get warm. The colors of this crochet blanket resemble the changing leaves in autumn, which we absolutely crave during this time of the year.

Crochet HookI/9 or 5.5 mm hook
Yarn Weight(4) Medium Weight/Worsted Weight and Aran (16-20 stitches to 4 inches)
Crochet GaugeGAUGE: 1 marquise motif = 4 wide x 5 long (11.5 x 14 cm); Rounds 13 = 3 (9 cm). CHECK YOUR GAUGE. Use any size hook to obtain the gauge.
Finished Size45 in x 55 in
Materials:
- RED HEART® Super Saver®: 2 skeins - 313 Aran A
- RED HEART® Super Saver®: 1 skein each:
- 3901 Rouge B
- 256 Carrot C
- 376 Burgundy D
- 776 Dark Orchid E
- 321 Gold F
- 656 Real Teal G
- 400 Grey Heather H
- 336 Warm Brown I
- Susan Bates® Crochet Hook: 5.5mm [US I-9]
- Yarn needle

Love motifs? Find more in our collection of 17 Motif Crochet Patterns for Afghans
Notes:
- Throw is made of 84 marquise motifs worked in joined rounds with right side facing. Marquise motifs are joined into Strips which are arranged as shown in Assembly Diagram and joined together.
- To change color, work last stitch of old color to last yarn over. Yarn over with new color and draw through all loops on hook to complete stitch. Proceed with new color. Cut old color.
- When instructed to work into a stitch or space “2 rounds below”, work into the round numbered 2 less than the current round. For example, if you are working Round 3, a stitch “2 rounds below” is in Round 3 – 2 = Round 1.
- Beginning and ending tails of Strips are gathered into tassels.
Special Stitches:
- bphdc (back post half double crochet) = Yarn over, insert hook from back side of work to front and to back again around post of indicated stitch; yarn over and pull up a loop (3 loops on hook), yarn over and draw through all 3 loops. Skip the stitch “in front of” the Bpdc.
- dc2tog = [Yarn over, insert hook in next stitch, yarn over and pull up loop, yarn over, draw through 2 loops] 2 times, yarn over, draw through all 3 loops on hook.
Special Techniques:
- Join with Bphdc = Place slip knot on hook, yarn over, insert hook from back side of work to front and to back again around post of indicated stitch; yarn over and pull up a loop (3 loops on hook), yarn over and draw through all 3 loops. Skip the stitch “in front of” the bpdc.
- Join with dc = Place slip knot on hook, yarn over, insert hook in indicated space, yarn over and pull up a loop (3 loops on hook), [yarn over, draw through 2 loops] twice.
- Join with sc = Place a slip knot on hook, insert hook in indicated stitch, yarn over and draw up a loop, yarn over and draw through both loops on hook.
Color Sequences
Make 84 marquise motifs in the following
color sequences:
Marquise Motif 1 (make 5): B, E, and D
Marquise Motif 2 (make 5): C, B, and E
Marquise Motif 3 (make 6): D, C, and B
Marquise Motif 4 (make 5): E, D, and C
Marquise Motif 5 (make 5): E, B, and D
Marquise Motif 6 (make 5): C, E, and B
Marquise Motif 7 (make 6): D, C, and E
Marquise Motif 8 (make 5): B, D, and C
Marquise Motif 9 (make 5): F, G, and H
Marquise Motif 10 (make 5): G, H, and I
Marquise Motif 11 (make 6): H, I, and F
Marquise Motif 12 (make 5): I, F, and G
Marquise Motif 13 (make 5): H, G, and I
Marquise Motif 14 (make 5): G, I, and F
Marquise Motif 15 (make 6): I, F, and H
Marquise Motif 16 (make 5): F, H, and G
THROW
Marquise Motif (make 84 as shown in Color Sequence)
With first color, ch 4; join with slip st in first ch to form a ring.
Round 1 (right side): Ch 3 (counts as first dc), 11 dc in ring; join with slip st in top of beginning ch—12 dc.
Round 2: Ch 3 (counts as first hdc and ch 1), hdc in next st, [ch 1, hdc in next st] 10 times, ch 1; change to 2nd color; join with slip st in 2nd ch of beginning ch—12 hdc and 12 ch-1 spaces.
Round 3: Ch 3 (counts as first dc), dc in same st as join, working in front of first ch-1 space, dc in next st 2 rounds below, [2 dc in next st, working in front of next ch-1 space, dc in next st 2 rounds below] 11 times; join with slip st in top of beginning ch—36 dc.
Fasten off. Weave in end.
Round 4: Join 3rd color with Bphdc around any st, Bphdc around each remaining st; join with slip st in top of beg Bphdc—36 hdc.
Round 5: Ch 2 (counts as first hdc), hdc in same st as join, hdc in next 2 sts, [2 hdc in next st, hdc in next 2 sts] 3 times, (hdc, dc) in next st, dc in next st, 2 tr in next 2 sts, dc in next 2 sts, [2 hdc in next st, hdc in next 2 sts] 4 times, (hdc, dc) in next st, dc in next st, 2 tr in next 2 sts, dc in next 2 sts; join with slip st in top of beginning ch—34 hdc, 8 dc, and two 4-tr groups. Fasten off.
Strip (make 12)
Refer to Assembly Diagram for marquise motif placement. Hold each marquise motif with right side facing. Leave a long tail at beginning and end of each round.
With A, ch 1.
Round 1 (right side): Working across first edge, slip st in 3rd tr of any 4-tr group of first marquise motif, slip st in next 24 sts, *ch 5, slip st in 3rd tr of any 4-tr group of next marquise motif, slip st in next 24 sts; repeat from * 4 times, ch 5, slip st in 3rd tr of any 4-tr group of first marquise motif, slip st in next 24 sts, ch 2; working across other edge, slip st in each st across same marquise motif, slip st in bottom loop of next 5 ch, **slip st in each st across next marquise motif, slip st in bottom loop of next 5 ch; repeat from ** 4 times, slip st in each st across last marquise motif; join with slip st in first ch—380 slip sts, 30 ch, 1 ch-1 space, and 1 ch-2 space. Fasten off.
Round 2: With right side facing, join A with dc in ch-1 space, 2 dc in same space, *[dc2tog] twice, [dc in next 5 sts, 2 dc in next st] twice, dc in next 5 sts, [dc2tog] twice, dc in next 5 ch, repeat from * 5 times, [dc2tog] twice, [dc in next 5 sts, 2 dc in next st] twice, dc in next 5 sts, [dc2tog] twice, (2 dc, ch 2, 2 dc) in ch-2 space, **[dc2tog] twice, [dc in next 5 sts, 2 dc in next st] twice, dc in next 5 sts, [dc2tog] twice, dc in each of next 5 ch, repeat from ** 5 times, [dc2tog] twice, [dc in next 5 sts, 2 dc in next st] twice, dc in next 5 sts, [dc2tog] twice, 3 dc in ch-1 space, ch 1; join with slip st in first dc—392 dc, 1 ch-1 space, and 1 ch-2 space. Fasten off.

ASSEMBLY
Arrange Strips as shown in Assembly Diagram. Leave a long tail at beginning and end of each row.
Joining Row for Strips A and B: With right side facing and working in back loops, join A with sc in first dc after ch-1 space of Strip A, sc in next 13 dc; hold Strips A and B with wrong sides together, working through both thicknesses and in inner loops (back loop of Strip A and front loop of Strip B), sc in next dc of Strip A and first dc after ch-2 space of Strip B, sc in each dc across to ch-2 space of Strip A, skip ch-2 space; working in back loops only, sc in last 14 dc of Strip B; leave ch-1 space unworked—210 sc. Fasten off.
Joining Row for Strips B and C: With wrong side facing and working in front loops, join A with sc in first dc after ch-1 space of Strip C, sc in next 13 dc; hold Strips B and C together, working through both thicknesses and in inner loops (back loop of Strip B and front loop of Strip C), sc in first dc after ch-2 space of Strip B and next dc of Strip C, sc in each dc across to ch-2 space of Strip C, skip ch-2 space; working in back loops only, sc in last 14 dc of Strip B; leave ch-1 space unworked—210 sc. Fasten off.
Repeat last 2 rows to join remaining Strips as follows:
Strips C and D, E and F, G and H, I and J, K and L: work Joining Row same as for Strips A and B Strips D and E, F and G, H and I, J and K: work Joining Row same as for Strips B and C
FINISHING
Edging With right side of unworked edge of Strip A facing and working in back loops only, join A with sc in first dc, sc in each dc across. Fasten off, leaving a long tail. Weave tail through end of Strip. Repeat on unworked edge of Strip L.

Get more throw patterns when you download our free eBook: 8 Crochet Ideas for Crochet Throws, Simple Crochet Patterns, and Crochet Blanket Patterns
Tassels
Cut six 24” (61 cm) strands of each of B, C, D, and E. Make 6 hanks, each containing 1 strand of each color. With right side of Strip A facing, thread each end of hank between first 2 dc on each side of ch-1 space of Round 2. Pull ends to close space and with A tails held with hank, tie an overhand knot. Repeat with each hank in end of Strips C, E, G, I, and K.
Repeat with F, G, H, and I, threading through ch-2 spaces of Strips B, D, F, H, J, and L. Trim tassels evenly to desired length.
Weave in ends.
ABBREVIATIONS
A, B, C = Color A, Color B, Color C, etc.
ch = chain(s)
dc = double crochet
hdc = half double crochet
sc = single crochet
st(s) = stitch(es)
tr = treble (triple) crochet
( ) = work directions in parentheses into same st
[ ] = work directions in brackets the number of times specified
* = repeat whatever follows the * as indicated.
Read NextMosaic Granny Square
Your Recently Viewed Projects
Thanks for your comment. Don't forget to share!
Zeemer
Jul 02, 2016
This afghan is so beautiful. The color combination just right - not too bright, not too drab. It reminds me of some Persian design. Thanks for having the pattern right up front and the diagram, too. Very useful for crocheters.
Report Inappropriate Comment
Are you sure you would like to report this comment? It will be flagged for our moderators to take action.
Thank you for taking the time to improve the content on our site.