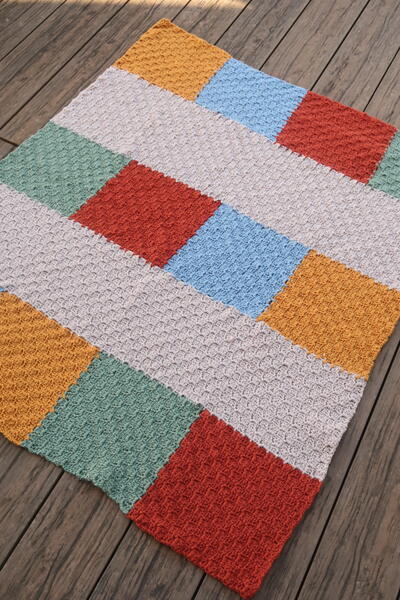
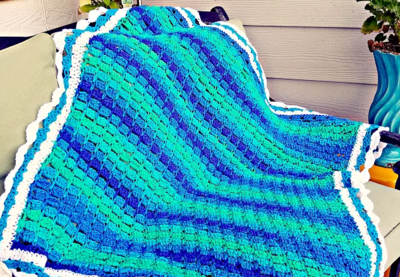
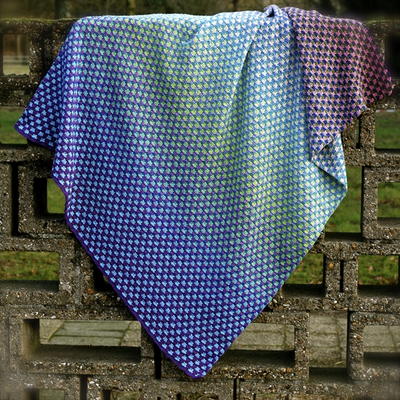
Modern Patchwork Crochet Throw
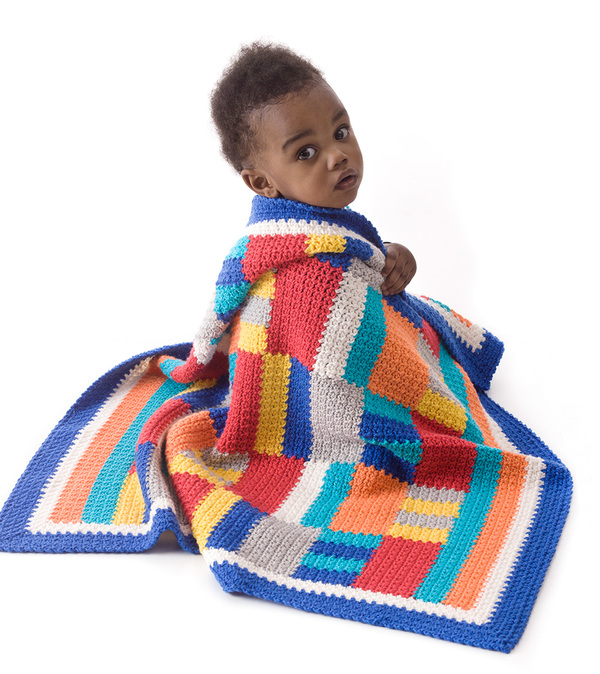
Modern Baby yarn is used to work up this bright and colorful Modern Patchwork Crochet Throw. Because of the primary colors that are used, it's a fantastic gender-neutral baby blanket. It is made up of five columns of patches, and each patch is worked back and forth in rows. As you work, you'll join the patches together. Work up this multi-colored crochet baby blanket for an upcoming baby shower, or treat yourself to this homemade baby blanket. It's a classic crocheted afghan that will look amazing in any nursery, regardless of the color scheme.

Crochet HookH/8 or 5 mm hook, J/10 or 6 mm hook
Yarn Weight(3) Light/DK (21-24 stitches to 4 inches)
MATERIALS:
- Lion Brand Modern Baby Yarn:
924-109 Modern Baby: Blue (A) - 2 balls
924-158 Modern Baby: Yellow (B) - 1 ball
924-149 Modern Baby: Grey (C) - 1 ball
924-148 Modern Baby: Turquoise (D) - 1 ball
924-113 Modern Baby: Red (E) - 1 ball
924-098 Modern Baby: Cream (F) - 1 ball
924-133 Modern Baby: Orange (G) - 1 ball - Lion Brand Crochet Hook - Size H-8 (5 mm)
- Lion Brand Crochet Hook - Size J-10 (6 mm)
- Lion Brand Large-Eye Blunt Needles (Set of 6)
- Assembly Diagram
One Size: About 30 x 32 in. (76 x 81.5 cm)
GAUGE:
18 sts + 16 rows = about 4 in. (10 cm) in pattern. Note: Each sc and each ch-1 sp count as a st.
Patch 1 = 5 1/4 in. (13.5 cm) wide x 1 1/2 in. (4 cm) high.
NOTES:
- Blanket is made from 5 Columns of Patches. Each Patch is worked back and forth in rows and is joined to other patches as you work. Refer to Assembly Diagram for arrangement of Patches.
- Work all Patches, Borders, and Edging rnds (except very last Edging rnd) with larger hook.
- Weave in ends as you work or upon completion of blanket.
INSTRUCTIONS
FIRST COLUMN OF PATCHES
Patch 1
- With larger hook and B, ch 24.
- Row 1 (RS): Working in back loops only, sc in 2nd ch from hook, *ch 1, sk next ch, sc in next ch; rep from * across – 12 sc and 11 ch-1 sps.
- Rows 2-6: Ch 1, turn, sc in first sc, *ch 1, sk next ch-1 sp, sc in next sc; rep from * across.
- Fasten off.
Patch 2
- Row 1 (RS): From RS, draw up a loop of A in first sc of last row, ch 1, sc in same sc, *ch 1, sk next ch-1 sp, sc in next sc; rep from * across.
- Rows 2-6: Ch 1, turn, sc in first sc, *ch 1, sk next ch-1 sp, sc in next sc; rep from * across.
- Fasten off.
Patch 3
- Row 1 (RS): From RS, draw up a loop of C in first sc of last row, ch 1, sc in same sc, *ch 1, sk next ch-1 sp, sc in next sc; rep from * across.
- Rows 2-12: Ch 1, turn, sc in first sc, *ch 1, sk next ch-1 sp, sc in next sc; rep from * across.
- Fasten off.
Patch 4
- Row 1 (RS): From RS, draw up a loop of D in 10th sc of last row, ch 1, sc in same sc, (ch 1, sk next ch-1 sp, sc in next sc) twice – 3 sc and 2 ch-1 sps.
- Rows 2-12: Ch 1, turn, sc in first sc, (ch 1, sk next ch-1 sp, sc in next sc) twice.
- Fasten off.
Patch 5
- Row 1 (RS): From RS, draw up a loop of A in 7th sc of last row of Patch 3, ch 1, sc in same sc, (ch 1, sk next ch-1 sp, sc in next sc) twice; sl st in end of Row 1 of previous Patch – 3 sc and 2 ch-1 sps.
- Row 2: Ch 1, turn, sc in first sc, (ch 1, sk next ch-1 sp, sc in next sc) twice.
- Row 3: Ch 1, turn, sc in first sc, (ch 1, sk next ch-1 sp, sc in next sc) twice; sl st in end of corresponding row of previous Patch.
- Row 4: Ch 1, turn, sc in first sc, (ch 1, sk next ch-1 sp, sc in next sc) twice.
- Rows 5-12: Rep last 2 rows 4 times.
- Fasten off.
Patch 6
- Row 1 (RS): From RS, draw up a loop of D in 4th sc of last row of Patch 3, ch 1, sc in same sc, (ch 1, sk next ch-1 sp, sc in next sc) twice; sl st in end of Row 1 of previous Patch – 3 sc and 2 ch-1 sps.
- Rows 2-12: Work same as Rows 2-12 of Patch 5.
- Fasten off.
Patch 7
- Row 1 (RS): From RS, draw up a loop of A in first sc of last row of Patch 3, ch 1, sc in same sc, (ch 1, sk next ch-1 sp, sc in next sc) twice; sl st in end of Row 1 of previous Patch – 3 sc and 2 ch-1 sps.
- Rows 2-12: Work same as Rows 2-12 of Patch 5.
- Fasten off.
Patch 8
- Row 1 (RS): From RS, draw up a loop of E in first sc of last row of previous Patch, ch 1, sc in same sc, (ch 1, sk next ch-1 sp, sc in next sc) twice, *ch 1, sk next sl st (joining seam), sc in first sc of next Patch, (ch 1, sk next ch-1 sp, sc in next sc) twice; rep from * 2 more times-12 sc and 11 ch-1 sps.
- Rows 2-12: Ch 1, turn, sc in first sc, *ch 1, sk next ch-1 sp, sc in next sc; rep from * across.
- Fasten off.
Patch 9
- Row 1 (RS): From RS, draw up a loop of B in first sc of last row, ch 1, sc in same sc, *ch 1, sk next ch-1 sp, sc in next sc; rep from * across-12 sc and 11 ch-1 sps.
- Rows 2-6: Ch 1, turn, sc in first sc, *ch 1, sk next ch-1 sp, sc in next sc; rep from * across.
- Fasten off.
Patches 10-16
Rep Patches 2-8, beg each Patch across top edge(s) of previous Patch(es).
SECOND COLUMN OF PATCHES
Patch 1
- From RS, draw up a loop of E in ch at base of first sc of Patch 1 of previous Column, ch 25.
- Row 1 (RS): Working in back loops only, sc in 2nd ch from hook, *ch 1, sk next ch, sc in next ch; rep from * to last ch, sk last ch sl st in end of Row 1 of Patch 1 of previous Column – 12 sc and 11 ch-1 sps.
- Row 2: Ch 1, turn, sc in first sc, *ch 1, sk next ch-1 sp, sc in next sc; rep from * across.
- Row 3: Ch 1, turn, sc in first sc, *ch 1, sk next ch-1 sp, sc in next sc; rep from * across, sl st in end of corresponding row of previous Column.
- Row 4: Ch 1, turn, sc in first sc, *ch 1, sk next ch-1 sp, sc in next sc; rep from * across.
- Rows 5-12: Rep last 2 rows 4 times.
- Fasten off.
Patch 2
- Row 1 (RS): From RS, draw up a loop of F in first sc of last row, ch 1, sc in same sc, *ch 1, sk next ch-1 sp, sc in next sc; rep from * across; sl st in end of corresponding row of previous Column-12 sc and 11 ch-1 sps.
- Rows 2-6: Work same as Rows 2-6 of Patch 1 of this Column.
- Fasten off.
Patch 3
With D, work same as previous Patch.
Patch 4
- Row 1 (RS): From RS, draw up a loop of G in first sc of last row, ch 1, sc in same sc, *ch 1, sk next ch-1 sp, sc in next sc; rep from * across; sl st in end of corresponding row of previous Column-12 sc and 11 ch-1 sps.
- Rows 2-12: Work same as Rows 2-12 of Patch 1 of this Column.
Patch 5
- Row 1 (RS): From RS, draw up a loop of C in 10th sc of last row, ch 1, sc in same sc, (ch 1, sk next ch-1 sp, sc in next sc) twice; sl st in end of corresponding row of previous Column – 3 sc and 2 ch-1 sps.
- Row 2: Ch 1, turn, sc in first sc, (ch 1, sk next ch-1 sp, sc in next sc) twice.
- Row 3: Ch 1, turn, sc in first sc, (ch 1, sk next ch-1 sp, sc in next sc) twice; sl st in end of corresponding row of previous Column.
- Row 4: Ch 1, turn, sc in first sc, (ch 1, sk next ch-1 sp, sc in next sc) twice.
- Rows 5-12: Rep last 2 rows 4 times.
- Fasten off.
Patch 6
With B, work same as Patch 5 of First Column, beg across Patch 4 of this Column.
Patch 7
With C, work same as Patch 6 of First Column, beg across Patch 4 of this Column.
Patch 8
With B, work same as Patch 7 of First Column, beg across Patch 4 of this Column.
Patch 9
- Row 1 (RS): From RS, draw up a loop of E in first sc of last row of previous Patch, ch 1, sc in same sc, (ch 1, sk next ch-1 sp, sc in next sc) twice, *ch 1, sk next sl st (joining seam), sc in first sc of next Patch, (ch 1, sk next ch-1 sp, sc in next sc) twice; rep from * 2 more times; sl st in end of corresponding row of previous Column-12 sc and 11 ch-1 sps.
- Rows 2-12: Work same as Rows 2-12 of Patch 1 of this Column.
- Fasten off.
Patches 10-16
Rep Patches 2-8 of this Column, beg each Patch across top edge(s) of previous Patch(es).
THIRD COLUMN OF PATCHES
Patch 1
- From RS, draw up a loop of B in ch at base of first sc of Patch 1 of previous Column, ch 25.
- Row 1 (RS): Working in back loops only, sc in 2nd ch from hook, *ch 1, sk next ch, sc in next ch; rep from * to last ch, sk last ch sl st in end of Row 1 of Patch 1 of previous Column – 12 sc and 11 ch-1 sps.
- Row 2: Ch 1, turn, sc in first sc, *ch 1, sk next ch-1 sp, sc in next sc; rep from * across.
- Row 3: Ch 1, turn, sc in first sc, *ch 1, sk next ch-1 sp, sc in next sc; rep from * across, sl st in end of corresponding row of previous Column.
- Row 4: Ch 1, turn, sc in first sc, *ch 1, sk next ch-1 sp, sc in next sc; rep from * across.
- Rows 5 and 6: Rep last 2 rows.
- Fasten off.
Patch 2
- Row 1 (RS): From RS, draw up a loop of A in first sc of last row, ch 1, sc in same sc, *ch 1, sk next ch-1 sp, sc in next sc; rep from * across; sl st in end of corresponding row of previous Column-12 sc and 11 ch-1 sps.
- Rows 2-6: Work same as Rows 2-6 of Patch 1 of this Column.
- Fasten off.
Patch 3
- Row 1 (RS): From RS, draw up a loop of C in first sc of last row, ch 1, sc in same sc, *ch 1, sk next ch-1 sp, sc in next sc; rep from * across; sl st in end of corresponding row of previous Column-12 sc and 11 ch-1 sps.
- Row 2: Ch 1, turn, sc in first sc, *ch 1, sk next ch-1 sp, sc in next sc; rep from * across.
- Row 3: Ch 1, turn, sc in first sc, *ch 1, sk next ch-1 sp, sc in next sc; rep from * across, sl st in end of corresponding row of previous Column.
- Row 4: Ch 1, turn, sc in first sc, *ch 1, sk next ch-1 sp, sc in next sc; rep from * across.
- Rows 5-12: Rep last 2 rows 4 times.
- Fasten off.
Patch 4
With D, work same as Patch 5 of Second Column, beg across Patch 3 of this Column.
Patch 5
With A, work same as Patch 5 of First Column, beg across Patch 3 of this Column.
Patch 6
With D, work same as Patch 6 of First Column, beg across Patch 3 of this Column.
Patch 7
With A, work same as Patch 7 of First Column, beg across Patch 3 of this Column.
Patch 8
With E, work same as Patch 9 of Second Column.
Patch 9
With B, work same as Patch 10 of Second Column.
Patches 10-16
Rep Patches 2-8 of this Column, beg each Patch across top edge(s) of previous Patch(es).
FOURTH COLUMN OF PATCHES
Work same as Second Column.
FIFTH COLUMN OF PATCHES
Work same as Third Column.
TOP BORDER
- Row 1 (RS): From RS, join D with sc in first sc of last row of Fifth Column, *ch 1, sk next ch-1 sp (or sl st joining seam), sc in next sc; rep from * across – 60 sc and 59 ch-1 sps.
- Rows 2-6: Ch 1, turn, sc in first sc, *ch 1, sk next ch-1 sp, sc in next sc; rep from * across. Fasten off.
- Row 7: From RS, join G with sc in first st of last row, *ch 1, sk next ch-1 sp, sc in next sc; rep from * across.
- Rows 8-12: With G, ch 1, turn, sc in first sc, *ch 1, sk next ch-1 sp, sc in next sc; rep from * across. Fasten off.
LOWER BORDER
- Row 1 (RS): From RS, working across opposite side of foundation ch and working into the 2 free loops of each ch, join D with sc in base of the last sc of Row 1 of First Column, *ch 1, sk next ch, sc in next ch (at base of next sc); rep from * all the way across lower edge – 60 sc and 59 ch-1 sps.
- Rows 2-12: Work same as Rows 2-12 of Top Border.
FINISHING
Edging
- Rnd 1 (RS): From RS, join F with sc in end of Row 6 of Lower Border, *ch 1, sk next row, sc in end of next row; rep from * to last row, ch 1, sk last row; working across top edge, (sc, ch 2, sc) in first sc (corner made), **ch 1, sk next ch-1 sp, sc in next sc; rep from ** to last ch-1 sp, sk last ch-1 sp, (sc, ch 2, sc) in last sc; ***ch 1, sk next row, sc in end of next row; rep from *** to last row, ch 1, sk last row; work across lower edge same as across top edge; ****ch 1, sk next row, sc in end of next row; rep from **** to end of rnd, ch 1; join with sl st in first sc – 244 sc and 4 corner ch-2 sps (62 sc across each long edge and 60 sc across lower and top edges).
- Rnds 2–4: Ch 1, turn, sc in first ch-1 sp, *(ch 1, sk next sc, sc in next ch-1 sp) to 1 sc before next corner ch-2 sp, ch 1, sk next sc, (sc, ch 2, sc) in corner ch-2 sp; rep from * 3 more times, (ch 1, sk next sc, sc in next ch-1 sp) to last sc, ch 1, sk last sc; join with sl st in first sc.
- Fasten off.
- Rnd 5 (RS): From RS, join A with sc in any ch-1 sp (at least several ch-1 sps from a corner), *(ch 1, sk next sc, sc in next ch-1 sp) to 1 sc before next corner ch-2 sp, ch 1, sk next sc, (sc, ch 2, sc) in corner ch-2 sp; rep from * 3 more times, (ch 1, sk next sc, sc in next ch-1 sp) to last sc, ch 1, sk last sc; join with sl st in first sc.
- Rnds 6-10: Ch 1, turn, sc in first ch-1 sp, *(ch 1, sk next sc, sc in next ch-1 sp) to 1 sc before next corner ch-2 sp, ch 1, sk next sc, (sc, ch 2, sc) in corner ch-2 sp; rep from * 3 more times, (ch 1, sk next sc, sc in next ch-1 sp) to last sc, ch 1, sk last sc; join with sl st in first sc.
- Rnd 11: Turn, sl st in first ch-1 sp, change to smaller hook, *(ch 2, sk next sc, sl st in next ch-1 sp) to 1 sc before next corner ch-2 sp, ch 2, sk next sc, (sl st, ch 3, sl st) in corner ch-2 sp; rep from * 3 more times, (ch 2, sk next sc, sl st in next ch-1 sp) to last sc, ch 2, sk last sc; join with sl st in first sl st.
- Fasten off.
- Weave in ends.
Find this pattern and more you'll love in our collection of 30+ Quick and Easy Crochet Baby Blanket Patterns.
Read NextBeginner Daydream Baby Blanket
Your Recently Viewed Projects

Thanks for your comment. Don't forget to share!
MarciaT
Apr 11, 2018
Loved pattern and colors. Tried to make it. Ripped it out and redid and redid. Either doing something really wrong or just hard to follow. Gave it to the dog for a blanket. Made different pattern for the baby.
AFC Editor Julia
Apr 12, 2018
Hi! I'm sorry you were having trouble - what part was giving you trouble? This is Lion Brand's pattern and I'm sure if you reached out to their pattern design team or customer service they could offer some advice! Julia, editor
mulberrygalprinces s
Jun 01, 2016
Although it is very pretty, the colors won't work in the room this is going to. The mommy to be has stated she wants soft pastels but I do love the pattern so I can improvise with the best of them. Greens, pinks, yellows, blues and violet colors will still look gorgeous in this pattern.
Beth McC
May 01, 2016
That is an adorable blanket and one of the cutest photos I have seen on this site! Grandchild 6 is due in July, so I'd better get stitching!
Zeemer
Apr 25, 2016
So lovely. very colorful. I will definitely make this. Thanks for the pattern which is just right on the front page. Here's the link to the aiagram http//www.allfreecrochetafghanpatterns.com/masteri == mages/files/assembly-diagram-patchwork-throw.JPG
Report Inappropriate Comment
Are you sure you would like to report this comment? It will be flagged for our moderators to take action.
Thank you for taking the time to improve the content on our site.