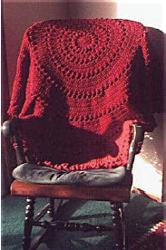
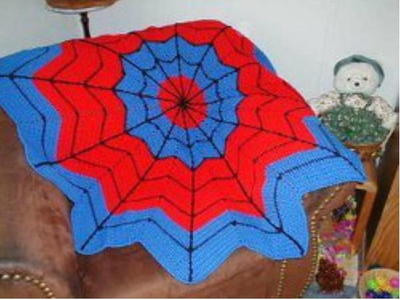
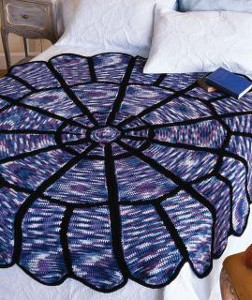
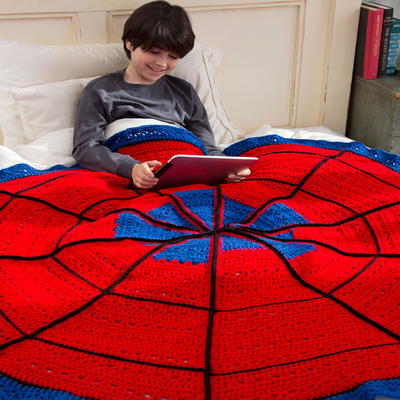
Spiderman's Favorite Blanket

Even superheroes need to sleep sometimes, and we heard rumors that this is a certain web slinger's favorite blanket. Spiderman's Favorite Blanket is an easy round crochet pattern that features surface slip stitches that make this blanket look just like a web. Work this up in his signature colors, blue and red, or you can substitute your child's favorite colors instead. This round pattern is worked up using simple stitches and the crochet v-stitch, making this a fast and fun project. Finish this blanket pattern off with a simple edging and you're good to go!
NotesNotes:
-To Change Color in Dc: Work last dc before color change
until 2 loops remain on hook, drop color in use, with next
color to be used yo and draw through 2 loops on hook;
continue with new color.
Special Abbreviation:
V-st = (dc, ch 1, dc) in indicated st or space.

Crochet HookK/10.5 or 6.5 mm hook
Yarn Weight(4) Medium Weight/Worsted Weight and Aran (16-20 stitches to 4 inches)
Crochet Gauge11 sts = 4”; 7 rows = 4” in dc.
Finished Size53 inches diameter
Materials List
- RED HEART® Super Saver®: 4 skeins 319 Cherry Red A, 2 skeins 385 Royal B, and 1 skein 312 Black C.
- Crochet Hook: 6.5mm [US K-10½].
- Stitch marker, yarn needle.
Pattern
Throw
-
Wedge A (make 5)
Row 1:With B, ch 3 (counts as dc); dc in 3rd ch from hook; turn – 2 dc.
Row 2 (Right Side): Ch 3 (counts as dc), dc in first dc, dc in top of beginning ch; turn – 3 dc.
Rows 3-7: Ch 3, dc in first dc, dc in each dc across; turn – 8 dc at the end of Row 7.
Row 8: Ch 3, dc in first dc, skip next dc, V-st in next dc, * skip 2 dc, V-st in next dc; repeat from * to last 2 sts; skip next dc, dc in last st; turn – 2 V-sts.
Row 9: Ch 3, dc in first dc, dc in each dc and space across changing to A in last st; turn – 10 dc.
Cut B and continue with A only.
Row 10: Ch 3, dc in first dc, dc in each dc across; turn – 11 dc.
Rows 11–37: Repeat Rows 8-10 – 38 dc at end of Row 37.
Row 38: Repeat Row 8.
Row 39: Repeat Row 9 – 40 dc.
Do not fasten off. -
Wedge Edging
Row 1: With right side still facing, and working down long edge of wedge toward point, ch 1, place 2 sc in side of each row, ch 1 at point, working up the opposite long edge, place 2 sc in side of each row to top – 78 sc each long edge and 1 ch at point. Fasten off. Do NOT work across top of wedge. -
Wedge B (make 5)
Rows 1-7: Work same as Wedge A.
Rows 8 and 9: Ch 3, dc in first dc, dc in each dc across; turn – 10 dc at end of Row 9.
Row 10: Ch 3, dc in first dc, skip next dc, V-st in next dc, * skip 2 dc, V-st in next dc; repeat from * to last st; dc in last st; turn – 3 V-sts.
Row 11: Ch 3, dc in first dc, dc in each dc and space across; turn – 12 dc.
Row 12: Ch 3, dc in first dc, dc in each st across changing to A; turn – 13 dc.
Cut B and continue with A only.
Row 13: Repeat Row 10 - 4 V-sts.
Rows 14 and 15: Repeat Rows 11 and 12 - 16 dc at end of Row 15.
Rows 16–39: Repeat Rows 10-12 – 40 dc at end of Row 39.
Do not fasten off. -
Wedge Edging
Work same as for Wedge A. -
Assembly
Alternating Wedge A and Wedge B as shown, with wrong sides together, join C in first st after the ch at points; ch 1, sc through the back loops of the edgings from point to outer edge. Fasten off – 78 sc. Repeat assembling all wedges together in same manner. -
Blanket Edging
Round 1: With right side facing, join C in any seam; ch 1, * sc in seam, sc in edging, work sc in next 40 dc, sc in edging; repeat from * around; join with a slip st in first sc – 430 sc. Fasten off.
Round 2: Join B in any sc; ch 3, dc in next sc and in each sc around; join in top of ch-3.
Round 3: Ch 4, dc in same st as joining (counts as first V-st), skip next dc, * V-st in next dc, skip next dc; repeat from * around; join in 3rd ch of ch-4 – 215 V-sts.
Round 4: Ch 3, dc in each st and space around; join – 645 dc. Fasten off. -
Center Edging
With right side facing, join C with sc in any ch-1 space of any wedge point; sc in each ch-1 space, and in an sc on either side of the space; join with slip st in first sc – 30 sc. Fasten off. -
Center Insert
Round 1: With C, ch 6; join with slip st to form a ring; ch 4 (counts as first tr), 19 tr in ring; join with a slip st in top of ch-4. Fasten off leaving a long end for sewing. Using yarn needle and C, whipstitch insert into center hole. -
Surface Slip Stitch
Using main projectphoto as guide for placement and holding slip knot on the wrong of the fabric, use hook to pull loop through to the right side (slip st made), slip st in between dc rows traveling across wedges all the way around. Remove hook from final loop, with hook on the wrong side of the fabric, pull the final loop through to the wrong side and fasten off. Continue for second slip st round.
Read NextLayer Cake Round Blanket
Your Recently Viewed Projects
Thanks for your comment. Don't forget to share!
KathrynAllison
Aug 19, 2016
Wow! My nephew would love this afghan. It would work perfectly with his superhero-themed bedroom.
Amharris1962
Aug 09, 2016
Would like to see a picture of it before deciding whether or not if like to try it.
AFC Editor Julia
Aug 09, 2016
Hi Amharris, There is a photo for this afghan at the top right of the pattern page that, I think, shows the detail pretty well. Is the photo not showing up for you? Julia, editor for AllFreeCrochetAfghanPatterns
Report Inappropriate Comment
Are you sure you would like to report this comment? It will be flagged for our moderators to take action.
Thank you for taking the time to improve the content on our site.