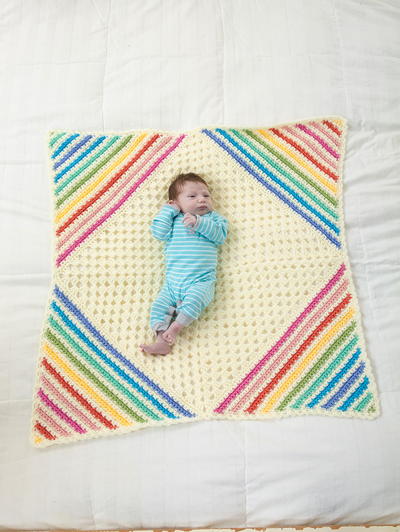
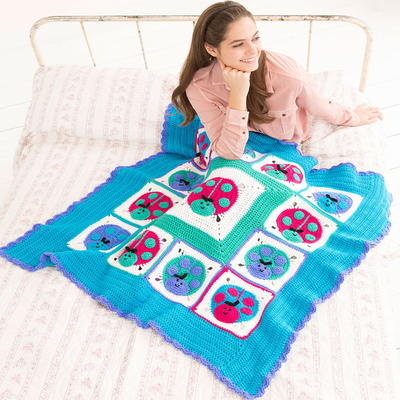
Luck Be a Ladybug Crochet Afghan

Many cultures throughout the world believe that ladybugs are lucky, so harness that good will with the Luck be a Ladybug Crochet Afghan. We can’t guarantee good luck, but whoever gets to use this bright crocheted throw will surely feel lucky. This crochet throw is a granny style afghan that's worked up in individual crochet squares first before being joined together at the end. Because of its construction, you can work on this as you travel or outside in the sunshine. This throw is perfect for a child's gift.
NotesNotes:
1. Throw is made with one large center
square bordered by 12 small squares.
Each square is worked in joined rounds
with right facing at all times.
2. Squares are sewn together and edged
with border worked back and forth in
rows.
3. Ladybug head and spots are worked in
continuous (spiral) rounds. Do not join
at end of round until instructed. Place a
marker for beginning of round and move
marker up as each round is completed.
4. To change color, work last stitch of old
color to last yarn over. Yarn over with
new color and draw through all loops on
hook to complete stitch. Proceed with
new color. Cut old color.

Crochet HookI/9 or 5.5 mm hook
Yarn Weight(4) Medium Weight/Worsted Weight and Aran (16-20 stitches to 4 inches)
Crochet GaugeRounds 1–9 = 7¾” (19.5 cm); 9 dc = 3” (7.5 cm); 8 rows = 4½” (11.5 cm) in double crochet.
Finished Size45” x 45” (114.5 x 114.5 cm)
Materials List
- RED HEART® With Love®: 1 skein each 1701 Hot Pink A, 1001 White B, 1562 Jadeite C, 1546 Iris D, 1803 Blue Hawaii E, and 1012 Black F Note: Only a small quantity of F is needed for this project.
- US size I/9 (5.5 mm) hook
- Yarn needle
- Stitch Marker
Pattern
Center Square
-
With A, ch 4.
-
Round 1 (right side): Work 11 dc in 4th ch from hook (beginning ch count as first dc); join with slip st in top of beginning ch—12 dc.
-
Round 2: Ch 3 (counts as first dc here and throughout), dc in same st as join, 2 dc in each dc around; join with slip st in top of beginning ch—24 dc.
-
Round 3: Ch 3, 2 dc in next dc, *dc in next dc, 2 dc in next dc; repeat from * around; join with slip st in top of beginning ch—36 dc.
-
Round 4: Ch 3, dc in next dc, 2 dc in next dc, *dc in next 2 dc, 2 dc in next dc; repeat from * around; join with slip st in top of beginning ch—48 dc
-
Round 5: Ch 3, dc in next 2 dc, 2 dc in next dc, *dc in next 3 dc, 2 dc in next dc; repeat from * around; join with slip st in top of beginning ch—60 dc. Fasten off.
-
Round 6: Working in back loops only, join B with slip st in same st as join, ch 4 (counts as first tr here and throughout), dc in next dc, hdc in next dc, *sc in next 9 dc, hdc in next dc, dc in next dc, tr in next dc, ch 3, tr in next dc, dc in next dc, hdc in next dc; repeat from * twice, sc in next 9 dc, hdc in next dc, dc in next dc, tr in last dc, ch 3; join with slip st in top of beginning ch—36 sc, 8 hdc, 8 dc, 8 tr, 4 ch-3 spaces.
-
Round 7: Ch 1, sc in same st as join, *sc in each st around to next ch-3 space, 5 sc in next ch-3 space (corner made); repeat from * around; join with slip st in first sc—60 sc and four 5-sc corners.
-
Round 8: Ch 2 (counts as first hdc here and throughout), *hdc in each st around to center st of next 5-sc corner, (2 hdc, ch 2, 2 hdc) in center st; repeat from * twice, sc in each remaining st; join with slip st in top of beginning ch—92 hdc and 4 ch-2 spaces.
-
Round 9: Ch 3, *dc in each st to next ch-2 space, (2 dc, ch 2, 2 dc) in next ch-2 space; repeat from * 3 times, dc in each remaining st; join with slip st in top of beginning ch— 108 dc and 4 ch-2 spaces.
-
Round 10: Repeat Round 9; change to C—124 dc and 4 ch-2 spaces.
-
Rounds 11–14: Repeat Round 9—188 dc and 4 ch-2 spaces. Fasten off.
Small Square
(make 12: 2 with D, B & E, 2 with E, B, & A, 4 with A, B, & C, and 4 with C, B, & D)
-
With first color, ch 4.
-
Rounds 1–8: Work same as Rounds 1–8 of Large Square. Fasten off B at end of last round
-
Round 9: With right side facing, join 3rd color with sc in any ch-2 space, 2 sc in same space, sc in each st around to next ch-2 space, *3 sc in next ch-2 space, sc in each st around to next ch-2 space; repeat from * twice; join with slip st in first sc—104 sc. Fasten off.
Ladybug Head
(make 13: 2 each with A & E, 4 each with D, and 5 with C)
-
Ch 6.
-
Round 1: Sc in 2nd ch from hook and in next 3 ch, 3 sc in last ch; working in opposite side of foundation ch, skip first ch, sc in next 3 ch, 2 sc in last ch—12 sc. Do not join at end of rounds until instructed. Place marker for beginning of round and move marker up as each round is completed.
-
Round 2: Work 2 sc in next sc, sc in next 3 sc, 2 sc in next 3 sc, sc in next 3 sc, 2 sc in next 2 sc—18 sc.
-
Round 3: Sc in next 2 sc, 2 sc in next sc, *sc in next 2 sc, 2 sc in next sc; repeat from * around—24 sc.
-
Round 4: Sc in each sc around; join with slip st in first sc. Fasten off, leaving very long tail for sewing and embroidery.
Spot
(make 40: 16 each with C & D and 8 each with A & E)
-
Ch 2.
-
Round 1: Work 6 sc in 2nd ch from hook—6 sc. Do not join.
-
Round 2: Work 2 sc in each sc around; join with slip st in first sc. Fasten off, leaving a long tail for sewing.
Antennae
(make 13)
-
With F, *ch 5, slip st in 2nd ch from hook and in each of next 3 ch; repeat from * once. Fasten off, leaving a long tail for sewing.
Finishing
-
Place A-colored heads and spots on E– colored squares, C-colored heads and spots on A-colored squares, D-colored heads and spots on C-colored squares, and E-colored heads and spots on D-colored squares. Position each head with tail at top and sew all pieces in place.
-
Draw remaining tail of head to wrong side of square. Insert hook from front to back between first 2 rounds above head. Make a slip knot and place on hook, pull hook and loop to right side, surface slip st evenly spaced across rounds to edge of Round 5.
-
With F, embroider French knot eyes and a couch stitch smile on each head.
-
Sew squares together.
Border
Add stitches as needed in Row 1 of each edge to keep piece flat. Stitch count at end of each row is a guideline; your count may vary but should be an odd number
Top Edge
-
Row 1 (right side): With right side facing, join E with slip st in center st of 3-sc group at top corner, ch 3, 108 dc evenly spaced across, working last dc in center st of 3-sc group at next corner, turn—109 dc.
-
Rows 2–9: Ch 3, dc in each dc across, turn. Fasten off.
Bottom Edge
With right side of bottom edge facing, work same as top edge.
Side Edge
(work twice)
-
Row 1 (right side): With right side of side edge facing, join E with slip st in end of first row, ch 3, working in ends of rows, 17 dc evenly spaced across; working across small squares, dc in center st of first 3-sc group, 108 dc evenly spaced across, working last dc in center st of last 3-sc group; working in ends of last rows, 18 dc evenly spaced across, turn—145 dc
-
Rows 2–9: Ch 3, dc in each dc across, turn. Fasten off.
-
Shell Edge Round: With right side of bottom facing, join D with sc in end of first row, working in ends of rows, **[shell in next row, sc in next row] 4 times; working in sts, *skip next dc, shell in next dc, skip next dc, sc in next dc*; repeat from * to * across; working in ends of remaining rows, sc in first row, [shell in next row, sc in next row] 4 times; working across side edge, shell in first dc; repeat from * to * across, skipping more or less sts as needed to end with shell in last dc; working across top edge; working in ends of rows of top edge, sc in first row, repeat from ** once; join with slip st in first sc. Fasten off.
Abbreviations
- shell
- 5 dc in indicated stitch
- surface slip st (surface slip stitch)
- With yarn held on wrong side, insert hook in indicated stitch or space, yarn over, pull loop to right side through loop on hook
- Join with sc
- Place a slip knot on hook, insert hook in indicated stitch, yarn over and pull up a loop, yarn over and draw through both loops on hook.
Your Recently Viewed Projects
Thanks for your comment. Don't forget to share!
Tricia108
Oct 29, 2017
I love the look of the afghan. However there are so many pieces. I would have liked a diagram to show how to put it all together. I am sure once it is finished it makes for an unique textured afghan. I just would have liked more detailed instructions.
Zeemer
Jul 12, 2016
I thought this is quilted or appliqued. It's actually crocheted ladybug pattern. The colors used are so fantastic. Very well thought of. It helps that the pattern is right on the front if the page.
anitaalexander65 6 346670
Jun 05, 2016
Oh wow! Just perfect! I would love to make this for my grand daughter. Thank you for such a cute pattern! #BestIdeaEver
mulberrygalprinces s
May 11, 2016
Oh no! What are you trying to do to me? First you offered a pattern for a baby diaper set of a lady bug, so I made it. Then you came along with a stuffed animal lady bug so naturally I had to add that to the set. Now you have a lady bug afghan too? Well there goes house cleaning for at least a week. I do have my priorities!! Thank you for this adorable pattern!
Report Inappropriate Comment
Are you sure you would like to report this comment? It will be flagged for our moderators to take action.
Thank you for taking the time to improve the content on our site.