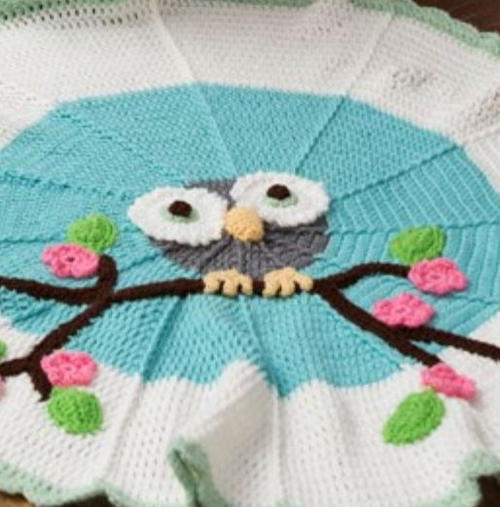
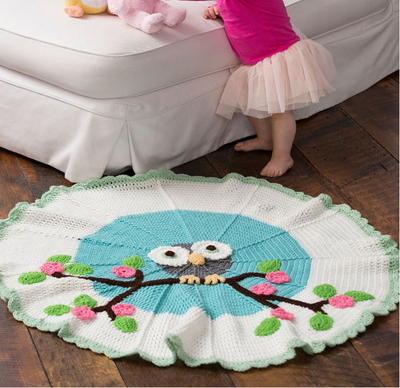
Cutie Owl Crochet Baby Blanket

Whoo's ready for the cutest round crochet pattern out there? This Cutie Owl Crochet Baby Blanket will blow you away. An amazing owl crochet applique is accompanied by adorable flowers and branches to make the best picture crochet baby blanket pattern ever.
A beautiful aqua blue gives the afghan just the pop it needs. No baby will ever want to stop playing on this gem. Whether you have a baby shower or a birthday, this crochet baby blanket will make the perfect gift.

Crochet HookH/8 or 5 mm hook
Yarn Weight(4) Medium Weight/Worsted Weight and Aran (16-20 stitches to 4 inches)
Crochet Gauge10 dc = 4” (10 cm) in pattern; 7 rounds = 4” (10 cm). CHECK YOUR GAUGE. Use any size hook to obtain the gauge.
Finished Size40" (101.5 cm) diameter
Materials List
- RED HEART® Super Saver®: 2 skeins each 316 Soft White A and 505 Aruba Sea B, 1 skein each 400 Grey Heather C, 668 Honeydew D, 365 Coffee E, 320 Cornmeal F, 706 Perfect Pink G, and 672 Spring Green H
- Hook: 5mm [H-8 US]
- Yarn needle
Instructions for BLANKET:
NOTES:
-Blanket, eye sections, beak, flower, and leaf are worked in joined rounds with right side facing at all times.
-Increases are made by working into the top of the indicated stitch and then by working around the post of the same stitch.
-Rounds 1–6 of blanket are the owl’s body. Owl’s body parts, branches, leaves, and flowers are worked separately and sewn to blanket. Leave long tails for sewing when fastening off.
-When sewing pieces to blanket, insert the needle horizontally through the top of the stitches on the right side of the blanket so your stitching doesn’t show on the wrong side.
-
With C, ch 4; join with slip st in first ch to form ring.
Round 1: Ch 3 (counts as first dc here and throughout), 11 dc in ring; join with slip st in top of beginning ch—12 dc.
Round 2: Ch 3, fpdc around same dc as joining, *dc in next dc, fpdc around same dc; repeat from * around; join with slip st to top of beginning ch—12 dc and 12 fpdc.
Round 3: Ch 3, dc in first fpdc, fpdc around same fpdc , *dc in next dc, dc in next fpdc, fpdc around same fpdc; repeat from * around; join with slip st to top of beginning ch—24 dc and 12 fpdc.
Round 4: Ch 3, dc in first dc, dc in next fpdc, fpdc around same fpdc, *dc in next 2 dc, dc in next fpdc, fpdc around same fpdc; repeat from* around; join with slip st to top of beginning ch—36 dc and 12 fpdc.
Round 5: Ch 3, *dc in each dc to next fpdc, dc in next fpdc, fpdc around same fpdc; repeat from * around; join with slip st to top of beginning ch—48 dc and 12 fpdc.
Round 6: Repeat Round 5; change to B—60 dc and 12 fpdc.
Rounds 7–19: Repeat Round 5 thirteen times; change to A at end of Round 19—216 dc and 12 fpdc.
Rounds 20–31: Repeat Round 5 twelve times;change to D at end of Round 31—360 dc and 12 fpdc.
Round 32: Repeat Round 5—372 dc and 12 fpdc.
Round 33: Ch 1, sc in same dc as join, skip next st, 5 dc in next st, *skip next st, sc in next st, skip next st, 5 dc in next st; repeat from *to last st, skip last st; join with slip st to first sc. Fasten off.
Instructions for OWL:
-
Eye (make 2)
With A, ch 4.
Round 1: Work 11 dc in 4th ch from hook (beginning ch count as first dc); join with slip st to top of beginning ch—12 dc.
Round 2: Ch 3, dc in same st as join, 2 dc in each dc around; join with slip st to top of beginning ch—24 dc.
Round 3: Ch 1, sc in same dc as join, ch 2, slip st in 2nd ch from hook, *sc in next dc, ch 2, slip st in 2nd ch from hook; repeat from *around; join with slip st in first st. Fasten off.
Iris (make 2)
WithD, ch 2.
Round 1: Work 6 sc in 2nd ch from hook; join with slip st in first st—6 sc.
Round 2: Ch 1, 2 sc in each sc around; join with slip st in first st—6 sc. Fasten off.
Pupil (make 2)
With E, ch 2.
Round 1: Work 6 sc in 2nd ch from hook; join with slip st in first st—6 sc. Fasten off.
Beak
With F, ch 2.
Round 1: Work 6 sc in 2nd ch from hook; join with slip st in first st—6 sc.
Round 2:Sc in first sc, 2 sc in next sc, *sc in next sc, 2 sc in next sc; repeat from * around; join with slip st in first st—9 sc.
Round 3: Sc in each sc around.
Round 4:Sc in first 2 sc, 2 sc in next sc, *sc in next 2 sc, 2 sc in next sc; repeat from *around; join with slip st in first st—12 sc.
Rounds 5 and 6: Sc in each sc around. Fasten off. [Cutie Owl Crochet Baby Blanket]
Foot (make 2)
With F, ch 7.
Row 1 (right side): Sc in 2nd ch from hook and in each ch, turn—6 sc.
Row 2: Ch 5, slip st in 2nd ch from hook, sc in last 3 ch, sc in first 2 sc, *ch 5, slip st in 2nd ch from hook, sc in last 3 ch, sc in next 2sc; repeat from * once. Fasten off.
Instructions for BRANCHES:
-
Note: Row 1 of all branches is the right side.
Branch 1
With E, ch 41.
Row 1: Sc in 2nd ch from hook and in next 8 ch, hdc in next 16 ch, dc in last 15 ch, turn.
Row 2: Slip st in first 25 sts, turn.
Row 3: Ch 25, sc in 2nd ch from hook and next 13 ch, hdc in next 10 ch, skip next 2 sts, slip st in next st. Fasten off.
Branch 2
With E, ch 30.
Row 1: Slip st in 2nd ch from hook, sc in next 12 ch, hdc in next 16 ch, turn.
Row 2: Ch 10, slip st in 2nd ch from hook, sc in next 8 ch, skip next 3 hdc, slip st in next hdc. Fasten off.
Branch 3 (make 2)
With E, ch 20.
Row 1: Slip st in 2nd ch from hook, sc in next 4 ch, turn.
Row 2: Ch 7, slip st in 2nd ch from hook, sc in next 5 ch, sc in next sc. Fasten off.
Flower (make 8)
With G, ch 4; join with slip st in first ch to form ring.
Round 1: Ch 1, 10 sc in ring, join with slip stto first sc—10 sc.
Round 2: Ch 1, 2 hdc in same sc as join, 2 hdc in next sc, *(slip st, ch 1, 2 hdc) in next sc, (2 hdc, ch 1) in next sc; repeat from * around; join with slip st to first ch—5 petals made. Fasten off.
Leaf (make 12)
With H, ch 6.
Round 1: Sc in 2nd ch from hook, hdc in next ch, dc in next 2 ch, 5 dc in last ch; working on opposite side of foundation ch, 2 dc in first ch, hdc in next ch, (2 sc, ch 1, sc) in last ch; join with slip st in first st.
Round 2: Ch 1, sc in first 5 sts, 2 sc in next 2 sts, ch 3, slip st in 2nd and 3rd ch from hook, 2 sc in next 2 sts, sc in next 5 sts, slip st inch-1 space. Fasten off.
Instructions for FINISHING:
-
Use photograph as a guide for placement of all pieces. See NOTES for sewing "invisibly".
Owl Face
Sew pupils to irises, sew irises to center of eyes, and sew eyes to upper half of Rounds 1–6. With wrong side facing, weave tail through Round 6 of beak, pull gently to gather, and sew beak between eyes.
Branches
Sew branch 1 directly under owl. Sew remaining branches in place as shown in photograph or as desired. Feet: Weave tail through wrong side of Row 1 and gather edge slightly. Place Row 1 on lower edge of Round 6 of blanket, wrap claws around branch 1, and sew in place.
Flowers and Leaves
Arrange at ends of branches and elsewhere as desired; sew in place. Weave in ends.
Abbreviations
- (SPECIAL) fpdc (front post double crochet)
- Yarn over, insert hook from front side of work to back and to front again around post of indicated stitch; yarn over and pull up a loop (3 loops on hook), yarn over and draw through 2 loops (2 loops on hook), yarn over and draw through 2 loops (1 loop on hook).
Read NextSweetheart Shell Baby Blanket
Your Recently Viewed Projects
Thanks for your comment. Don't forget to share!
Zeemer
Nov 29, 2017
Wow! This Cutie Owl Crochet Baby Blanket is so tedious to make but it's worth it. It's outcome is so beautiful, so immaculate, so dainty. I'm gonna put this in my list of projects as gift to a special or for my crochet business.
Hippie Chick
Feb 22, 2017
I love making blankets for little ones. Especially ones that carry are just too cute like this one. This will definitely be on my crochet to do list. I also love yarn from Red heart, the colors are beautiful. The little owl on top is whimsical and owls are very popular now.
bruce1debbie2 9577 846
Nov 24, 2015
As always, Michele Wilcox's patterns are easy to follow and turn out so cute! I made this for a friend who is having a baby boy. It won 2nd in the local fall fair for crocheted baby afghans. Thank you!
Juslilome 5477952
Nov 06, 2015
I made two of these afghans and they both came out adorable. The pattern was super easy to follow.
schluesselburg 071 7064
Sep 23, 2014
Cute and easy pattern. Made 2, took only a couple of days. Thanks for sharing this pattern
lmalta 6257974
Aug 02, 2014
I am having difficulty logging onto site. I am trying to print or save this pattern password emailed to me does not work.
Report Inappropriate Comment
Are you sure you would like to report this comment? It will be flagged for our moderators to take action.
Thank you for taking the time to improve the content on our site.