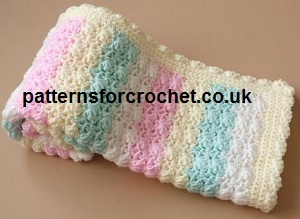
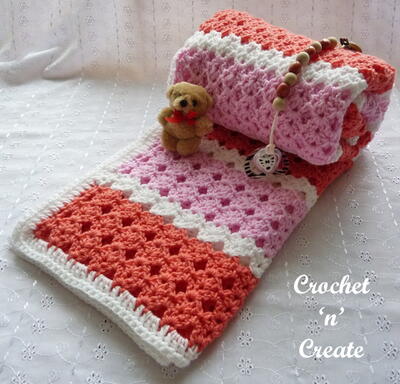
Baby Granny Square Blanket

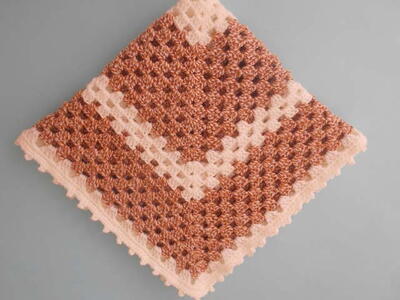
Whether you're currently expecting a little one or you know someone that is, this Baby Granny Square Blanket is the perfect pattern to make. Choose any three colors of Red Heart With Love Yarn to work up this granny square afghan. We love the precious pink, white, and yellow for a baby girl, but this particular crochet pattern is super easy to customize for a baby boy by simply using blue colored yarn. The afghan itself is made up of two simple crochet granny squares that are joined together at the end.

Crochet HookK/10.5 or 6.5 mm hook
Yarn Weight(4) Medium Weight/Worsted Weight and Aran (16-20 stitches to 4 inches)
Crochet GaugeRounds 15 of square = 5 (12.5 cm). CHECK YOUR GAUGE. Use any size hook to obtain the gauge.
Finished Size29 x 29 (73.5 x 73.5 cm)
Materials List
- RED HEART With Love: 1 skein each 1101 Eggshell A, 1701 Hot Pink B, 1201 Daffodil C
- Susan Bates Crochet Hook: 6.5mm [US K-10]
- Yarn needle
Special Techniques
Join with dc = Place a slip knot on hook, yarn over, insert hook in indicated stitch, yarn over and draw up a loop, [yarn over, draw through 2 loops on hook] 2 times. Join with sc = Place a slip knot on hook, insert hook in indicated stitch, yarn over and draw up a loop, yarn over and draw through both loops on hook.
Notes
1. Blanket is made from 25 squares worked in joined rounds with right side facing at all times. 2. Squares are joined together as shown in Assembly Diagram and edged in rounds. 3. When joining squares, take care not to work too tightly. Squares may pop up a bit in the center; this is an intentional feature of the blanket
Square A (make 13)
With A, ch 4; join with slip st in first ch to form a ring. Round 1 (right side): Ch 3 (counts as first dc here and throughout), 15 dc in ring; join with slip st to top of beginning ch16 dc. Fasten off. Round 2: With right side facing, join B with sc in any dc, *ch 1, skip next dc, sc in next dc, ch 3, skip next dc, sc in next dc; repeat from * around omitting last sc; join with slip st in first sc8 sc, 4 ch-1 spaces, and 4 ch-3 spaces. Fasten off. Round 3: With right side facing, join C with dc in first ch-1 space, dc in same space, *ch 1, (2 dc, ch 2, 2 dc) in next ch-3 space, ch 1, 2 dc in next ch-1 space; repeat from * around omitting last 2 dc; join with slip st in first dc twelve 2-dc groups, 8 ch-1 spaces, and 4 ch-2 spaces. Fasten off. Round 4: With right side facing, join B with sc in last ch-1 space, ch 2, sc in next ch-1 space, ch 2, *3 sc in next ch-2 space (corner made), [ch 2, sc in next ch-1 space] twice, ch 2; repeat from * around ending with 3 sc in last ch-2 space, ch 2; join with slip st in first sc20 sc and 12 ch-spaces. Fasten off. Round 5: With right side facing, join A with dc in any ch-2 space, dc in same space, dc evenly around working dc in each sc, 3 dc in center st of each corner (corner made), and 2 dc in each ch-2 space; join with slip st in first dc52 dc. Fasten off. Round 6: With right side facing, join B with sc in any dc, sc evenly around working sc in each dc and 3 sc in center st of each corner; join with slip st in first sc60 sc. Fasten off.
Square B (make 13)
With A, ch 4; join with slip st in first ch to form a ring. Round 1 (right side): Ch 3, 15 dc in ring; join with slip st in top of beginning ch16 dc. Fasten off. Round 2: With right side facing, join B with sc in first dc, sc in next dc, *3 sc in next dc, sc in next 3 dc; repeat from * around, omitting last 2 sc; join with slip st in first sc24 sc. Fasten off. Round 3: With right side facing, join C with dc in first sc, *dc in next 2 sc, 3 dc in next sc, dc in next 3 sc; repeat from * around, omitting last dc; join with slip st in first dc32 dc. Fasten off. Round 4: With right side facing, join B with sc in first dc, *sc in next 3 dc, 3 sc in next dc, sc in next 4 dc; repeat from * around, omitting last sc; join with slip st in first sc40 sc. Fasten off. Round 5: With right side facing, join A with dc in first sc, *dc in next 4 sc, 3 dc in next sc (corner made), dc in next 5 sc; repeat from * around, omitting last dc; join with slip st in first dc48 dc. Fasten off. Round 6: With right side facing, join B with sc in any dc, sc evenly around working sc in each dc and 4 sc in center st of each corner; join with slip st in first sc60 sc. Fasten off.
Finishing
With right sides facing, arrange squares as shown in Assembly Diagram. Join vertical edges first. Joining Row: With right sides of first pair of squares held together, working from right corner and working through both thicknesses, join B with sc in first st, sc in next 14 sts of first pair of squares, *sc in 15 sts of next pair of squares; repeat from * across. Fasten off. Join horizontal edges in the same manner, placing a ch-1 at each corner between squares (when working over existing seam).
Edging
Round 1 (right side): With right side facing, join B with dc in any first st after seam between squares, [*sc in each st to last corner st before next seam between squares, dc in last st of current square, skip seam between squares**, dc in first corner st of next square; repeat from * to next outer corner, 3 sc in outer corner st (outer corner made)] 4 times; repeat from * across last edge ending at **; join with slip st in first dc. Fasten off. Round 2: Join A with sc in any st, sc in each sc around, working 2 sc in each outer corner st; join with slip st to first sc. Fasten off. Weave in ends.
Read NextSweet Dreams Baby Blanket
Your Recently Viewed Projects
Thanks for your comment. Don't forget to share!
Zeemer
Feb 17, 2018
Beautiful baby blanket in not so usual colors - deep pink, gold and white. Yeah, why not for a change. Sooo beautiful! Perfect for a christening or baby shower present.
Report Inappropriate Comment
Are you sure you would like to report this comment? It will be flagged for our moderators to take action.
Thank you for taking the time to improve the content on our site.