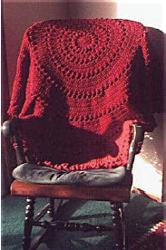
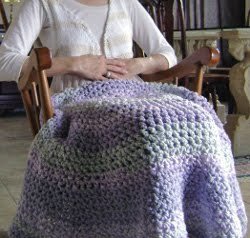
Stained Glass Afghan
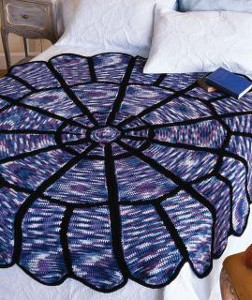
Turn some heads with a free crochet pattern. The Stained Glass Afghan uses a stunning round crochet pattern that everyone will admire. With plum variegated yarn, this uniquely shaped blanket looks like a beautiful stained glass church window. The circle shape gives it a dynamic appeal that not many afghans have. Best of all, this is an easy crochet pattern that crocheters of all levels can learn to make. Don't be intimidated by its different design, this round crochet pattern is simple, yet gorgeous.

Crochet HookI/9 or 5.5 mm hook
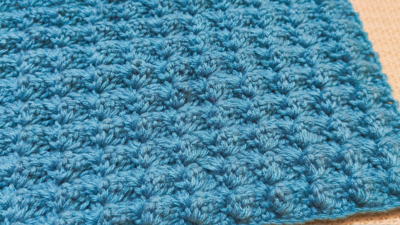
Yarn Weight(4) Medium Weight/Worsted Weight and Aran (16-20 stitches to 4 inches)
MATERIALS:
- Red Heart® “Super Saver®”: 13 skeins 0940 Plum Pudding A and 3 skeins 0312 Black B
- Crochet Hook: I-9 (5.5mm)
- Yarn needle
- Stitch markers
- Chart
SIZE:
Approx 76”/193cm diameter.
GAUGE:
13 sc + 15 rows = 4”/10cm. CHECK YOUR GAUGE. Use any size hook to obtain the specified gauge.
Notes:
To change color, work last st of old color to last yo, yo with new color and draw through both lps on hook to complete st. Use a separate ball of yarn or bobbins for each section that requires a color change.
Special Abbreviations
sc2tog (sc 2 sts together): [Insert hook in next st, yo and draw up a lp] twice, yo and draw through all 3 lps on hook.
AFGHAN:
Exterior Panel (make 11)
Starting at center edge with A, ch 13.
Row 1 (right side): Sc in 2nd ch from hook and in each rem ch across – 12 sc. Ch 1, turn.
Rows 2–4: Sc in each st across. Ch 1, turn.
Row 5: Work 2 sc in first st, sc in each st across to last st, 2 sc in last st – 14 sc. Ch 1, turn.
Rows 6–95: Following Exterior Panel Chart for color placement, repeat Rows 2–5 twenty-two times more, then repeat Rows 2 and 3 once more – 58 sc at end of Rows 93–95. Place marker in first and last st on Row 95. Fasten off B. Do not fasten off A.
First Scallop
Row 96 (wrong side): Sc2tog, sc in next 25 sts – 26 sc. Ch 1, turn, leaving rem sts unworked.
Row 97: Sc2tog, sc in each st across to last 2 sts, sc2tog – 24 sc. Ch 1, turn.
Rows 98–103: Repeat Row 2 six times more – 12 sc at end of row 103. At end of Row 103, do not ch 1.
Row 104: Sl st in first st, ch 1, sc2tog, sc in each st across to last 3 sts, sc2tog – 8 sc. Ch 1, turn, leaving last st unworked.
Row 105: Repeat Row 104 – 4 sc. At end of row, do not ch 1.
Fasten off.
Second Scallop
Row 96 (wrong side): With wrong side facing, sk next 4 unworked sts on Row 95, join A with sl st in next st, ch 1, sc in same st as joining, sc in each rem st across to last 2 sts; sc2tog – 26 sc. Ch 1, turn.
Rows 97–105: Work same as Rows 97–105 on First Scallop.
Exterior Panel Edging
Note: When working sts with B on Round 1, carry A along edge of panel and work B sts over strand of A, changing back to A in last st of B. Drop and cut B after short section of B has been worked.
Round 1: With right side facing and Row 1 at top, join A with sc in free lp of ch at right-hand corner of center edge of any exterior panel, matching yarn color with center of exterior panel and changing color as necessary, sc in free lp of each foundation ch along center edge, in edge of each row along both side edges and in each st on scallop edge around panel, working 2 sc in each corner of center edge and in each marked corner st on Row 95; join with sl st in first sc. Fasten off
Round 2: With right side facing, join B with sl st in first sc, ch 1, sc in same st as joining, sc in each sc around, working 2 sc in each corner; join as before.
Round 3: Ch 1, sc in same st as joining, sc in each sc around, working 2 sc in each corner; join. Fasten off.
Interior Panel (make 11)
Starting at center edge with A, ch 5.
Row 1 (right side): Sc in 2nd ch from hook and in each rem ch across – 4 sc. Ch 1, turn.
Rows 2–4: Sc in each st across. Ch 1, turn.
Row 5: Work 2 sc in first st, sc in each st across to last st, 2 sc in last st – 6 sc. Ch 1, turn.
Rows 6–14: Repeat Rows 2–5 two times more, then repeat Row 2 once more – 10 sc at end of Rows 13 and 14.
Interior Panel Edging
Round 1 (right side): Sc in each st and in edge of each row around panel, working 2 sc in each corner; join with sl st in first sc. Fasten off.
Rounds 2 and 3: Work same as Rounds 2 and 3 on exterior panel edging.
ASSEMBLY
Place two exterior panels with right sides tog. Working through both thicknesses, join B with sl st in back lp of first st at end of long panel edges, sl st in back lp of each st across long panel edge. Fasten off. Repeat on other exterior panels until all panels have been assembled, forming a large exterior ring. Assemble interior panels in same manner as exterior panels, forming an interior ring. Connect exterior and interior rings by placing each face down on a large surface with interior ring in center opening of exterior ring. Working through both thicknesses, join B with sl st in back lp of any st on outer edge of interior ring and inner edge of exterior ring, sl st in back lp of each st around until inner and outer rings are joined, easing to fit where necessary. Join with sl st in first sl st. Turn afghan over.
Inner Circle
Round 1: With right side facing, join B with sl st in bottom right- hand corner of any interior panel edge, ch 1, sc in same st as joining and in next 5 sc along bottom edge of panel; work 6 sc along bottom edge of each panel around – 66 sc. Join with sl st in first sc. Fasten off.
Round 2: With right side facing, join A with sl st in first sc, ch 1, starting in same st as joining, [sc in next 4 sc, sc2tog] 11 times – 55 sc. Join as before.
Round 3: Ch 1, sc in same st as joining and in each sc around. Join.
Round 4: Ch 1, starting in same st as joining, [sc in next 3 sc, sc2tog] 11 times – 44 sc. Join.
Round 5: Repeat Round 3.
Round 6: Ch 1, starting in same st as joining, [sc in next 2 sc,sc2tog] 11 times – 33 sc. Join.
Round 7: Ch 1, starting in same st as joining, [sc in next sc, sc2tog] 11 times – 22 sc. Join
Round 8: Ch 1, starting in same st as joining, [sc2tog] 11 times – 11 sc. Join.
Round 9: Ch 1, starting in same st as joining, [sc2tog] 5 times; sc in next sc – 6 sc. Join. Fasten off, leaving a long tail. Weave tail through sts to close hole.
FINISHING
Weave in all ends.

Read NextCircle Lapghan
Your Recently Viewed Projects
Thanks for your comment. Don't forget to share!
jehpam 8207614
Oct 13, 2020
I made this and loved the finished product which I gave to my daughter and new son-in-law as a wedding gift. I changed the centre to African Flower
suzkiz
Mar 27, 2017
I want to make the stained glass afghan.... the pattern says to follow the chart.... where is the chart? is it the little thing at the bottom under 'weaving in ends'? If so, it is so small i cant see a thing, and i cant seem to enlarge it either. Is there another chart somewhere?
KLC
Mar 28, 2017
Hi! Yes, it is the chart at the bottom. I have increased the size but you can also click on it to see the original Red Heart pattern with larger chart. Thanks, Krista, Editor
Jstewart
Dec 04, 2016
Download instructions invisible to user.
AFC Editor Julia
Dec 05, 2016
Hi Jstewart, The instructions for this afghan are shown right on the page. See the screenshot attached - they begin at the circled word "Afghan" and continue on past it. I hope that helps! :) Julia, editor of AllFreeCrochetAfghanPatterns
Zeemer
Aug 25, 2016
Four-star rating for the color and shape. Some people probably like this Stained Glass Afghan but it does not appeal to me so much. I was initially excited when I saw the word stained glass. I was imagining multicolors just like the one you see in church windows. Thanks for the free pattern which is right on the same page. It's very well-presented complete with a diagram.
Report Inappropriate Comment
Are you sure you would like to report this comment? It will be flagged for our moderators to take action.
Thank you for taking the time to improve the content on our site.