Cranberry Mosaic Web Throw and Pillow
Attention lace lovers! This Cranberry Mosaic Web Throw and Pillow use the best crochet lace pattern out there. Bright, juicy cranberries are the inspiration for this amazing blanket. Hexagonal motifs give this afghan a unique geometric shape that will be the perfect accent for any room. There's even a tutorial for a matching pillow cover, so you can tie the rest of your decor in with this throw! When it comes to free crochet patterns, this lacy masterpiece won't let you down.
Crochet HookI/9 or 5.5 mm hook
Yarn Weight(4) Medium Weight/Worsted Weight and Aran (16-20 stitches to 4 inches)
Materials:
- Throw: 16433 (New Rose) - 7 balls; Cushion: Main Color (MC) (16433 New Rose) 1 ball, Contrast A (16432 Pale New Rose) - 1 ball
- Crochet hook: Size 5.5 mm (U.S. I o r 9) or size needed to obtain tension
- Round pillow form 16 ins [40.5 cm] in diameter
Size: Throw: Approx 48 ins [122 cm] wide x 56 ins [142 cm] long. Cushion: Approx 16 ins [40. 5 cm] in diameter
Gauge: 13 dc and 7 rows = 4 ins [10 cm]. Motif measures 8 ins [20. 5 cm] in diameter from point to point
Abbreviations: Approx = Approximately, Beg = Beginning, Ch = Chain, Dc = Double crochet, Rem = Remaining, Rep = Repeat, Rnd(s) = Round(s), sc = Single crochet, sl st = Slip stitch, sp(s) = Space(s), yoh = Yarn over hook
INSTRUCTIONS:
Motif:
Note: Ch 3 at beg of rnd counts as dc. Ch 5 Join with sl st in first ch to form a ring
1st rnd: Ch 3. 11 dc in ring. Join with sl st in top of ch 3. 12 dc.
2nd rnd: Ch 3. 1 dc in same sp as last sl st. *Ch 5. Miss next dc. 2 dc in next dc. Rep from * to last dc. Ch 5. Miss last dc. Join with sl st in top of ch 3.
3rd rnd: Ch 3. 1 dc in same sp as last sl st. 1 dc in next dc. Ch 5.* 2 dc in next dc. 1 d in next dc. Ch 5. Rep from * around. Join with sl st in top of ch 3.
4th rnd: Sl st in next dc. Ch 3. (1 dc. Ch 2. 2 dc) in same sp as last sl st. * Ch 5. 1 sc in ch - 5 sps of both 2nd and 3rd rnds. Ch 5. Miss next dc. * * (2 dc. Ch 2. 2 dc) in next dc. Rep from * 4 times more, then from * to * * once. Join with sl st in top of ch 3.
5th rnd: Sl st in each of next dc and ch - 2 sp. Ch 3. (2 dc. Ch 3. 3 dc) in same sp as last sl st. * Ch 2. (Yoh and draw up a loop in next ch - 5 sp. Yoh and draw through 2 loops) twice. Yoh and draw through all 3 loops on hook – Cluster made. Ch 2. * * ( 3 dc. Ch 3. 3 dc) in next ch - 2 sp. Rep from * 4 times more, then from * to * * once. Join with sl st in top of ch 3.
6th rnd: Ch 1. 1 sc in same sp as last sl st. * Ch 3. (1 sc. Ch 3) twice in next ch - 3 sp. Miss next 2 dc. 1 sc in next dc. Ch 3. 1 sc in top of next Cluster. Ch 3. * * 1 sc in next dc. Rep from * 4 times more, then from * to * * once. Join with sl st in first sc. Fasten off.
Joining Motif on one side:
Work 1st to 5th rnds as given for Motif.
6th rnd: Ch 1. 1 sc in same sp as last sl st. Ch 3. 1 sc in next ch - 3 sp. Ch 1. Sl st in corresponding ch - 3 sp of adjoining Motif. Ch 1. 1 sc in same ch - 3 sp as last sc. Ch 1. Sl st in next ch - 3 sp of adjoining Motif. Ch 1. Miss next 2 dc. 1 sc in next dc. Ch 1. Sl st in next ch - 3 sp of adjoining Motif. Ch 1. 1 sc in top of next Cluster. Ch 1. Sl st in next ch - 3 sp of adjoining Motif. Ch 1. 1 sc in next dc. Ch 1. Sl st in next ch - 3 sp of adjoining Motif. Ch 1. 1 sc in next ch - 3 sp. Ch 1. Sl st in next ch - 3 sp of adjoinin Motif. Ch 1. 1 sc in same ch - 3 sp as last sc. * Ch 3. Miss next 2 dc. 1 sc in next dc. Ch 3. 1 sc in top of next Cluster. Ch 3. * * 1 sc in next dc. Ch 3. (1 sc. Ch 3. 1 sc) in next ch - 3 sp. Rep from * 3 times more, then from * to * * once. Join with sl st in first sc. Fasten off.
Joining Motif on 2 sides:
Work 1st to 5th rnds as given for Motif.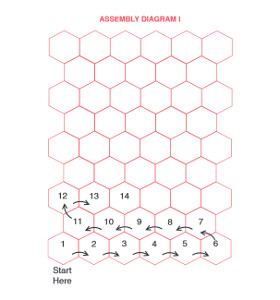
6th rnd: Ch 1. 1 sc in same sp as last sl st. Ch 3. 1 sc in next ch - 3 sp. Ch 1. Sl st in corresponding corner ch - 3 sp of first adjoining Motif. * Ch 1. 1 sc in same ch - 3 sp as last sc. Ch 1. Sl st in next ch - 3 sp of adjoining Motif. Ch 1. Miss next 2 dc. 1 sc in next dc. Ch 1. Sl st in next ch - 3 sp of adjoining Motif. Ch 1. 1 sc in top of next Cluster. Ch 1. Sl st in next ch - 3 sp of adjoining Motif. Ch 1. 1 sc in next dc. Ch 1. Sl st in next ch - 3 sp of adjoining Motif. Ch 1. 1 sc in next ch - 3 sp. Ch 1. * Sl st in corner ch - 3 sp of both adjoining Motifs. Rep from * to * once more Sl st in corner ch - 3 sp of adjoining Motif. Ch 1. * * 1 sc in same ch - 3 sp as last sc. Ch 3. Miss next 2 dc. 1 sc in next dc. Ch 3. 1 sc in top of next Cluster. Ch 3. * * * 1 sc in next dc. Ch 3. 1 sc. Ch 3 in next ch - 3 sp. Rep from * * twice more, then from * * to * * * once. Join with sl st in first sc. Fasten off.
Joining Motif on 3 sides:
Work 1st to 5th rnds as given for Motif.
6th rnd: Ch 1. 1 sc in same sp as last sl st. Ch 3. 1 sc in next ch - 3 sp. Ch 1. Sl st in corresponding corner ch - 3 sp of adjoining Motif. Ch 1. 1 sc in same ch - 3 sp as last sc. * Ch 1. Sl st in next ch - 3 sp of adjoining Motif. Ch 1. Miss next 2 dc. 1 sc in next dc. Ch 1. Sl st in next ch - 3 sp of adjoining Motif. Ch 1. 1 sc in top of next Cluster. Ch 1. Sl st in next ch - 3 sp of adjoining Motif. Ch 1. 1 sc in next dc. Ch 1. Sl st in next ch - 3 sp of adjoining Motif. Ch 1. 1 sc in next ch - 3 sp. Ch 1. Sl st in corner ch - 3 sp of both adjoining Motifs. Ch 1. 1 sc in same ch - 3 sp as last sc. Rep from * once more. * * Ch 3. Miss next 2 dc. 1 sc in next dc. Ch 3. 1 sc in top of next Cluster. Ch 3. * * * 1 sc in next dc. Ch 3. (1 sc. Ch 3. 1 sc) in next ch - 3 sp. Rep from * * once more, then from * * to * * * once. Join with sl st in first sc. Fasten off.
THROW:
Make 50 Motifs, beg at bottom left corner of Throw and joining Motifs on 6th rnd as shown in Diagram 1.
CUSHION: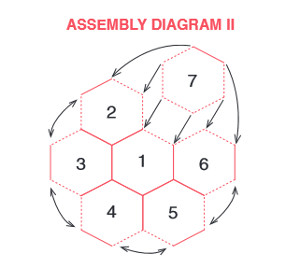
1st Motif: With A, make Motif following instructions for Motif given above.
2nd Motif: With MC, make Motif, joining to 1st Motif on 6th rnd along one side as shown in Diagram 2.
3rd to 6th Motifs: With MC, make Motif, joining to 1st Motif on 6th rnd along one side and to next Motif along 2 sides as shown in Diagram 2.
7th Motif: With MC, make Motif, joining to 6th Motif along 2 sides, to 1st Motif along one side, and to 2nd Motif along 2 sides as shown in Diagram 2.
Insert pillow form through opening. With A, make 8th Motif, joining to all 6 rem sides of Motifs on 6th rnd to close opening.